The arm length I gave you was of the arm itself, still need to add the heims. So, it is even a few inches wider overall. So depending on tire size, I am shooting for closer to 18" + of front travel. Talking to Chenowth, that is pretty standard for this chassis.
With those big arms up front and the equivelent of 5x5's out back, I will be pretty mad if I am stuck in the 15" travel range!
Chenowth Explorer A-Arm Build
-
59Bisquik

- Posts: 468
- Joined: Wed Oct 08, 2008 12:18 am
-
jim.fernish
- Posts: 40
- Joined: Thu May 29, 2008 10:10 pm
Re: Chenowth Explorer A-Arm... My SLOW Build
59Bisqulk,
Could post some pictures of your spindles with a tape measurenext to them? I am curious as to how wide and the lenght of the steering arms. Any idea the type of metal the spindles are made from?
Thanks, Jim
Could post some pictures of your spindles with a tape measurenext to them? I am curious as to how wide and the lenght of the steering arms. Any idea the type of metal the spindles are made from?
Thanks, Jim
-
59Bisquik
- Posts: 468
- Joined: Wed Oct 08, 2008 12:18 am
Re: Chenowth Explorer A-Arm... My SLOW Build
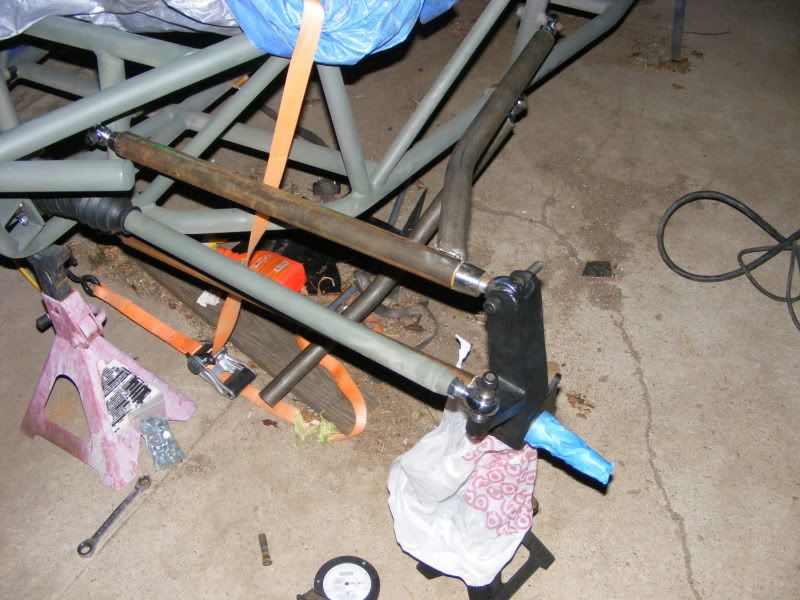
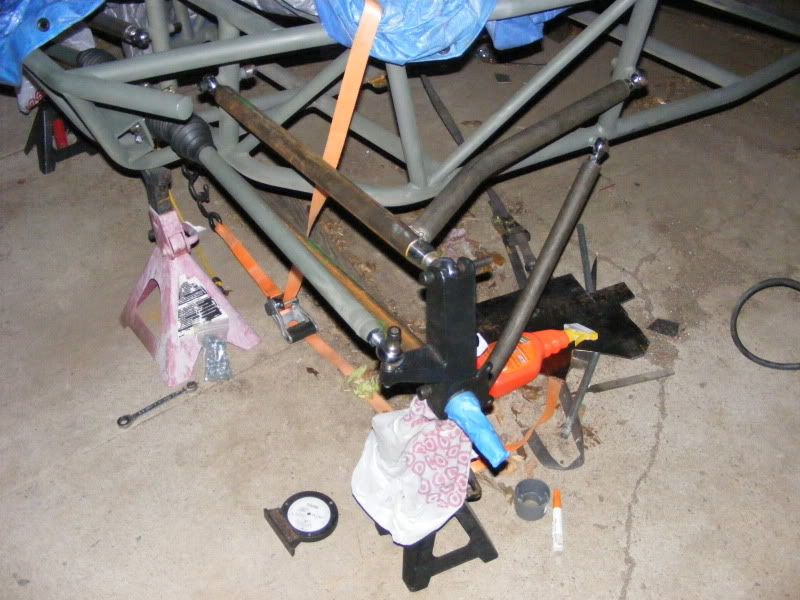
Little more mock up tonight...
-
jim.fernish
- Posts: 40
- Joined: Thu May 29, 2008 10:10 pm
Re: Chenowth Explorer A-Arm... My SLOW Build
Any progress on your project?
-
59Bisquik
- Posts: 468
- Joined: Wed Oct 08, 2008 12:18 am
Re: Chenowth Explorer A-Arm... My SLOW Build
Yes and no, I got the rear brakes and microstubs all assembled and have been working on disassembling the other car so I could start fabbing up the shock mounts and such. Not to mention the weather has been bad and I needed to get another project ready for Moab. Should be back to this shortly. I will keep you guys posted!
-
59Bisquik
- Posts: 468
- Joined: Wed Oct 08, 2008 12:18 am
Re: Chenowth Explorer A-Arm... My SLOW Build
Two friends came over and we went to town on the buggy. Final welded the torsion housing, floor tabs and the front arms. Added roof supports, tabbed the seats and mocked up the steering shaft and wheel. I will need to go with a smaller steering wheel and make it removable to make it easier to get in the car. The car is a little tighter inside than I thought it would be... diet time for me! Still need to finish the rear pivots and then start the engine tranny mock up. Measured out 20.5" of travel up front and shooting for 18 in the back. I guess we will find out shortly on the rear. Also, Devastator fabbed up a set of rear trailing arm pivots for me since the Chenowth are different than VW and the chassis was missing them. I should get to welding those in a week or two and will post up some pics.

-
Ol'fogasaurus
- Posts: 17881
- Joined: Mon Nov 13, 2006 10:17 pm
Re: Chenowth Explorer A-Arm... My SLOW Build
That is interesting! Are you going to add anything in the two tubes that support the two front beams in case there is some deflection coming up the upper arms?
Lee
Lee
-
59Bisquik
- Posts: 468
- Joined: Wed Oct 08, 2008 12:18 am
Re: Chenowth Explorer A-Arm... My SLOW Build
Ol'fog... not sure what you mean? Where exactly?
-
Devastator
- Posts: 3493
- Joined: Tue Nov 06, 2007 6:51 am
Re: Chenowth Explorer A-Arm... My SLOW Build
WOW! You guys did go to town on your build! Looking good!
Devastator's Build Thread
Sandrail
2.4 liter, supercharged Chevy Ecotec
"If everything seems under control, you're just not
going fast enough."
Mario Andretti
Sandrail
2.4 liter, supercharged Chevy Ecotec
"If everything seems under control, you're just not
going fast enough."
Mario Andretti
-
59Bisquik
- Posts: 468
- Joined: Wed Oct 08, 2008 12:18 am
Re: Chenowth Explorer A-Arm... My SLOW Build
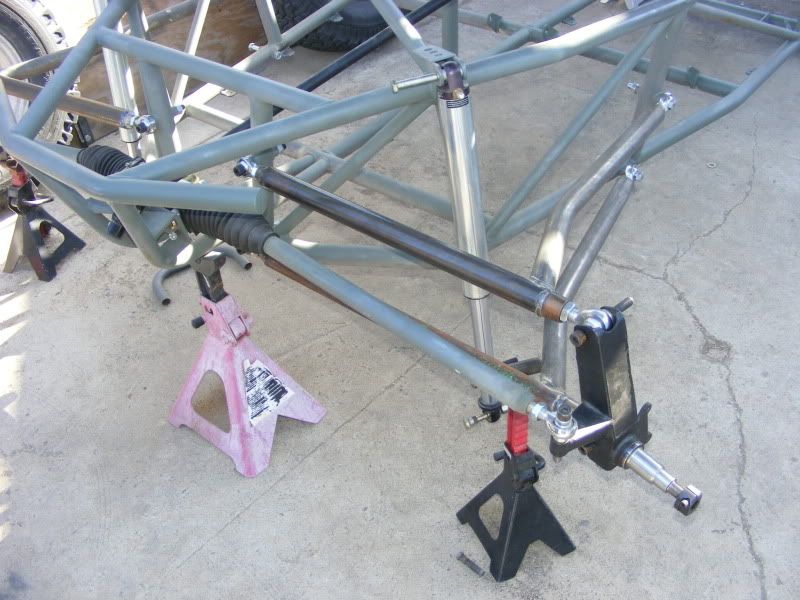
If it wasnt for a galled lower hiem joint, the front would of had the brakes installed and sitting on its own. Hopefully, I can get that replaced this week and get the front finished. Need to make a set of plates to go with the stuff Devastator made, the offset ones I have from the other car will not work right. Its gotta be built and tested before Halloween at Glamis or Dumont!
-
Ol'fogasaurus
- Posts: 17881
- Joined: Mon Nov 13, 2006 10:17 pm
Re: Chenowth Explorer A-Arm... My SLOW Build
This area
You do not have the required permissions to view the files attached to this post.
-
59Bisquik
- Posts: 468
- Joined: Wed Oct 08, 2008 12:18 am
Re: Chenowth Explorer A-Arm... My SLOW Build
Lee,
I have thought about it, but not sure how to brace it. I am somewhat limited due to the steering shaft going right through the middle of that opening.
I have thought about it, but not sure how to brace it. I am somewhat limited due to the steering shaft going right through the middle of that opening.
-
Ol'fogasaurus
- Posts: 17881
- Joined: Mon Nov 13, 2006 10:17 pm
Re: Chenowth Explorer A-Arm... My SLOW Build
How about just making a sheer plate with a hole through it for the steering shaft; get some flat stock of at least the tube’s thickness (that should be enough unless you wanted to go a bit bigger) and cut it to shape. Locating the hole should be easy enough to do. I don’t think you would need to reinforce the hole but it is an option.
A sheer plate should stop a lot of the movement potential of what you are going to throw at it. Consider it to be like corner gussets only better as it would stop the sides from moving as well as protect the corners.
This is only opinion as to the need but I would at least consider it. I would hope others would jump in and give their opinions as to the necessity and options.
The rest of the suspension looks fine but I would also look at gusseting the rear of the arms where they connect into the vertical tube. A hit from the front could cause some flex there also.
A couple years ago one of my friends who has rails mixed it up with a quad that was coming down a narrow trail way too fast. The damage to the rail was more than to the quad but the guy on the quad hobbled around for almost a year (we knew him too). My friend’s wife also got into it with a quad a bit farther up the same trail when a quad came flying over the top of the hill w/o looking. She had to replace most of the left front of her rail as I remember (it was fixed before I heard of it and saw the rail). They are pretty vulnerable to damage but they do absorb a lot of the shock w/o the worst of it getting to the driver.
Lee
-
59Bisquik
- Posts: 468
- Joined: Wed Oct 08, 2008 12:18 am
Re: Chenowth Explorer A-Arm... My SLOW Build
Lee,
Thanks for the tips! So for the center of the frame, a piece of square plate that would weld into to opening is what your talking about? That sounds simple enough and I have the material laying around. As for the arms, I am debating adding a tube on the lower arm where the bend is, to the front arm. The original design had it, but they used 1.25" .120 wall mild steel for the arm. I used 1.5" .125 chromoly instead which is a bit stronger. Not sure if the brace is needed or not. However, at the rear of the arms that you were talking about, are you thinking I should add reinforcement to the vertical frame bar?
Please keep the tips coming, it is still in build mode and I would rather fix a weak point now, than be sorry later.
Also, I have heard from others with this frame that I need to box in the steering box mount, as it tends to crack and make the steering on the spindles double shear. Those are also in process and should be done soon.
-
Ol'fogasaurus
- Posts: 17881
- Joined: Mon Nov 13, 2006 10:17 pm
Re: Chenowth Explorer A-Arm... My SLOW Build
59Bisquik wrote:Lee,
Thanks for the tips! So for the center of the frame, a piece of square plate that would weld into to opening is what your talking about? That sounds simple enough and I have the material laying around. As for the arms, I am debating adding a tube on the lower arm where the bend is, to the front arm. The original design had it, but they used 1.25" .120 wall mild steel for the arm. I used 1.5" .125 chromoly instead which is a bit stronger. Not sure if the brace is needed or not. However, at the rear of the arms that you were talking about, are you thinking I should add reinforcement to the vertical frame bar?
Please keep the tips coming, it is still in build mode and I would rather fix a weak point now, than be sorry later.
Also, I have heard from others with this frame that I need to box in the steering box mount, as it tends to crack and make the steering on the spindles double shear. Those are also in process and should be done soon.
"... at the rear of the arms that you were talking about, are you thinking I should add reinforcement to the vertical frame bar?"
See the mark up below. I think at the minimum a tube could be added or a gusset to get some of the load in the center of the tube down into the lower tube and into the rest of the frame.
The sheer place would preferable be inside and welded to the centers of the tubes. It should stop any potential side loading and maybe some racking that could happen.
As far as the bend in the lower arm, I would leave it as it is going to fail if too much load is applied and that absorbing of the energy is I think one of the things you might want. It saves other things being taken out. It is also for tire clearance during turning (to state the obvious)
I can see what they are talking about on the steering mount. It is weak looking and if you are just turning the wheels standing still it is going to put a side load on that bracket. Boxing it in might help but then you would have to have some holes to access the nuts and washers for the mounting of the steering box or use longer bolts which I am not sure you want to do unless you do a fairly close fitting tube for each of the bolts. Got a better picture of the area?
It is a nice looking frame though.
Lee
You do not have the required permissions to view the files attached to this post.