Few questions in rebuilding my 411

Discuss with fans and owners of the most luxurious aircooled sedan/wagon that VW ever made, the VW 411/412. Official forum of Tom's Type 4 Corner.
User avatar
can86
Posts: 87
Joined: Wed Sep 01, 2004 1:34 pm

Few questions in rebuilding my 411

Post by can86 »

So i'm getting close to getting my 411 back together. My motor and tranny are almost ready to put back in...I just have a few questions

For the torque converter, what's the best way to drain the oil out, and get in some fresh before putting in on?

Also, if i remember right Ray mentioned some measurements when installing the motor and auto tranny, what are those? any suggestions?


i'll get some pics up in the next day or so, but i'm open for any helpful information, i can't wait to get this beast on the road :lol:
User avatar
MGVWfan
Posts: 825
Joined: Fri Jun 11, 2004 9:23 pm

Post by MGVWfan »

The "brown" Type 3 Bentley manual has the VW suggested way to drain the torque converter using a rubber stopper with two holes and two brass tubes (one long enough to go to the bottom of the converter). It works, but it's slow (like overnight).

I'm envious...it's 14 months and counting on my '73 412 :cry:
Lane
73 VW 412 (the Nomad, dropped valve seat land now, argh!)
67 MGB (Abingdon's Finest)
76 Plymouth Duster /6 (runs like a top)
99 New Beetle 2.0 (never gives any trouble)
04 Golf TDI (45 MPG)
09 JSW (love it, love it, love it!)
User avatar
can86
Posts: 87
Joined: Wed Sep 01, 2004 1:34 pm

Post by can86 »

any pointers or tips on the engine/tranny installation?
User avatar
raygreenwood
Posts: 11912
Joined: Wed Jan 22, 2003 12:01 am

Post by raygreenwood »

The auto tranny and teh manual tranny have the same issues. Beleive it or not....only the clymer manual describes both the tools and gauges....simple....needed to align the tranny correctly. This is crucial to keep from putting tenion on the tranny case. It misaligns the oil pump drive and input shaft....read that as puts a bend in it while it runs....wearing things out. The four speed has teh same issue.

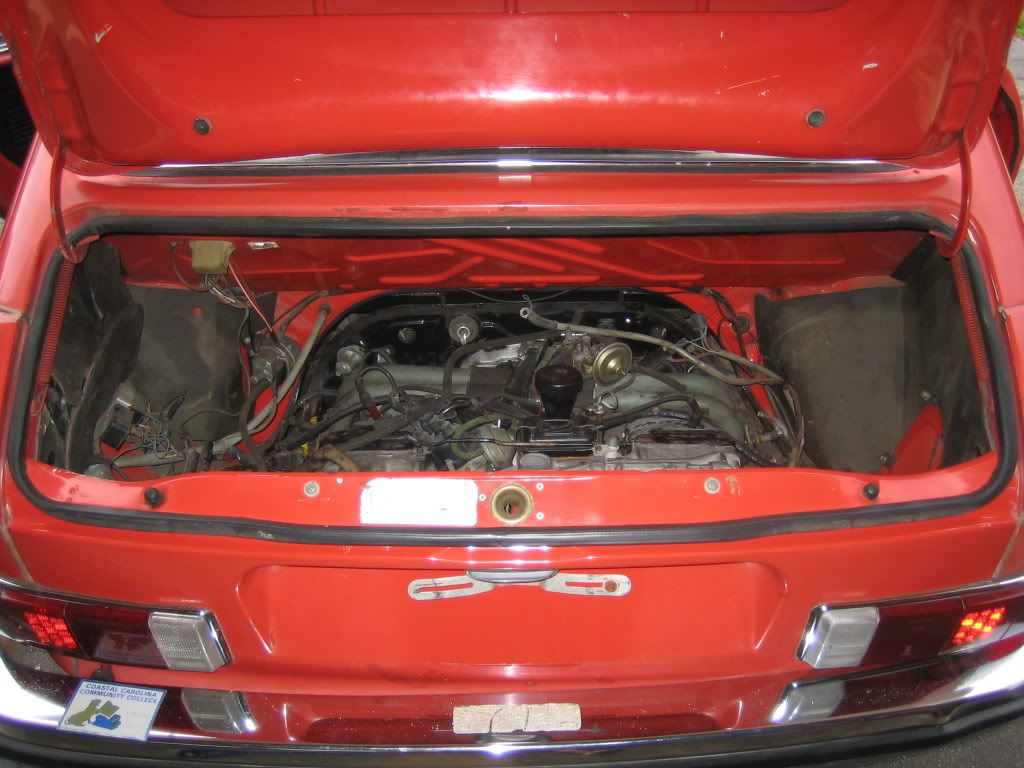
This is actually simple. Just remember...that the tranny in the type 4 absorbs "0" load. Thats right....none! The tail bushing is the same part numer wether auto or manual. It also does the same thing. It is simple a bumper to arrest movement of the drivetrain package. On the 411/412....100% of the engine and tranny load....yes 100%....is held by the cross bar that is over the area where the engine bols to the tranny. The rear hanger bar bushings are simply there as bumpers as well. The entire package pivots slightly about the center hanger bar.

The object is this. You want the rear hanger bar bushings with the long bolts on them...to not have more than about 1/8th to 3/'16" crush on them.....AND simultaneously....the metal tube in the center of the tranny tail cone bushing should be almost exactly centered in the middle of the tube in the suspension. This is so that the bushing surrounding it....has not more than about 1/16" crush touching the tube anywhere. The three feeler gauges are described i the clymer manual....and are easily made with 3 pieces of flat 1/2 wide cheap steel from home depot...a dremel tool and a caliper.

How to get this adjustment? The first primary adjustment is made in the general height of the package. You will notice that there is a center hanger bar with the two funcky "EYE" bushings on it where it bolts to teh tranny. Above it....where the rubber bushings bolt to that bar...are two 13mm bolts each side. Underneath each one of those rubber bushings where it contacts the bar....is a stack of shims. They are slotted...so all you need do is losen the two bolts on each side and you can slip them in or out. By the way....these shims are identical to the control arm shims of a Saab 900....late 70's to about 88... :shock: ...identical in every way. There are about 8 of them on any given Saab...so they are easy to get.
You have about 8 on your 411/412.

The actual slewing of the package from side to side.....is done at the rear hanger bar. Look up next to the ends of the hanger bar. There are three adjustments at each end. The two horizontal 13mm bolts that go through each end of the hanger bar...are in slotted holes. When you are done getting the tail cone bushing correct...thos bolts should be in the top end of the slots. If not...then the shims are wrong on the middle hanger bar.

The vertical ut on the stud at each end of the hanger bar is to tip the end of the tranny bushing upward or downward....but once you do that...again...pay attention to the two horizontal locking bolts to make sure they are very close to the top of the slotted holes.

The third adjustment is the actual mounts for thr end of the rear hanger bar. There are two 13mm bolts. The whole mount can slide backward and forward and from side to side...to slew the whole drive train package. This is the course adjustment. Do this first.

One thing to look at...is that there is about 1/8" left beween the plate that bolts to the back of the tranny with the bushing on it...and the rear suspension crossmember. Also...looking from below at the parralellism between the bushing plate on the back of the tranny and the cross member will tell you wether the the whole package is align axially to the centerline of the car. If the bushing plate is not exactly parralel to the crossmember that holes the trailing arms....then loosen the rear hanger mounts at the end where the are bolted to the body...and tap the whole package one way or the other. Ray
Guest

Post by Guest »

One of the things you are trying to achieve while shimming the mounts is getting the tin on the engine aligned in its opening so that the foam engine compartment gasket will fit well. With everything adjusted right the engine tin and the corresponding cutout in the engine compartment should be on the same plain and have nearly equal spacing all around.
User avatar
raygreenwood
Posts: 11912
Joined: Wed Jan 22, 2003 12:01 am

Post by raygreenwood »

That is true of the tin....But...bear this in mind....the tin and the seal are totally unimportant compared to proper compression (or actually the lack of it) of the rear hanger bar bushings...and the correct centering of the transmission tail cone bushing (which means pretty much no contact with the tubular socket in the crossmember).
Its rare to find the tin perfectly straight and unbent....firstly, and secondly....adjusting the driveline alignment, when you are close to where you need to be....moves you but a few millimeters. If you are having trouble with the engine tin being out of whack...you either have bent tin....or you are actually really out of whack on your bushings. Generally, you should correctly adjust your drive line...then if the the tin is still slightly off....just bend it up or down a little. It should never be more than about 1/4" out of where it needs to be in any direction. If it is...then something on your alignment is seriously out of whack. Ray
User avatar
can86
Posts: 87
Joined: Wed Sep 01, 2004 1:34 pm

Post by can86 »

Thanks for the great help, i just have a few more questions

1. Where's the best/cheapest place to get a fuel pump or alternative.

2. Can anyone post or e-mail pictures of 1.7l sedan motors for reference. I have to run alot of vaccuum lines and what not. I'm also doing the paper element air box conversion

can86@hotmail.com

thanks!
User avatar
can86
Posts: 87
Joined: Wed Sep 01, 2004 1:34 pm

Post by can86 »

nobody? I got the motor in last night and really would like some pics of 1.7l sedan motors. The motor was not in this car when i got it, so its like putting a puzzle together.... I would really appreciate it. As for the fuel pump i'm just gonna order a rebuild form rockauto... thanks! i'll get some pics up soon
User avatar
can86
Posts: 87
Joined: Wed Sep 01, 2004 1:34 pm

Post by can86 »

Image
Image
Image
Image
Image
Image
Image
User avatar
ubercrap
Posts: 1394
Joined: Sun Apr 18, 2004 8:00 pm

Post by ubercrap »

Looks nice man! I'll try to take some pics of an engine bay for ya'.
User avatar
MGVWfan
Posts: 825
Joined: Fri Jun 11, 2004 9:23 pm

Post by MGVWfan »

Damn that exterior looks nice! Nice engine compartment, too.

Mine's a Variant, so the engine compartment looks a bit different, but dig through the images I've posted in the past and see if any of these help...

http://www.thesamba.com/vw/forum/album_ ... lodeutsch4

Hope it helps some.
Lane
73 VW 412 (the Nomad, dropped valve seat land now, argh!)
67 MGB (Abingdon's Finest)
76 Plymouth Duster /6 (runs like a top)
99 New Beetle 2.0 (never gives any trouble)
04 Golf TDI (45 MPG)
09 JSW (love it, love it, love it!)
User avatar
can86
Posts: 87
Joined: Wed Sep 01, 2004 1:34 pm

Post by can86 »

thanks, i got the fuel pump on the way and all the fluids to add to the transaxle and motor. I'm gonna work on it as much as i can this week....hopefully get her started :)

I also am doing the paper element air cleaner conversion, anything i need to know more than swap them out? i'm pretty sure i have all the pieces, unless someone has an oil bath they would like to sell or trade?
User avatar
can86
Posts: 87
Joined: Wed Sep 01, 2004 1:34 pm

Post by can86 »

update: got it runnin today, once the fuel lines were filled she fired right up :lol: The only problem is the injectors leak just a little but along with a little oil around a couple pushrod tubes...Heck, even the radio worked, lol. This week i plan on rebuilding my CVs and going throught the brakes to get the beast on the road. It only took a year since i got it, but progress is being made 8)
Guest

Post by Guest »

Got another question: The engine starts up right away and seems to run pretty good. The only problem is that the idle seems really high. I've followed the manual when adjusting the idle screw but it doesn't change it at all. I do know that the aux. idle valve is working properly. Any suggestions? thanks
User avatar
MGVWfan
Posts: 825
Joined: Fri Jun 11, 2004 9:23 pm

Post by MGVWfan »

Vacuum leaks for one. The bane of D-Jet existence. Get medieval on those hoses, joints, gaskets, etc. from the intake valve back and find the leak. The D-Jet manifold pressure sensor can leak internally, test it with a vacuum pump (the little hand-operated type with a gauge). I use an unlit propane torch with the valve cracked JUST a little, waving it around very near the joints CAREFULLY with the car out of the garage (just in case), and that usually finds the leak by the idle going up even further when the end of the torch leaking propane out gets near the offending vacuum (air actually) leak. Is it running a bit rough, too? That can be a sign. Do a search on this forum for "vacuum" or "leak" and you'll find even more pearls of wisdom on the subject.

CAREFUL WITH THAT TORCH! There, I said it again!
Lane
73 VW 412 (the Nomad, dropped valve seat land now, argh!)
67 MGB (Abingdon's Finest)
76 Plymouth Duster /6 (runs like a top)
99 New Beetle 2.0 (never gives any trouble)
04 Golf TDI (45 MPG)
09 JSW (love it, love it, love it!)
Post Reply