Thanks Steve. Thats a damn good idea about recirculating the heated air and keeping it much cleaner (and warmer). Pefect! I'll delete the outlets on the shroud and hard pipe (more 2") both inlets through the firewall. I kind of wanted to avoid using booster fans under the rear seat. But this way the pusher fans can be behind the back seat (next to the oil tank) where there's a little room to spare.
Do you know what the amp draw is on one of those Bus/Vanagon blowers, and maybe where I could find one (or 2). I've got a stock (52? amp) Alt. and it'll be working pretty hard as it is. I probable should step up to 75 amp unit.
Some day, my Baja will be drivable again!!!
Back to WORK !(play)
My ongoing Turbobaja build
-
Steve Arndt
- Posts: 7420
- Joined: Sat Mar 10, 2001 12:01 am
They don't draw very much current. I could measure it for you. I would estimate it to be ~4 amps.
914 Porsches, late Bay window busses, and aircooled 80/81 vanagons all have the heater blower motors. Should probably run 10$ each at a junk yard.
914 Porsches, late Bay window busses, and aircooled 80/81 vanagons all have the heater blower motors. Should probably run 10$ each at a junk yard.
Steve
My Baja Build
My Baja Build
-
turbobaja

- Posts: 2826
- Joined: Fri Sep 14, 2007 4:56 pm
I did a little searching on ebay and craigslist and I'm finding most places want good money for these things. I haven't looked at any wrecking yards yet though.
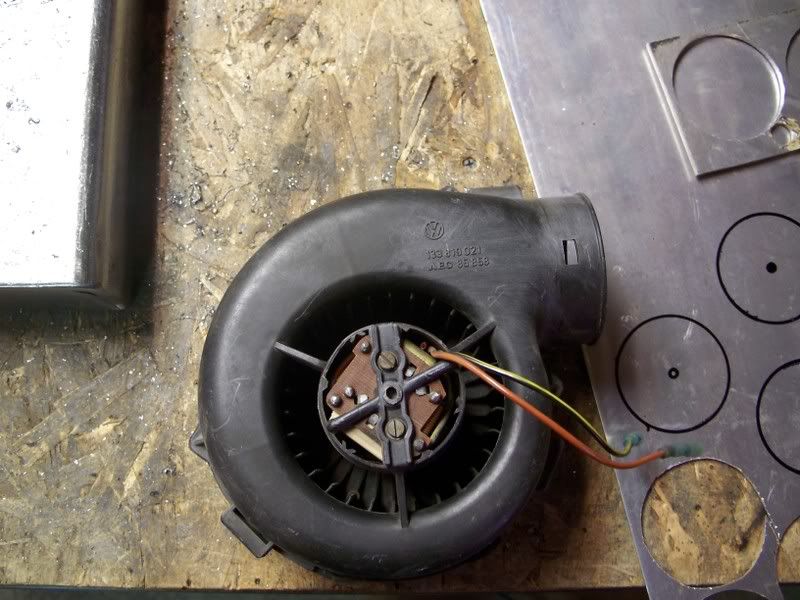
Meanwhile, I stold the fresh air blower motor from my girlfriends '74 Super to see how it blows. I think its designed to have 2 speeds, but the low speed resistor is blown, so only high. Really High! Nice round (just under 3") outlet and it blows like hell. Only problem is it draws just over 8 amps. I've already stripped off all the intake, carbs and fan shroud to start fabing some different heater hose routing. It's already so crouded around the engine, I'm probably going to run the pipes out the bottom of the rear parcel tray, out around the intake manifolds and into the heater boxes. I've got to bolt the rear bumper back on to make sure there aren't any issues with that as well.
Thanks again for your helpful ideas/suggestions, this will be a much better way of doing things in the end.
Karl
-
turbobaja
- Posts: 2826
- Joined: Fri Sep 14, 2007 4:56 pm
I found a pretty nice blower made by Jabsco (Marine mfg) rated @ 150cfm, draws 6.8 amps and has 3" outlet. Nice 360 deg insulated mounting also, but all the marine blowers are only rated for 1,000 hr motor life. They're pretty much all designed for short term bilge vapor clearing, not running for an hour or more on a rainy/snowy trip to the mountains. I think I'll just design the system to work with the blower I have and when that one craps out it shouldn't be too dificult to swap in another blower w/3" outlet. I can only hope it doesn't go bad when I really need it. I've done my share of driving VWs with no defrost or heat in this climate (Pacific North West) as I'm sure many other people have as well. If all else fails, I'll run the engine N/A and turbocharge my heater boxes  !
!
Karl
Karl
-
Leatherneck

- Moderator
- Posts: 17104
- Joined: Sat Jul 01, 2006 6:47 pm
-
turbobaja
- Posts: 2826
- Joined: Fri Sep 14, 2007 4:56 pm
I checked out some Inverters and AC blowers (after I read Leatherneck's post) and there sure are a lot more choices for blower motors. I don't think I'll need AC for anything else in the Baja (no TVs, playstation or girlfriends hair dryer) so I think I'll stick to 12v for now. If I can save some money on part of this build it would be amazing, so for now it'll be a used 1974 Super Beetle blower. Fingers crossed.
Thanks for the suggestion Leatherneck, and I hope your intercooler install is going well. I kind of cheaped out on my Air/Air cooler. $15 @ a local VW show/swap. I think its off a late 80's Dodge turbo car of some kind? It cleaned up nice and held 15psi so I figure I'll run with it. Now I just have to design/build a spoiler that routes air through it and my oil cooler and doesn't look like crap.
Karl
-
turbobaja
- Posts: 2826
- Joined: Fri Sep 14, 2007 4:56 pm
-
BrockGrimes

- Posts: 58
- Joined: Thu Aug 02, 2007 3:12 pm


-
turbobaja
- Posts: 2826
- Joined: Fri Sep 14, 2007 4:56 pm
Has anybody seen those "Electric Turbo/Superchargers" for sale. They claim to add like 50Hp to your ride, what a joke. This here fan blows some serious air, but it also draws 8+ amps (unrestricted). I bet with one of these things blowin into each carb hat, maybe run from a full throttle switch for that extra KICK, it'd make just enough extra snort to overcome the additional Alt load the two blowers are drawing. Course I could take the belt off for a trip down the track with it and  .
.
That would be kind of fun to try some time. But I've been working on this thing for so long now, if I could have just stuck some electric fans on it five years ago and made like 250Hp then this set up is going up for sale. I'll just run the old 1776 thats still sittin in the corner and be done with it.
All BS aside, thank you very much for the compliments on the project. I'm currently side tracted from heater stuff onto throttle linkage. Years ago a friend of mine and I were dreaming up some kind of cable operated throttle body style linkage for dual carbs. and I think I got something figured out. All get some pics up once theres something worth sharing .
.
Karl
That would be kind of fun to try some time. But I've been working on this thing for so long now, if I could have just stuck some electric fans on it five years ago and made like 250Hp then this set up is going up for sale. I'll just run the old 1776 thats still sittin in the corner and be done with it.
All BS aside, thank you very much for the compliments on the project. I'm currently side tracted from heater stuff onto throttle linkage. Years ago a friend of mine and I were dreaming up some kind of cable operated throttle body style linkage for dual carbs. and I think I got something figured out. All get some pics up once theres something worth sharing
Karl
-
turbobaja
- Posts: 2826
- Joined: Fri Sep 14, 2007 4:56 pm
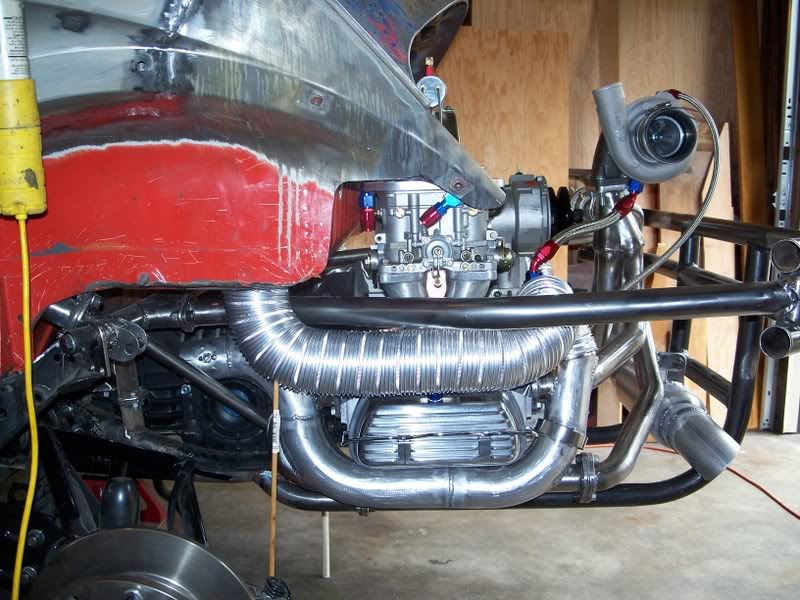
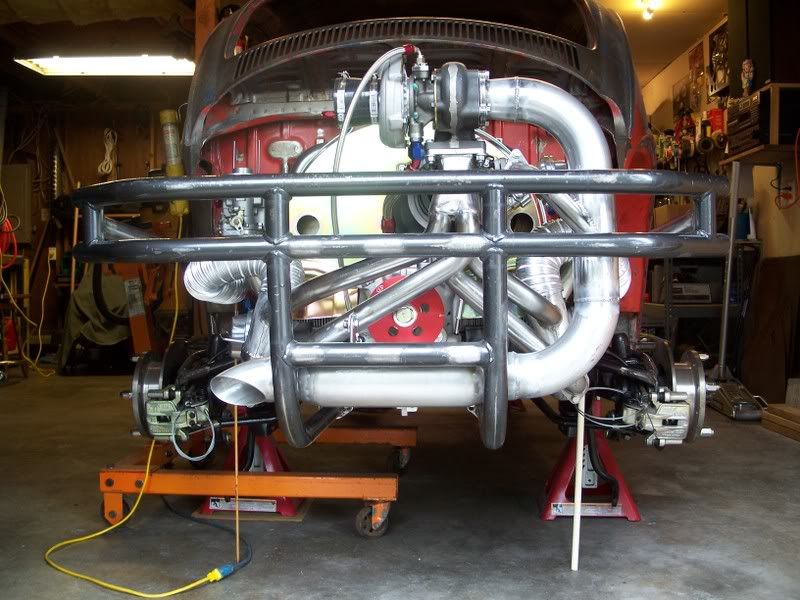
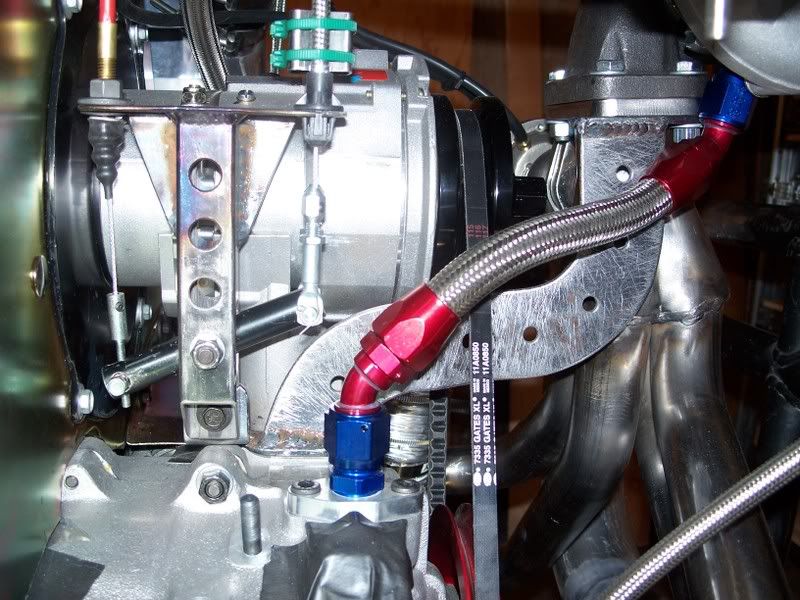
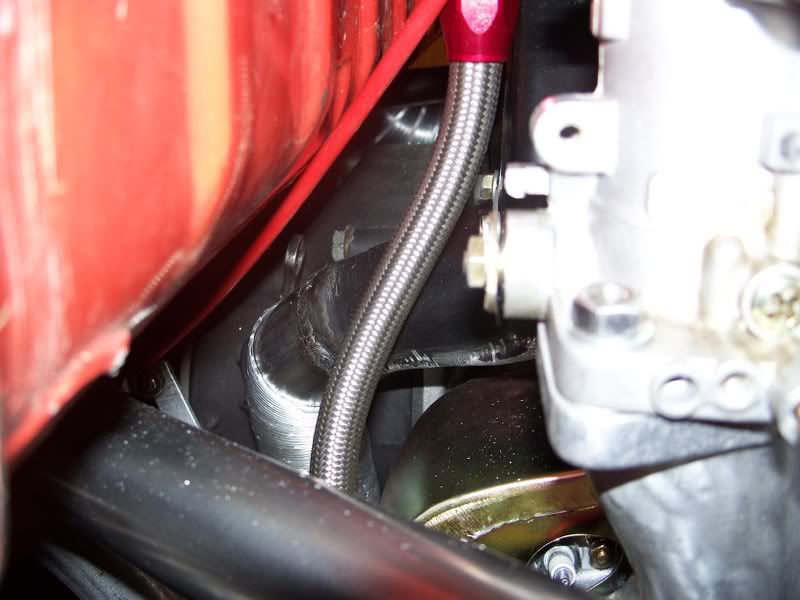
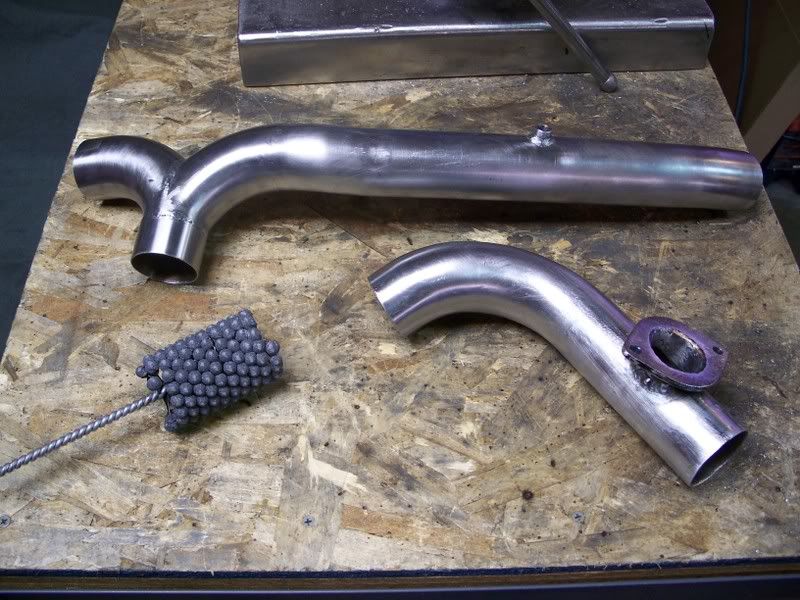
Well, got a few things nocked off the list over the last few weeks. Finished the throttle linkage, made some progress on the heater conversion, added a support for the turbo/header, fitted some tins under the cylinders, assembled some oil lines, fitted/modified the oil cooler exhaust ducts, mounted the oil tank and got the filter/cooler plumbing figured out (not installed yet).
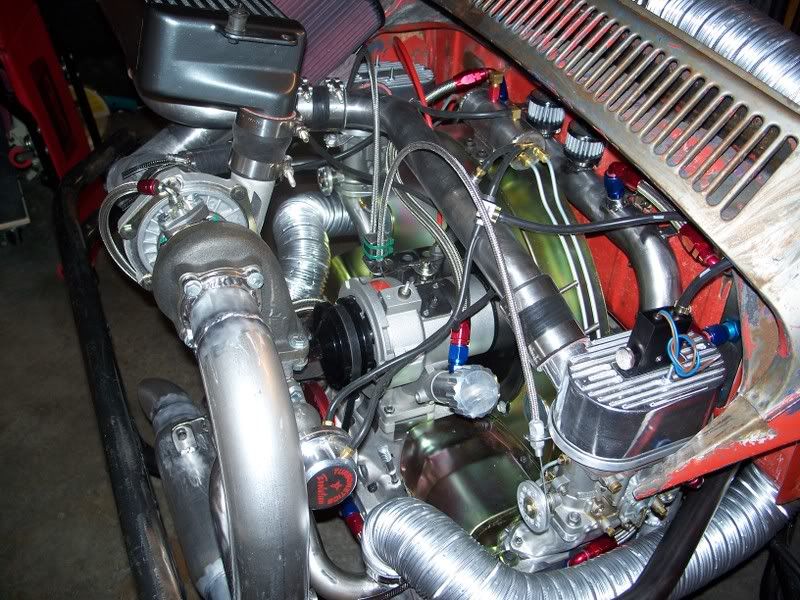
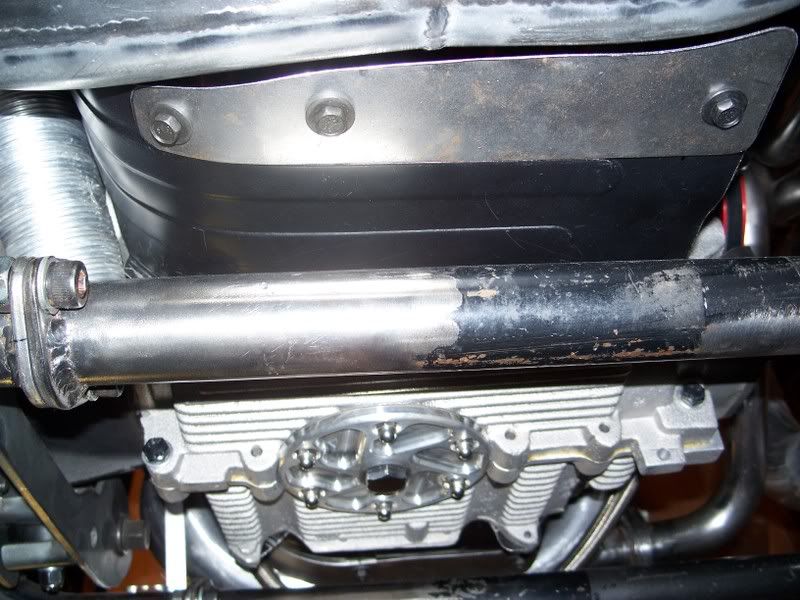
I thought the turbo and header could use little extra support, so I made this bracket from 3/16" sheet metal that mounts to the Alt stand studs and also ties into the throttle linkage assembly.
I think I solved my rear window fogging problem also. I'm going to try and make some defrost ports off the recirc ducting below the rear glass to keep it dry/defogged.
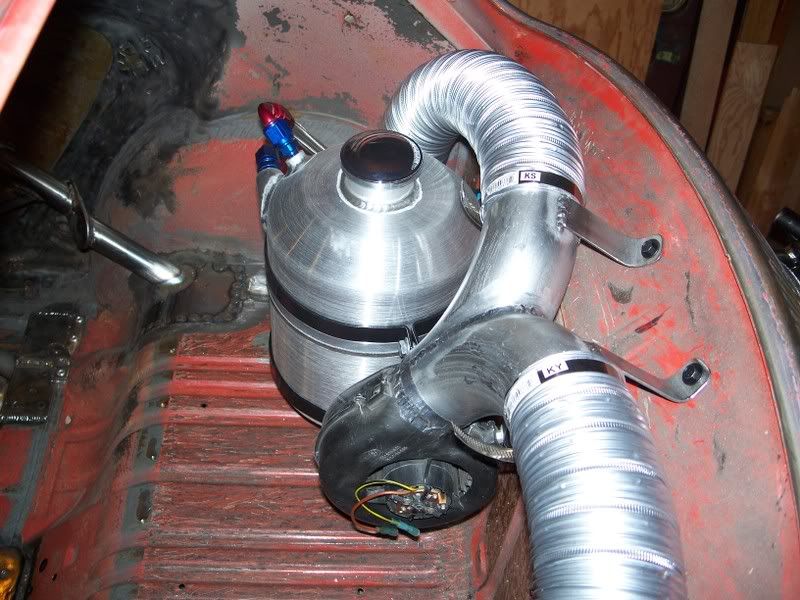
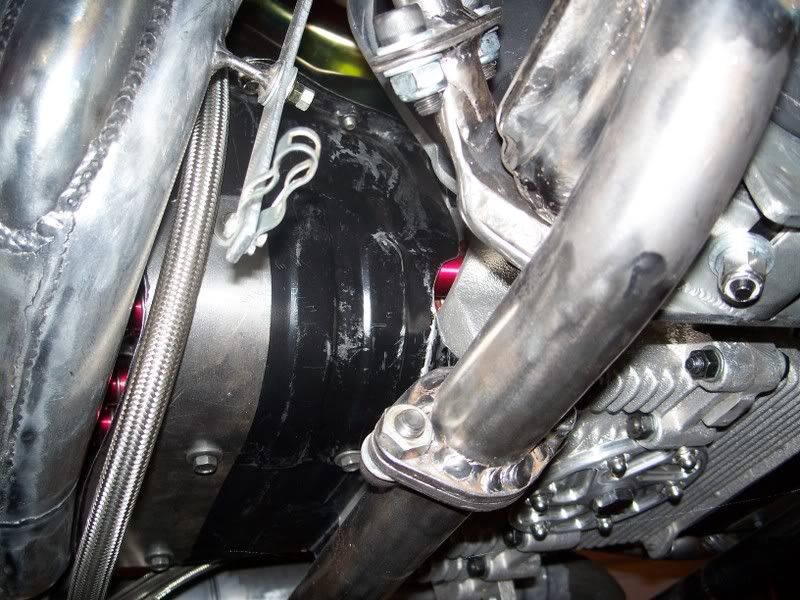
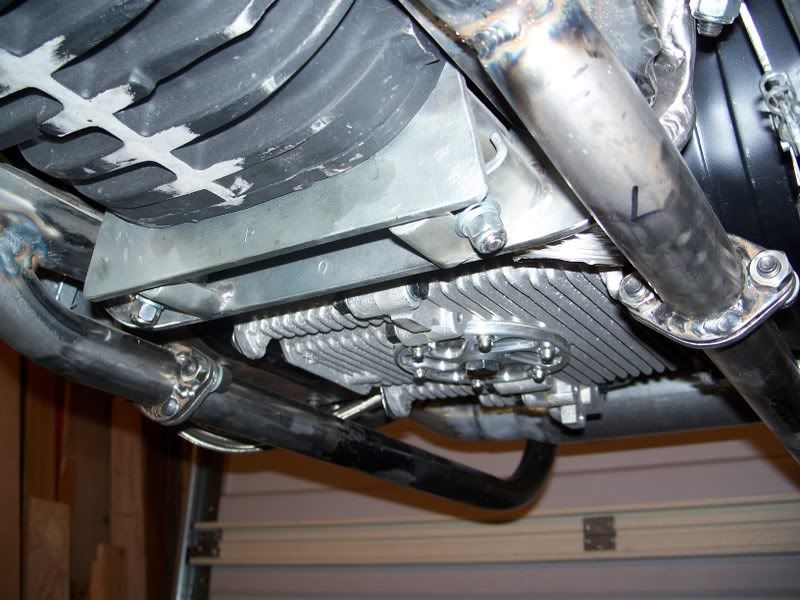
If you look close you can see the oilcooler exhaust ducting. I'm trying to avoid getting warm air into the fan shroud inlet, so I directed the oil cooler exhaust down and under the cylinder tins to get it out in the air flow a little better.
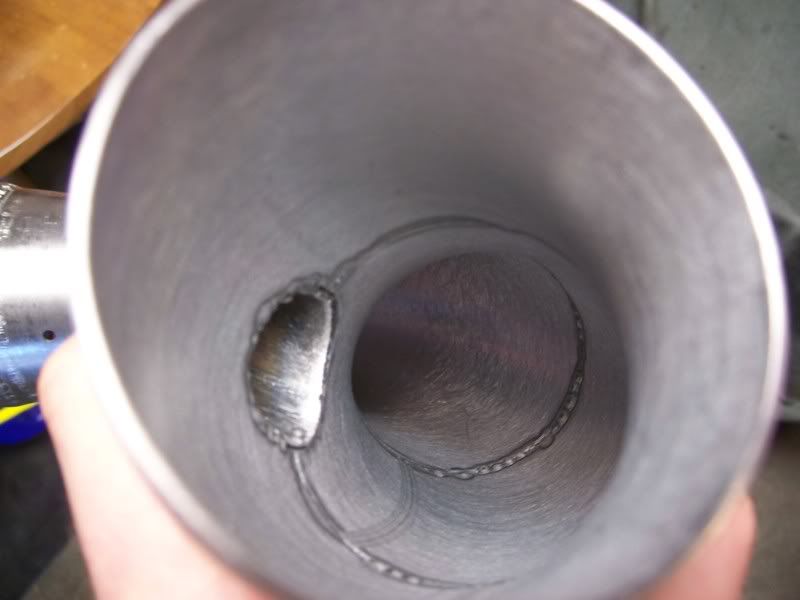
I found a new use for some ball hones. They clean up the inside of my boost pipes really nice.
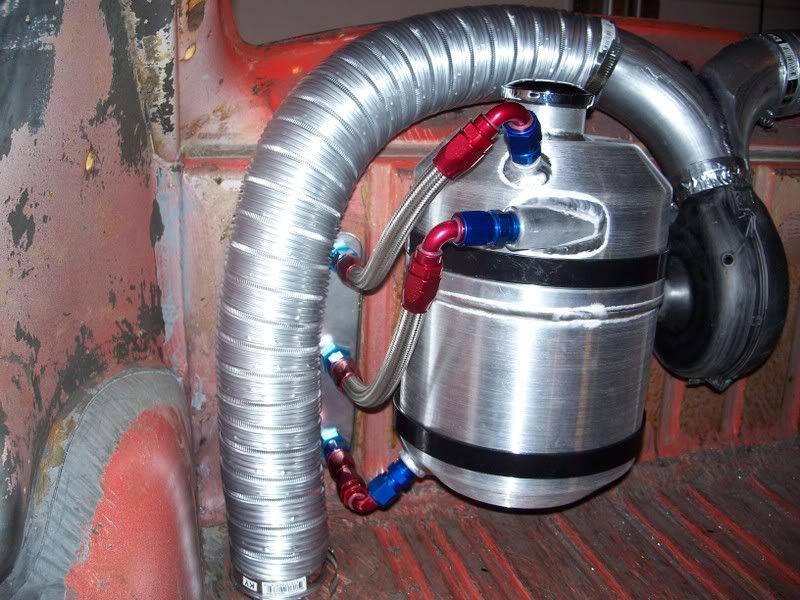
I'm probably going to make some of the flexible recirc hoses out of pipe or tin at least since they are so exposed to tire debris, etc.
I'm going to add some extra support to the rear bumper for a little more protection, and I'd like to have a hitch on it when I'm done.
Still have to make brackets to mount the air cleaner support to left carb hat and Turbosmart boost controller on right carb hat.
Oil filter needs a mount and very little of the fuel system is made yet.
Lots of work to do still
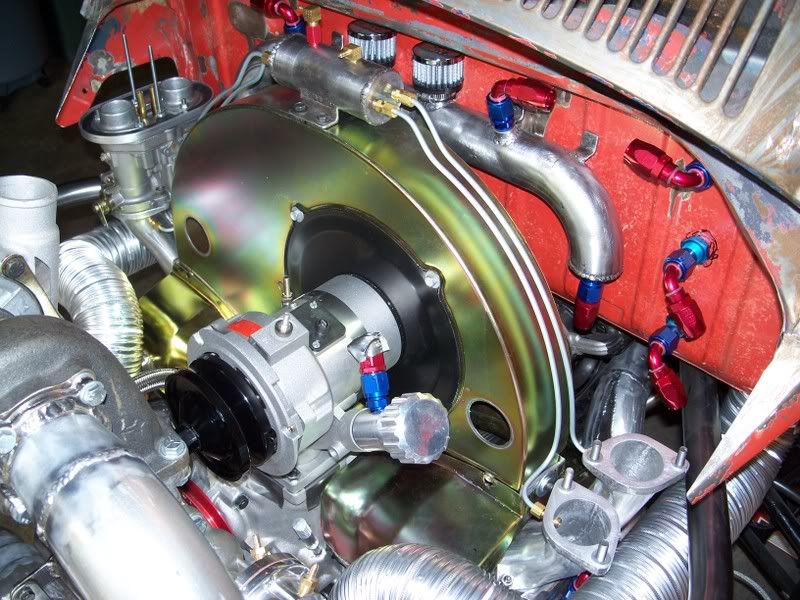
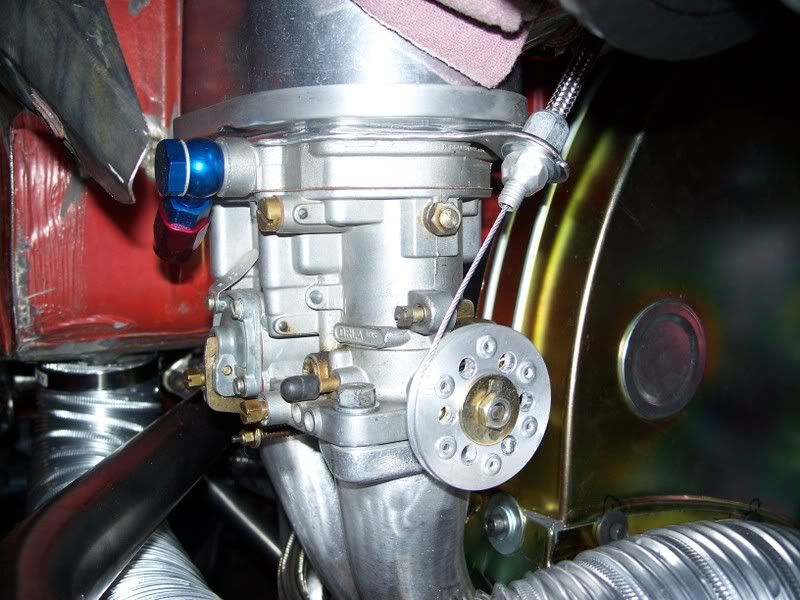
How do you like my hand made carb pulley linkage? Of course everything you see will be media blasted and coated before it hits the road.
Karl
I thought the turbo and header could use little extra support, so I made this bracket from 3/16" sheet metal that mounts to the Alt stand studs and also ties into the throttle linkage assembly.
I think I solved my rear window fogging problem also. I'm going to try and make some defrost ports off the recirc ducting below the rear glass to keep it dry/defogged.
If you look close you can see the oilcooler exhaust ducting. I'm trying to avoid getting warm air into the fan shroud inlet, so I directed the oil cooler exhaust down and under the cylinder tins to get it out in the air flow a little better.
I found a new use for some ball hones. They clean up the inside of my boost pipes really nice.
I'm probably going to make some of the flexible recirc hoses out of pipe or tin at least since they are so exposed to tire debris, etc.
I'm going to add some extra support to the rear bumper for a little more protection, and I'd like to have a hitch on it when I'm done.
Still have to make brackets to mount the air cleaner support to left carb hat and Turbosmart boost controller on right carb hat.
Oil filter needs a mount and very little of the fuel system is made yet.
Lots of work to do still
How do you like my hand made carb pulley linkage? Of course everything you see will be media blasted and coated before it hits the road.
Karl
-
turbobaja
- Posts: 2826
- Joined: Fri Sep 14, 2007 4:56 pm
Well I'm finally gettin some progress on the spoiler. It's been one of those things that lingers in the back of my mind for a long time now. I really didn't know how it would turn out, so I just started making something and this is what I got so far.
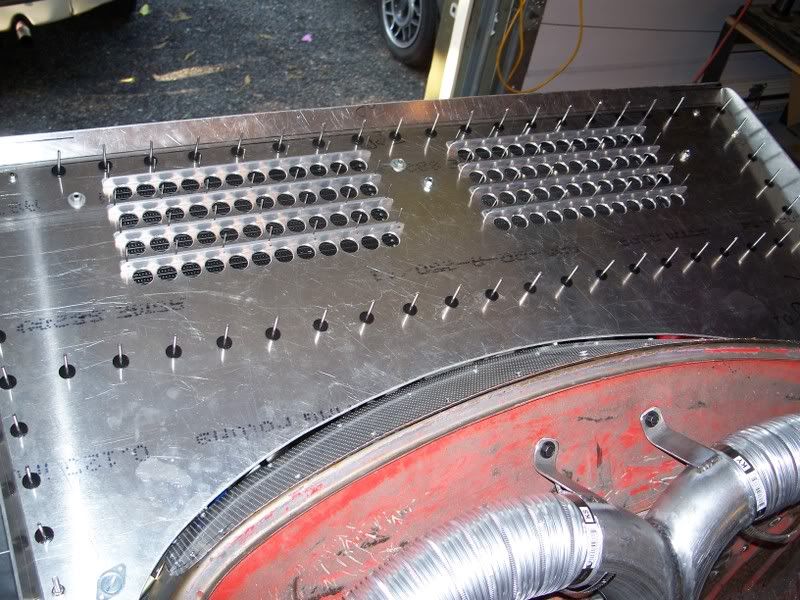
I made it out of .25" plywood first to get the basic shape. Then I picked up a 4x4 sheet of .125" 6061 T-4 (slightly more bendable than T-6, I guess) to cut the panels from. The whole idea for this contraption is to get some air to the coolers and maybe add a little stability for the occational 100mph blast.
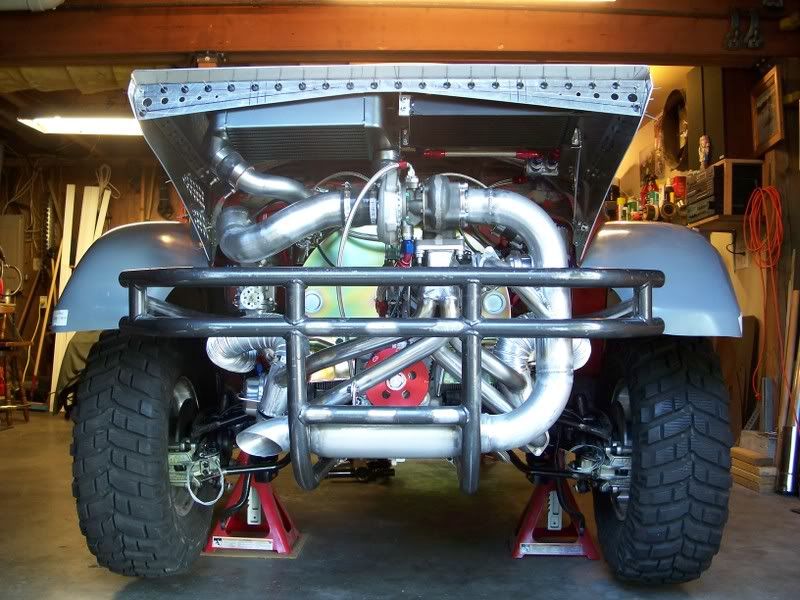

I put a couple scoops on the drivers side to direct some cool/fresh air to the Air filter. The series of .5" tall ribs along the top are to help direct some air down the 1.0" holes through the coolers. There will be some foam gaskets around both coolers to seal off the air flow.
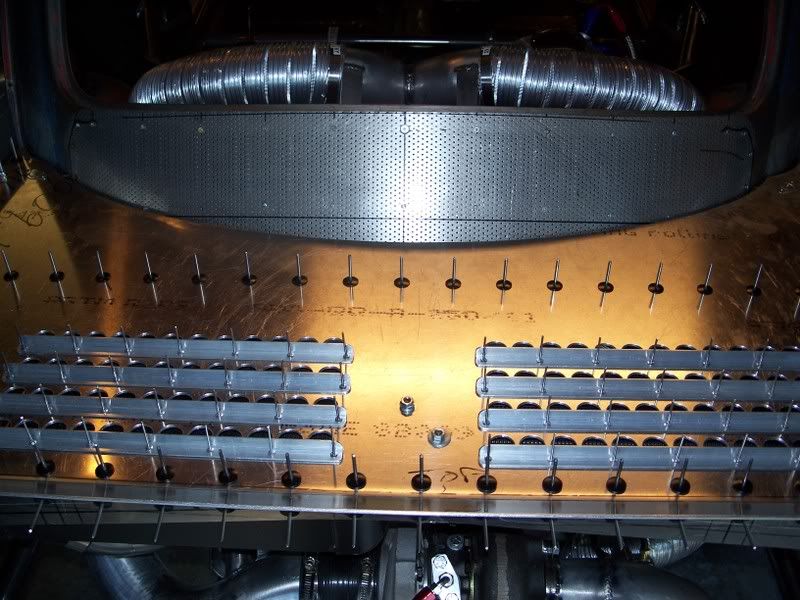
I put this sheet of stainless over the factory air inlets to restrict airflow into the engine 'compartment' from above the spoiler surface, hopefully forcing more air to flow over the top and down through it. Idealy there will be an area of low pressure under the coolers to draw air through them, at least that's the idea.
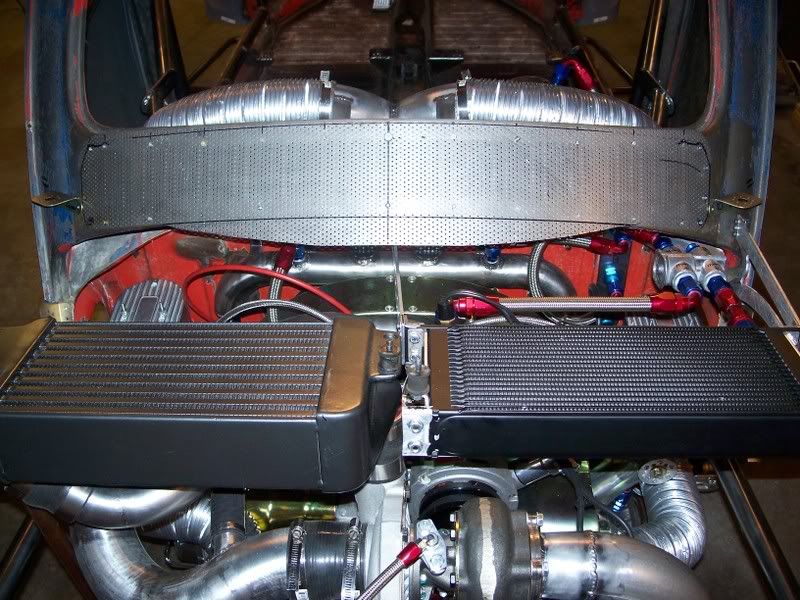
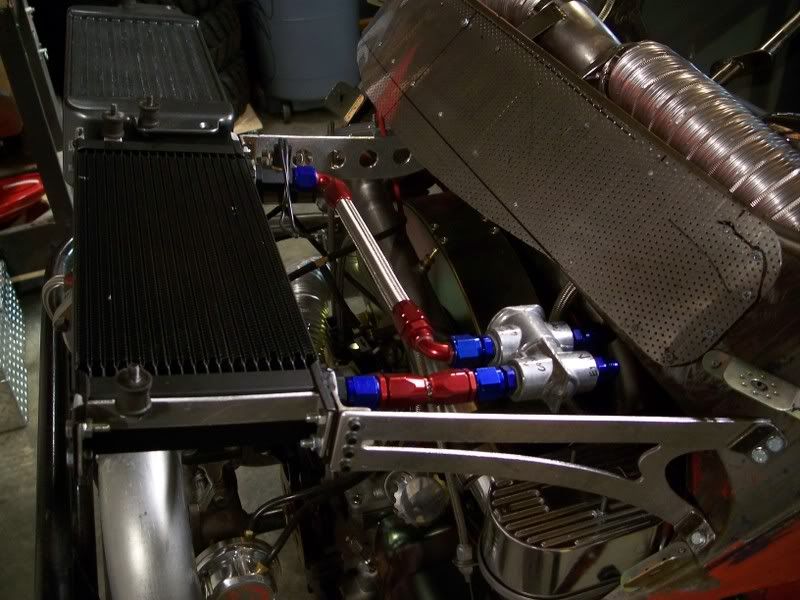
I built it so the spoiler can be removed (to run/tune/show) and the coolers are self supported. The intercooler prettymuch supports itself. I had to make some support brackets for the oil cooler & t-stat to keep them in position. Both coolers are mounted to the underside of the spoiler with rubber insualted mounts so the intercooler can move with the engine and not jerk the spoiler around too bad. The whole thing is just mocked up for the most part right now. I still have 5 more mounting points to make and more pop rivets to pop than I care to count. This is the first time the whole thing has been assembled on the car, so I had to throw the tires and fenders on real quick to get an idea how it's overall shape looks. It's going to take a little gettin used to I think. All this shiny stuff will look much more appropriate once its been painted or coated somehow.
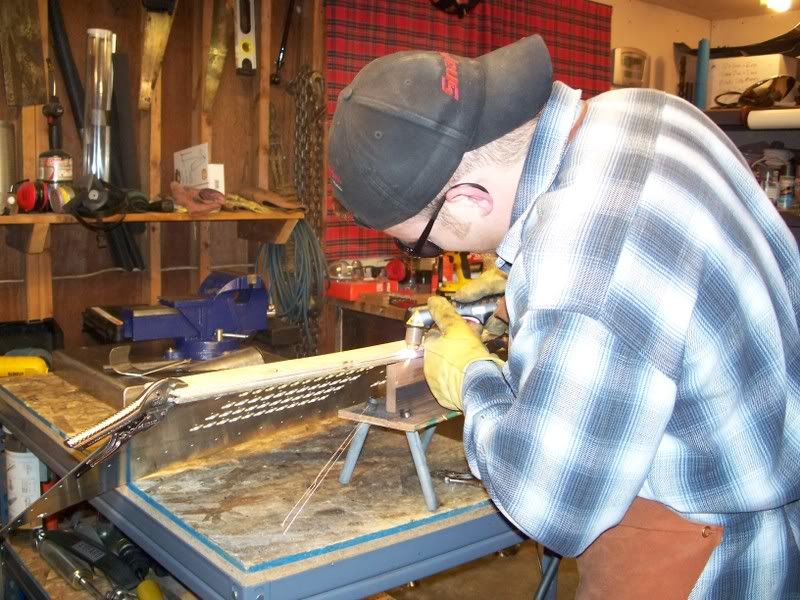
Here I am making the final cut along the trailing edge with the plasma. A friend of mine granted me access to a large sheet metal brake to bend the rear lip and both sides. Nothing like the right tool for the job.
The hunch-back is from years of labor and lack of elbow grease
Actually thats just a weird angle of my right shoulder..........I hope.
Karl
I made it out of .25" plywood first to get the basic shape. Then I picked up a 4x4 sheet of .125" 6061 T-4 (slightly more bendable than T-6, I guess) to cut the panels from. The whole idea for this contraption is to get some air to the coolers and maybe add a little stability for the occational 100mph blast.
I put a couple scoops on the drivers side to direct some cool/fresh air to the Air filter. The series of .5" tall ribs along the top are to help direct some air down the 1.0" holes through the coolers. There will be some foam gaskets around both coolers to seal off the air flow.
I put this sheet of stainless over the factory air inlets to restrict airflow into the engine 'compartment' from above the spoiler surface, hopefully forcing more air to flow over the top and down through it. Idealy there will be an area of low pressure under the coolers to draw air through them, at least that's the idea.
I built it so the spoiler can be removed (to run/tune/show) and the coolers are self supported. The intercooler prettymuch supports itself. I had to make some support brackets for the oil cooler & t-stat to keep them in position. Both coolers are mounted to the underside of the spoiler with rubber insualted mounts so the intercooler can move with the engine and not jerk the spoiler around too bad. The whole thing is just mocked up for the most part right now. I still have 5 more mounting points to make and more pop rivets to pop than I care to count. This is the first time the whole thing has been assembled on the car, so I had to throw the tires and fenders on real quick to get an idea how it's overall shape looks. It's going to take a little gettin used to I think. All this shiny stuff will look much more appropriate once its been painted or coated somehow.
Here I am making the final cut along the trailing edge with the plasma. A friend of mine granted me access to a large sheet metal brake to bend the rear lip and both sides. Nothing like the right tool for the job.
The hunch-back is from years of labor and lack of elbow grease
Actually thats just a weird angle of my right shoulder..........I hope.
Karl