I don't know if you got that mount figured out yet, but when I converted mine, I used a moustache bar from an early bay to mount to the motor and used the hangars from the type IV mount to bolt up to the moustache bar. Worked great, but mines on ly a 1600 in my 73.
I am considering going back to a type IV and using a 79 2000cc.
Type 1 conversion
-
Chris V
- Posts: 3416
- Joined: Tue Sep 03, 2002 12:01 am
Here's a few pictures of our setup:


BTW Not the heads we're using.
BTW Not the heads we're using.
http://www.joesracing.com/
Son of Marc
Son of Marc
-
mightymanx

- Posts: 705
- Joined: Mon Feb 09, 2004 10:29 am
Thanks Chris for the pictures.
So I got my fiberglass/meatal worker merit badge today and got 99% of the tin sorted out the CCC fiberglass adaptors needed some clearancing and a new bell housing cut. Hard to explain other than it was not round looked like they didn't finish. The engine tin needed some work but that is standard for a wider motor. I just need the triangle piece and the chute for the oil cooler (on order) then its ready. I will try to take some pictures and post them for those that are interested (got to figure out how to post pictures). other than that the exaust is done had to widen it (1.5 inch bug headder 1600cc with ) tomorrow I will pull the type 4 and start rebuilding the 34 ICT's (they need it).
Dan
So I got my fiberglass/meatal worker merit badge today and got 99% of the tin sorted out the CCC fiberglass adaptors needed some clearancing and a new bell housing cut. Hard to explain other than it was not round looked like they didn't finish.
Dan
-
Chris V
- Posts: 3416
- Joined: Tue Sep 03, 2002 12:01 am
Pictures are easy...I could have even sent you the tin.mightymanx wrote:Thanks Chris for the pictures.
So I got my fiberglass/meatal worker merit badge today and got 99% of the tin sorted out the CCC fiberglass adaptors needed some clearancing and a new bell housing cut. Hard to explain other than it was not round looked like they didn't finish.
Dan
Our engine is going to be .200" wider than stock. I'm still plannin' on runnin' an 1-3/8" system w/boxes - but if that doesn't work to our satisfaction we'll toss on an 1-1/2" beetle header that we widened to fit with stock under cylinder tin/thermostat. I called A-1 muffler yesterday about the possibility of getting a Bay' "sidewinder header" and they're available in several ways, and they work with the stock boxes and BugPack big-bore boxes too.

Yesterday I finished my beam-swap on my `67 drag Beetle and then got to welding in new mounts for some Recaro's in the bus
http://www.joesracing.com/
Son of Marc
Son of Marc
-
stevemariott

- Posts: 141
- Joined: Tue Sep 17, 2002 12:01 am
-
Chris V
- Posts: 3416
- Joined: Tue Sep 03, 2002 12:01 am
Isn't it! I was thrilled to see they were making one for a Type I Bay'.
Yeah, I told him I'd judge whether or not my 'combo' would benefit from the larger exhaust before I bothered ordering...with the fun bits and pieces I can see spending ~$800 I really do love my Type I Beetle sidewinder though...awesome craftsmanship and performance.
Yeah, I told him I'd judge whether or not my 'combo' would benefit from the larger exhaust before I bothered ordering...with the fun bits and pieces I can see spending ~$800
http://www.joesracing.com/
Son of Marc
Son of Marc
-
mightymanx
- Posts: 705
- Joined: Mon Feb 09, 2004 10:29 am
Here is the latest update.
For those who want to do this conversion source yourself a "mock up case" makes it tons easier. A whole mock up long block would be better
The type 4 is out (took 15 minutes)
The input shaft is cut down 1/2 inch .500 thou.
The mock up case is installed
http://i64.photobucket.com/albums/h181/ ... 190048.jpg
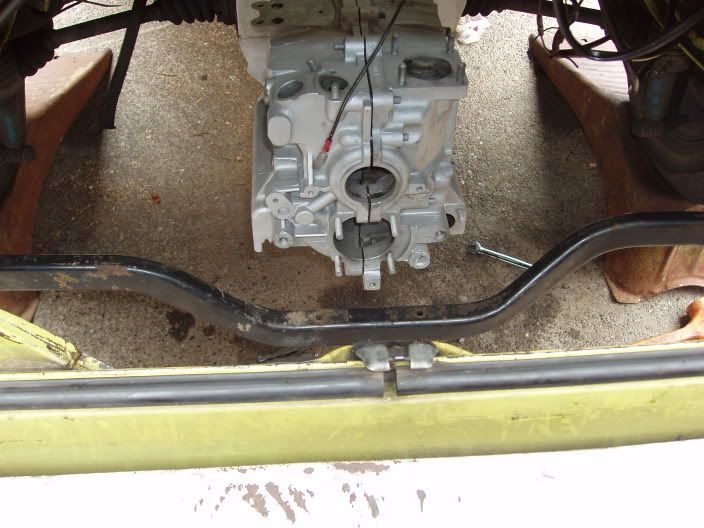
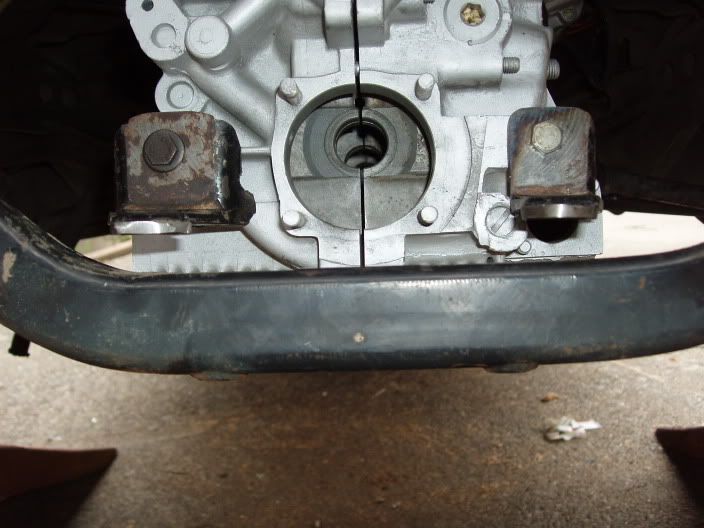
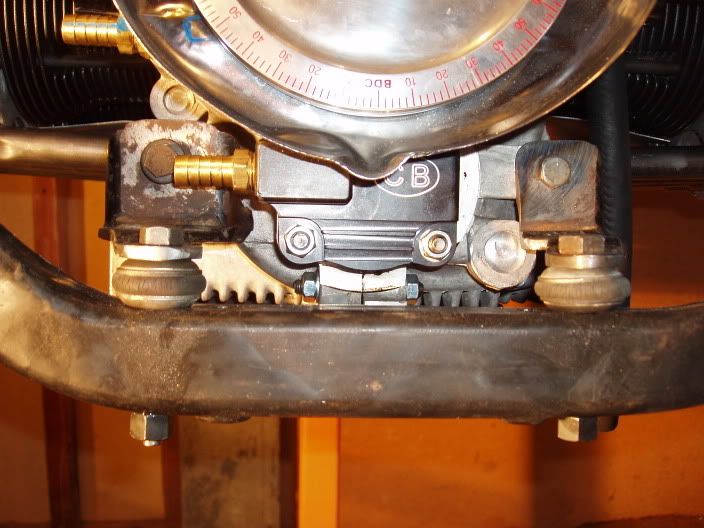
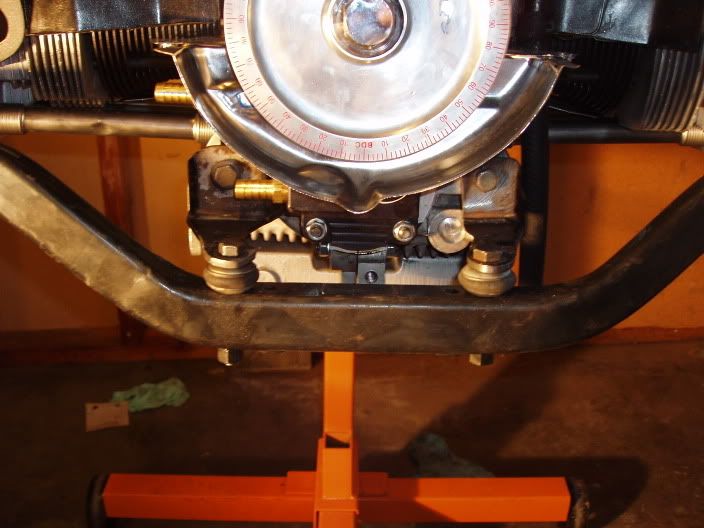
I made a bad A$$ set of motor mounts by modifying the stock type 4 set. rotate 90 degrees from stock position and trim to fit. then just have to drill 2 new crossbar holes and put in 1" urathane or rubber spacers.
http://i64.photobucket.com/albums/h181/ ... 190065.jpg
http://i64.photobucket.com/albums/h181/ ... 190064.jpg
http://i64.photobucket.com/albums/h181/ ... 190060.jpg
But It won't clear the &%$#@ing merged header

I started looking and realized that no merged headder will clear the crossbar with out major modification so I get to cut apart the new header that I just welded. next time I will have a mockup engine with heads. and do the exhaust last.
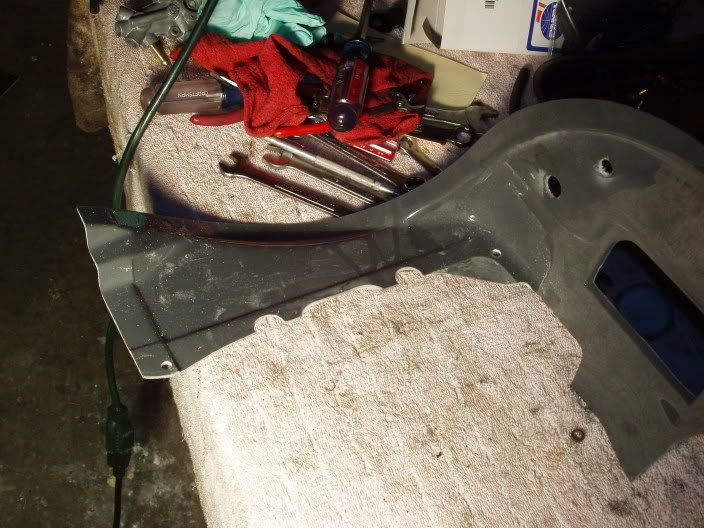
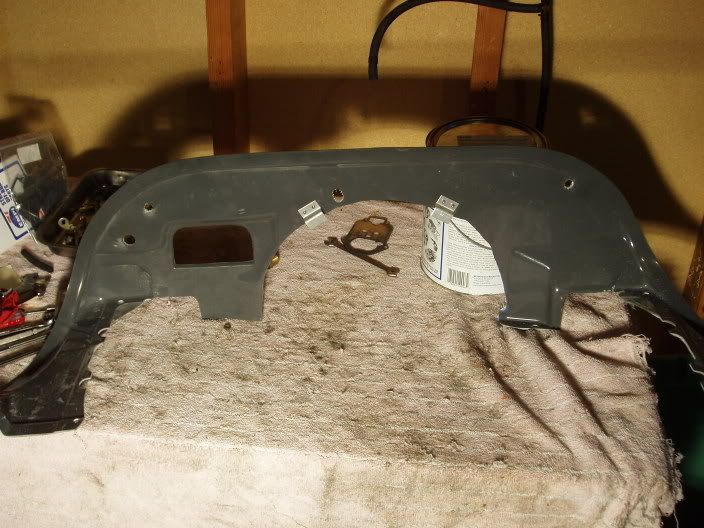
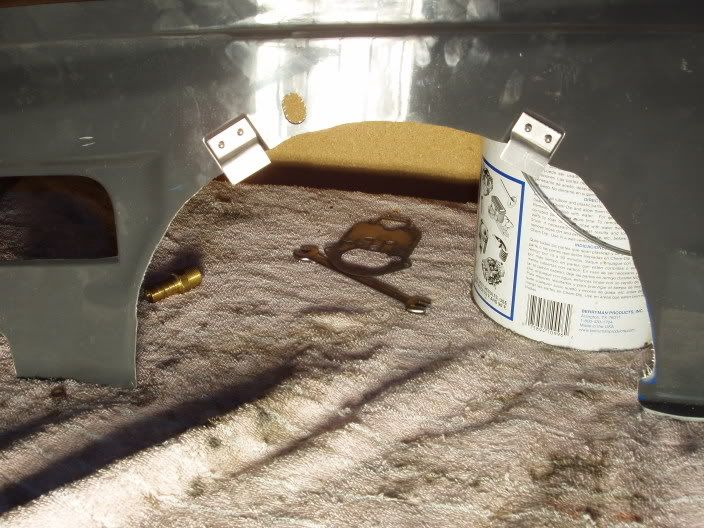
Here are some picts of the "conversion tin" fiberglass I have most of the holes cut for the lines throttle cable etc. when I got it it had none of that. If I had to do it again I would make my own for $250 in cost I have spent 8 hours fitting it and I think I could have built the whole shebang out of auluminum in about 16 hours or so.
http://i64.photobucket.com/albums/h181/ ... 190056.jpg
http://i64.photobucket.com/albums/h181/ ... 190054.jpg
No I didn't do a crappy job on the bell housing cut out it came that way and if i smooth it any more I will have a huge gap.
http://i64.photobucket.com/albums/h181/ ... 190057.jpg
I also ran into carb issues I hoped I could modify my 34 type 4 ICT linkage to work but there is no prayer or it clearing the fan shroud do I am going to get a bell crank linkage which means I need to modify my fuel pump block off again.
here is the brake booster intake manifold mod i did I have to decided to do the 1/2 side also and use the stock cross ovet tube and mount it to the "tin"
http://i64.photobucket.com/albums/h181/ ... 190051.jpg
So that is all for now now that I have figured out the picture thing I keep you folks posted and tommorow I tackle the exaust.
Dan
For those who want to do this conversion source yourself a "mock up case" makes it tons easier. A whole mock up long block would be better
The type 4 is out (took 15 minutes)
The input shaft is cut down 1/2 inch .500 thou.
The mock up case is installed
http://i64.photobucket.com/albums/h181/ ... 190048.jpg
I made a bad A$$ set of motor mounts by modifying the stock type 4 set. rotate 90 degrees from stock position and trim to fit. then just have to drill 2 new crossbar holes and put in 1" urathane or rubber spacers.
http://i64.photobucket.com/albums/h181/ ... 190065.jpg
http://i64.photobucket.com/albums/h181/ ... 190064.jpg
http://i64.photobucket.com/albums/h181/ ... 190060.jpg
But It won't clear the &%$#@ing merged header
I started looking and realized that no merged headder will clear the crossbar with out major modification so I get to cut apart the new header that I just welded. next time I will have a mockup engine with heads. and do the exhaust last.
Here are some picts of the "conversion tin" fiberglass I have most of the holes cut for the lines throttle cable etc. when I got it it had none of that. If I had to do it again I would make my own for $250 in cost I have spent 8 hours fitting it and I think I could have built the whole shebang out of auluminum in about 16 hours or so.
http://i64.photobucket.com/albums/h181/ ... 190056.jpg
http://i64.photobucket.com/albums/h181/ ... 190054.jpg
No I didn't do a crappy job on the bell housing cut out it came that way and if i smooth it any more I will have a huge gap.
http://i64.photobucket.com/albums/h181/ ... 190057.jpg
I also ran into carb issues I hoped I could modify my 34 type 4 ICT linkage to work but there is no prayer or it clearing the fan shroud do I am going to get a bell crank linkage which means I need to modify my fuel pump block off again.
here is the brake booster intake manifold mod i did I have to decided to do the 1/2 side also and use the stock cross ovet tube and mount it to the "tin"
http://i64.photobucket.com/albums/h181/ ... 190051.jpg
So that is all for now now that I have figured out the picture thing I keep you folks posted and tommorow I tackle the exaust.
Dan
-
mightymanx
- Posts: 705
- Joined: Mon Feb 09, 2004 10:29 am
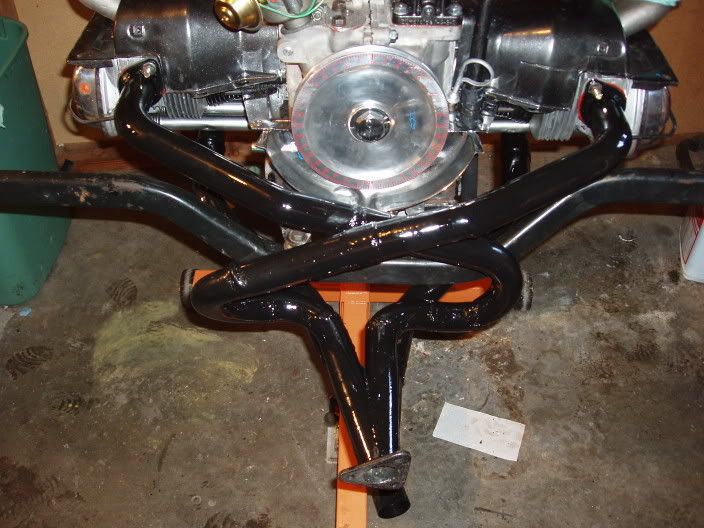
Well today I learned a few things like buy the colector some flanges and some tubes and build your own headder it is easier than what I did.
What had to happen for it to clear using the stock type 4 cross bar is the 1&4 tubes have to go above the bar and the 2&3 have to go below it kind of looks like a stock headder that is spread in the vertical axis.
But it is done and I am happy with the fit of the motor mounts I like using the old type 4 stuff because It was free and I feel clever for "recycling" the stuff.
Going to the drag strip tomorrow so just going to put some more paint on the tin before. I go will try and post pictures tomorow.
Dan
-
mightymanx
- Posts: 705
- Joined: Mon Feb 09, 2004 10:29 am
The update for the day Didn't do anything yesterday went to the track and watched Tom H almost rip his exaust off his 51 split drag car  it was a good run even though traction was poor.
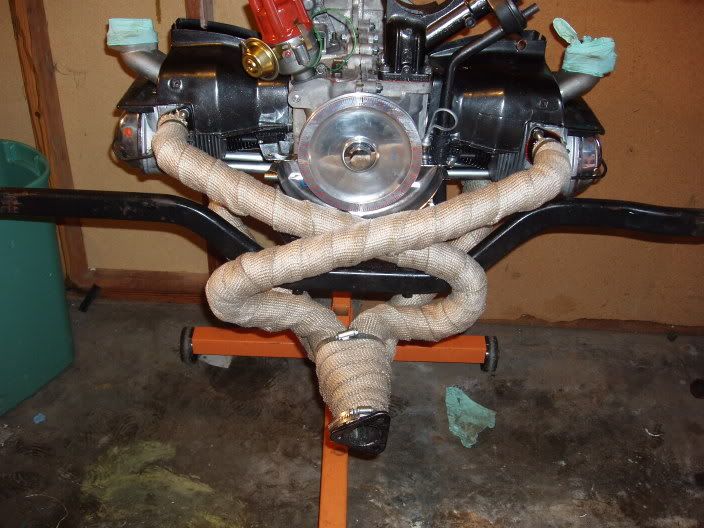
The exaust and cross bar are on and as promesed I have pictures
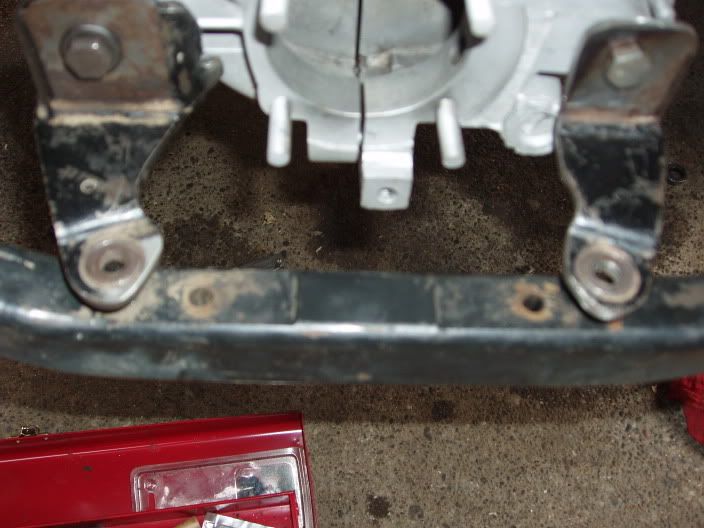
The motor mounts Recycled bushings from a super's old struts.
http://i64.photobucket.com/albums/h181/ ... 220067.jpg
http://i64.photobucket.com/albums/h181/ ... 220068.jpg
The exaust system it bends to the right on for a reason that is the direction of the muffler and it would taks greater than 90 degree bend to keep under the bus. so I cheated.
http://i64.photobucket.com/albums/h181/ ... 220069.jpg
the finished product
http://i64.photobucket.com/albums/h181/ ... 220071.jpg
the side view so you can see how far it has to be streched out to clear the crossbar.
http://i64.photobucket.com/albums/h181/ ... 220072.jpg
all I have left is carbs carb linkage alt. fan shroud, clutch and install.
tomorow rebuilding carbs
Dan
The exaust and cross bar are on and as promesed I have pictures
The motor mounts Recycled bushings from a super's old struts.
http://i64.photobucket.com/albums/h181/ ... 220067.jpg
http://i64.photobucket.com/albums/h181/ ... 220068.jpg
The exaust system it bends to the right on for a reason that is the direction of the muffler and it would taks greater than 90 degree bend to keep under the bus. so I cheated.
http://i64.photobucket.com/albums/h181/ ... 220069.jpg
the finished product
http://i64.photobucket.com/albums/h181/ ... 220071.jpg
the side view so you can see how far it has to be streched out to clear the crossbar.
http://i64.photobucket.com/albums/h181/ ... 220072.jpg
all I have left is carbs carb linkage alt. fan shroud, clutch and install.
tomorow rebuilding carbs
Dan
-
Chris V
- Posts: 3416
- Joined: Tue Sep 03, 2002 12:01 am
Woah...racin' ahead of our progress. Exhaust looks good as do the mounts.
http://www.joesracing.com/
Son of Marc
Son of Marc
-
mightymanx
- Posts: 705
- Joined: Mon Feb 09, 2004 10:29 am
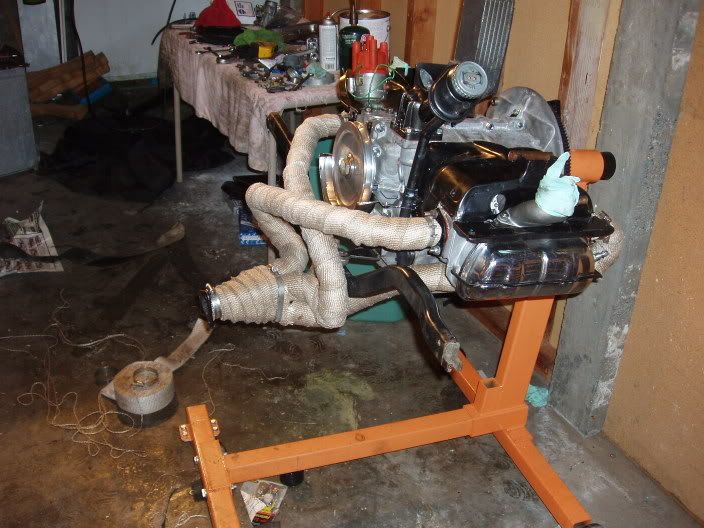
Well almost have it ready to throw in just need the Volkswagen Fairy to show up with my linkage and find a sump plug, its a wierd size must be AN I have tried every thing else it has a bung for scavaging turbo oil on the side.
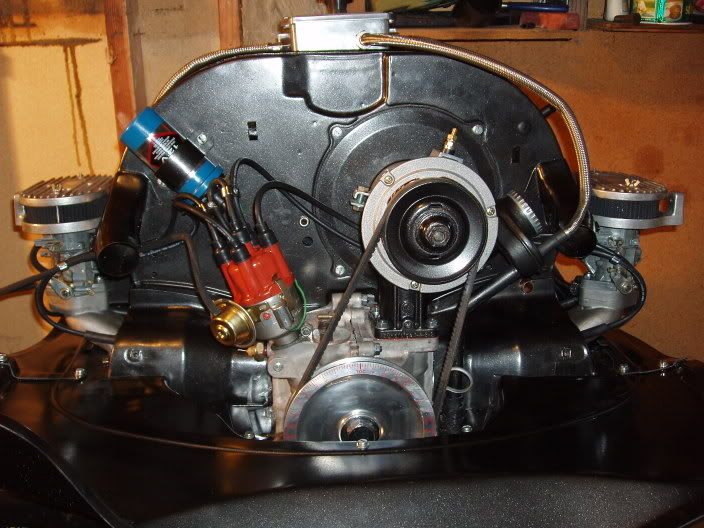
Here is a good shot of the whole enchalada this is what It will looks like with the adapter "tin" in place.
http://i64.photobucket.com/albums/h181/ ... 230075.jpg
I am making a Pre-luber for the engine out of an old bus washer bottle and some fittings to pre-lube the engine before starting.
Here is a good shot of the whole enchalada this is what It will looks like with the adapter "tin" in place.
http://i64.photobucket.com/albums/h181/ ... 230075.jpg
I am making a Pre-luber for the engine out of an old bus washer bottle and some fittings to pre-lube the engine before starting.
-
mightymanx
- Posts: 705
- Joined: Mon Feb 09, 2004 10:29 am
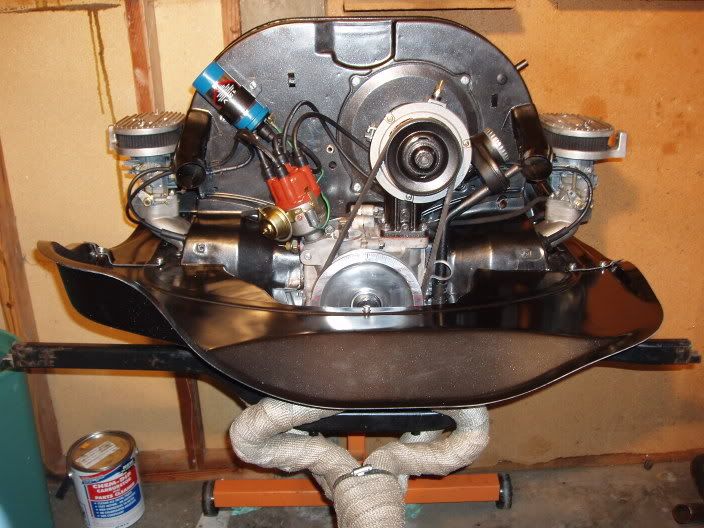
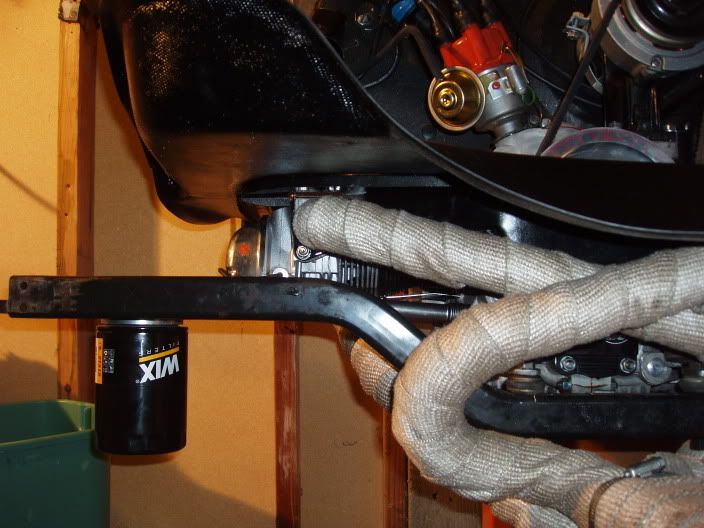
Ready to Install
http://i64.photobucket.com/albums/h181/ ... 240076.jpg
I found that the cross bar is an great place for the filter mount just drill and tap.
http://i64.photobucket.com/albums/h181/ ... 240079.jpg
The breather system took some time running through the "tin" and routing
the box will be mounted to the firewall in the bus I hope it is big enough .
http://i64.photobucket.com/albums/h181/ ... 240080.jpg
The carbs are set, timing set ready to rock EXCEPT for no carb linkage Hope the UPS dude shows up tomorow or my buddy has a ghetto type 3 linkage I will use.
http://i64.photobucket.com/albums/h181/ ... 240076.jpg
I found that the cross bar is an great place for the filter mount just drill and tap.
http://i64.photobucket.com/albums/h181/ ... 240079.jpg
The breather system took some time running through the "tin" and routing
the box will be mounted to the firewall in the bus I hope it is big enough
http://i64.photobucket.com/albums/h181/ ... 240080.jpg
The carbs are set, timing set ready to rock EXCEPT for no carb linkage
-
mightymanx
- Posts: 705
- Joined: Mon Feb 09, 2004 10:29 am
It Lives sorry to anybody who has been following this but I have been working lots and haven't been sitting in front of the computer much .
The break in is done and I am just sorting out the carbs. Running lean, go figure stock jets. Waiting for the jet kit from webber to come in it has a 52 idle and a 1.3 main right now. got to jump that up some and she will run cooler gets pretty hot right now have the idle screws out 4-1/4 to do the break in once that is done putting in a new throttle cable tomorow and putting the tin on and the engine bay seal. I will post picts soon. I hope to have some road test data mid this week.
Dan
-
Chris V
- Posts: 3416
- Joined: Tue Sep 03, 2002 12:01 am
Sweet  Any first impressions of response and RPM limit?
We recently put 34 ICT's on my ported stock-valve 1775 with an Erson 200 (242* @ .050" / .441" valve lift) - carbs have got 55 idles and 137 mains and I've only driven it a handful of times since, but as I recall they really choke performance/revs down, est. two seconds in the 1/4 (with 44's, and all else being equal she'd run 16.1) and she stops at 45-4800rpm.
Dad and I finished machining and assembling the heads yesterday for ours...
http://www.joesracing.com/
Son of Marc
Son of Marc