IT is just good for you and us to see what your starting with and pics along the way. The old adage a pic is worth a thousand words. It just helps all concerned to see what your talking about almost as much as telling what your working on. Pics also give ideas to other projects. Trust me you will go back and look at what you have done many times in the future.
Leatherneck wrote:IT is just good for you and us to see what your starting with and pics along the way.
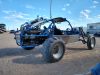
I don't have think I have anymore digital pictures of the sandrail before I took it apart, except for what I posted. I guess I don't understand what other pictures I should post. I' completely willing to offer up anything I can. Just let me know what that might be. That Youtube video was taken almost a year ago, and before I started this project.
So, here's another pic of the, mostly finished, driver's side trailing arm. The long bar extending to the floor is to hold it up.
Dev
You do not have the required permissions to view the files attached to this post.
You have done a fine job on both your build and the information you that have presented us; especially on how you set-up and leveled the torsion bar and started the rebuild off that. I think we made things a little hard for you by asking for so much extra from you but when the chance comes; it is hard to pass on getting those extra bits of information. My thanks again.
Ol'fogasaurus wrote:I think we made things a little hard for you by asking for so much extra from you but when the chance comes; it is hard to pass on getting those extra bits of information. My thanks again.
I'm glad someone else, (other than myself), is taking an interest in it. I'm happy to post more, more, more. I just don't know what more, more, more, to post.
Chime in with suggestions...anyone....anyone?
Dev
As an interesting side light (to me anyways); this last week my wife, step-daughter and I along with the couple we often travel with were motor homing in Moses Lake. One of the couples, in the spot next to our friends, happened to be someone we talked to in CA several years ago. It also turned out that he worked for the same company I did but he was a machinist and worked with several different types of lathes and milling machines. I was able to talk with him about setups and other machine setup things to help me with destroying tools with my Smithy . Your posts did help me understand some of the things he was talking about; I also got more information on stuff you talked about from him.
You never know where information is going to pop up do you!
Short update.
Last weekend I fabbed up and welded my other trailing arm. Tonight, I cut a paper template for a plate that will cover some less than attractive welds. Transferred the template to steel and cut it out on the bandsaw. A little die grinding and belt sanding, then welded it on. Still needs a little more welding and grinding, but I needed to go make dinner for my daughter and myself.
You do not have the required permissions to view the files attached to this post.
I finished my trailing arms finally. Well, almost finished them. I tacked on shock mounts after painting them, (I know, I know, but I was so excited that I got carried away with the paint).
I decided to post the method I used to measure the gap between 2 bars so I could cut a gusset to fit in between them. As usual, I don't know how others do it, but this is how I did.
First I measured the gap with a set of old school calipers. You can get a set of these at Harbor Freight for under $15 and you get inside, depth, and outside tools.
Next I transfer this measurement to a piece of steel I had already notched, (at an angle thank you), and cut it on the chop saw. Viola! Fits perfectly. I did the same thing for my front engine mount and a few other gussets during this build.
You do not have the required permissions to view the files attached to this post.
Here's a shot of one of the trailing arms, (without the aforementioned shock mount), with the paint still drying. Can you see the bugs landing on it and embedding themselves in my paint? Next is a shot of the trailing arms mounted on the sandrail so I can start the upper shock mounts. I ordered all four shock and springs form FOA yesterday. I'm so excited I nearly peed myself.
You do not have the required permissions to view the files attached to this post.