Electromans Type 4 conversion
-
CobraJet
- Posts: 430
- Joined: Sun Oct 31, 2010 11:12 pm
Re: 1911 Build
What thread did you post those pics in?
-
Electroman

- Posts: 181
- Joined: Tue Oct 20, 2009 12:04 am
Re: 1911 Build
I didn't get as much done this weekend as I would have liked, but I did make some progress.
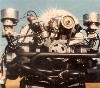
Last weekend I got the two sets of head tins cut in half and very roughly tacked together. As those are what all the rest of the tin is built off of. This weekend I managed to get all four of those side tins basically done (they sill need some finish work on the welds ect) and I also started shaping the tin that goes over the bellhousing.
The four side tin pieces were made from the four factory pieces. The back two didn't need much modifying at all, just a slight tweak at the bottom to help direct the air around the exhaust port. The front two took quite a bit more work to get those two stock pieces to fit and direct the air around the exhaust ports. You should be able to see what I'm talking about in the pictures. I'm still thinking about adding a few more bolt holes to the tins to make attaching some of the other tin work easier. That bellhousing tin piece needs allot of work around the #3 cylinder which you can see I cut that whole section out to make it from scratch. Well that's all I got done so far. Once I get that bellhousing tin finished I'll start putting together a cardboard template for the main fan shroud.


EDIT: Trying to get all of the pictures back since I lost photobucket. Doesn't look like I have these either, will upload if I find them.
Last edited by Electroman on Sun Mar 27, 2022 2:57 pm, edited 1 time in total.
Joshua Taitt
1967 Beetle w/ type 4 conversion in progress
1967 Beetle w/ type 4 conversion in progress
-
Electroman
- Posts: 181
- Joined: Tue Oct 20, 2009 12:04 am
Re: 1911 Build
Well as I have been working on the cooling tin for the corvair fan I have been thinking about the transmission that currently sits in my car. A little while back I did an IRS conversion and at that time I picked up a 73-74 SSC superbeetle transmission to put in the car. I figured the gearing would be close and the transmission would be strong enough to get the car on the road until I got a better transmission built.
Well long story short when I went to buy that transmission I checked the code on it and swore it said AN ect, which would be the 3.875 R&P. Once I got it home and started to clean it up I discovered the the code was actually AM, which is a non US transmission for a 1300cc equiped super. Basically same gearing as the AN only it has a 4.375 R&P. To that gearing coupled with my 24.5" tall tires would mean high cruising rpms ect.
Fast forward to this month.
Soooo I made some calls to several VW transmission re-builders and after some drawn out discussions about how to strengthen the transmission to handled the torque and the cost of re-gearing the whole thing, I was quoted prices from $2000 - $3000. I decided to move forward with a modification I thought about doing long ago but decided it was too much work at the time.
So 5 speed 914 transmission it is.
I made some calls and was able to track down a core transmission for a killer price, so on Saturday my father and I made the 100 mile round trip out to a junkyard to pick it up. When we got out there after yacking with the owner for about 30 minutes about cars and business and such we left with a 914 transmission and starter that had been sitting on the shelf since 1995.
Got it home and spent the next 4 hours scraping, degreasing, scrubbing and finally steam cleaning the transmission clean, and its still not clean. Got the old oil drained out, the old oil was pretty dirty but the magnetic plug didn't have an alarming amount of metal stuck to it so that's good.
Next step is to tear the whole thing down and check out its condition and replace anything that's worn ect. I also managed to take some measurements of the transmission and the back end of my car and it seems that what I have planned for the shifter ect should fit. I plan on doing this install a bit different than what you usually see(hopefully it works out) anyway the transmission I picked up is a 1973 side shifter. My plan is to build a cable shifter and keep the side shifter mechanism intact. I want to use a cable shifter because I never liked the idea of putting a big z bend in the middle of your shift rod. To me that seems like it would make shifting not as easy as a factory linkage and the idea of installing and replacing bushings later on sounds like a nightmare. So cable shifter it is.
Didn't get anything done on Sunday, spent the day with my father and father in law, I only managed to find a copy of the factory workshop manual for the 914 engine and transmission so I have some reading to do. Just because everyone loves pictures here is a picture of my cleaner transmission.

Also question of anyone who may know. The transmission code on this transmission is 914/11 HA0054257, which is odd to me. obviously its a side shifter but the 914/11 code says otherwise. but the HA0054257 says its a 73' whats up with that?
EDIT: Trying to get all of these pictures back after loosing photo bucket. Doesn't look like I have this picture either. Will upload it if I find it.
Last edited by Electroman on Sun Mar 27, 2022 3:05 pm, edited 1 time in total.
Joshua Taitt
1967 Beetle w/ type 4 conversion in progress
1967 Beetle w/ type 4 conversion in progress
-
Piledriver

- Moderator
- Posts: 22859
- Joined: Sat Feb 16, 2002 12:01 am
Re: 1911 Build
The casting code (and even the stamped serial#) means little, the trans case is the same, either can be tailshift or side shift, only nosecone and some shift parts swapping is required.
I would personally fill her up with swepco and try it, once you dive in it can get very expensive to get back out..
I would personally fill her up with swepco and try it, once you dive in it can get very expensive to get back out..
Addendum to Newtons first law:
zero vehicles on jackstands, square gets a fresh 090 and 1911, cabby gets a blower.
EZ3.6 Vanagon after that.(mounted, needs everything finished) then Creamsicle.
zero vehicles on jackstands, square gets a fresh 090 and 1911, cabby gets a blower.
EZ3.6 Vanagon after that.(mounted, needs everything finished) then Creamsicle.
-
Electroman
- Posts: 181
- Joined: Tue Oct 20, 2009 12:04 am
Re: 1911 Build
Ya I know what your saying pile, I already priced out some of the parts and they can be very pricey.
Unfortunately the gasket between the intermediate plate and the main housing was weeping gear oil so I have to at minimum replace that. The gear oil that came out was almost black too so I want to get in there and at least clean everything up.
Oh and since this is going into a beetle I have to pull the gear stack to flip the differential too. All I can say is I'm hoping and praying that when I crack this thing open I don't have to start replacing a bunch of parts.
On a side note I was doing some reading about how to protect the magnesium housing from corrosion after I get this thing all fixed up. I know from the factory they applied a chromate conversion coating after they did all the machine work to the case. Then after the whole trans was built they sprayed on a coating to Tectyl (sp?) 553. Now that tectyl coating is a waxy like substance kinda like camosline (sp?) that only lasts a few years at best. I want a coating that could last 10 years or so. So here is what I'm thinking, and I would like some input on this. After I get the whole case degreased and steam cleaned again I want to blast it. I'm thinking bead blast it (protecting all of the gasket surfaces of course) to get any corrosion ect off the case and get me a fresh surface to work with. Then do another chromate coating. The aircraft industry has a product called Alodine which is for magnesium and aluminum should work great assuming I can actually find a place that would sell me a bottle. Then hit it with two coats of 2k epoxy primer, finally followed buy a coat or two of a paint of some type. That is the process I was seeing allot of aircraft guys using for aluminum and magnesium parts. I figure if its good enough for airplane parts it should work for a transmission case. But I'm still unsure of what paint to use and if I can get a hold of the alodine or a similar product.
Last edited by Electroman on Sun Mar 27, 2022 3:08 pm, edited 1 time in total.
Joshua Taitt
1967 Beetle w/ type 4 conversion in progress
1967 Beetle w/ type 4 conversion in progress
-
CobraJet
- Posts: 430
- Joined: Sun Oct 31, 2010 11:12 pm
Re: 1911 Build
You already bought the trans., did you happen to look at one of the reversed Subaru trans?
-
Electroman
- Posts: 181
- Joined: Tue Oct 20, 2009 12:04 am
Re: 1911 Build
No I dint look at the Subaru transmissions mainly because I didn't want to have to run an adapter plate to run my engine.
Had a spare 30mins tonight, so I started to tare into the transmission. Haven't gotten too far into it just pulled all the bits off the outside of it and the side cover and the nosecone.
The one differential bearing I can see so far looks to be in great condition as does the ring and pinion gears. I'll have to take a closer look once I get them all out and cleaned up but so far so good.
On to the nosecone. The reverse Idler gear is in pretty good shape as well but does show some signs that reverse was crunched once or twice. Nothing bad just a small amount of wear. The two bearings for the idle gear are in great shape too. That's all I got torn down so far but I did take a peak at first, specifically its dog teeth. They are very worn which seems to be common so looks like I'm in for at least a set of first gear dog teeth and a synchro. I'll update as I get further along and also get some pictures up as well.
Last edited by Electroman on Sun Mar 27, 2022 3:10 pm, edited 2 times in total.
Joshua Taitt
1967 Beetle w/ type 4 conversion in progress
1967 Beetle w/ type 4 conversion in progress
-
Piledriver
- Moderator
- Posts: 22859
- Joined: Sat Feb 16, 2002 12:01 am
Re: 1911 Build
CobraJet wrote:What thread did you post those pics in?
They should be in the following thread, can't easily see if they are or not from work, pasting here as sort of a meta bookmark so I can upload when I get home:
(search username: "piledriver" search for "horizontal")
http://www.shoptalkforums.com/viewtopic ... 1&t=123360
or
http://www.shoptalkforums.com/viewtopic ... ht=corvair
Addendum to Newtons first law:
zero vehicles on jackstands, square gets a fresh 090 and 1911, cabby gets a blower.
EZ3.6 Vanagon after that.(mounted, needs everything finished) then Creamsicle.
zero vehicles on jackstands, square gets a fresh 090 and 1911, cabby gets a blower.
EZ3.6 Vanagon after that.(mounted, needs everything finished) then Creamsicle.
-
Electroman
- Posts: 181
- Joined: Tue Oct 20, 2009 12:04 am
Re: 1911 Build
I managed to get a few hours in over the past two days and got the transmission all torn down except for the brake bands ect. and the spider gears in the diff. All in all for a 41 year old transmission that appeared to have never been fully apart to my untrained eyes it didn't do too bad. Just a small  list of parts to replace.
Did find one surprise though, the PO liked RTV for fixing leaks.
Parts needed
1st gear dog teeth
1st gear synchro
2nd gear dog teeth
2nd gear synchro
3rd gear dog teeth
3rd gear synchro
4th gear synchro
5th gear cage bearing
the questionable parts
5th gear synchro
1st reavers slider
2nd 3rd slider
Unfortunately because 5th gears bearing failed it looks like I might need a new 5th gear as the bearing race is slightly scored.
Soooo basically almost all wear parts. As of now I'm looking for another 914 transmission so I can take parts from both and get one good transmission built. That being said if anybody in SoCal has a 914 trans they would part with let me know.
Now since everyone likes pictures...


EDIT: Trying to get all of these pictures back after loosing photo bucket. Looks like I don't have these either. Will upload if I find them.
Last edited by Electroman on Sun Mar 27, 2022 3:14 pm, edited 1 time in total.
Joshua Taitt
1967 Beetle w/ type 4 conversion in progress
1967 Beetle w/ type 4 conversion in progress
-
Electroman
- Posts: 181
- Joined: Tue Oct 20, 2009 12:04 am
Re: 1911 Build
Small update.
Went back to working on the engine tin while I search for transmission parts. Started fabricating the main fan shroud, didn't get too far but made some progress none the less.
Started by making a form out of cardboard and masking tape to get the basic shape for the middle section between the head tins. Got a few of the pieces of metal hammered into shape but like I said didn't get too far. As usual, pictures!


EDIT: Trying to get all of these photos back after loosing photobucket. Looks like I don't have these either. Will upload if I find them.
Last edited by Electroman on Sun Mar 27, 2022 3:19 pm, edited 1 time in total.
Joshua Taitt
1967 Beetle w/ type 4 conversion in progress
1967 Beetle w/ type 4 conversion in progress
-
Electroman
- Posts: 181
- Joined: Tue Oct 20, 2009 12:04 am
Re: 1911 Build
So its been awhile since I updated this, life's been busy and I haven't had much time at all to work on this. I have managed to put in a few hours into the trans install though. When I first started the install I figured I could get the case drilled and mounted to the rear mount in an hour or two.
Boy was I wrong.


As you can see the flat spots on the Porsche trans are slightly closer together and at a slightly different angle, so I decided to mod the rear mount.


Finally it was in the car, a bit of clearancing and some gentle massaging with a BFH and it was in, with the front supported by a jack stand. So I took this time to do some final measuring to double check that I can get a cable shifter on the side shift linkage.
Well my initial measurements over a month ago said I would have plenty of space, but... I forgot to take into account that the trans case is offset to one side. Sooooo long story short, it wont fit. Not even close.

Now the plan is to convert this side shifter to a 911 style shift linkage and doing this conversion more like everyone else does. Thats going to add some work to this install. Right now I'm working on a deal with Dr. Evil the trany guy to get the parts I need to convert this. Hopefully I will be able to get some work in on this soon.
EDIT: Trying to get all of these pictures back after loosing photo bucket. Looks like I'm missing these as well. Will upload if I find them.
Last edited by Electroman on Sun Mar 27, 2022 3:27 pm, edited 1 time in total.
Joshua Taitt
1967 Beetle w/ type 4 conversion in progress
1967 Beetle w/ type 4 conversion in progress
-
Electroman
- Posts: 181
- Joined: Tue Oct 20, 2009 12:04 am
Re: 1911 Build
Had a free hour to get something done on this and before I dive back into tin work. Decided I needed to address my hack job of an engine stand. Well I guess its not the stand itself but how I connected a standard VW table mount engine stand to a cheep harbour freight V8 engine stand. Since I had a spare 914 transmission case that I am cutting up to make a shift fork jig, I decided to cut off the bell housing and make a better engine stand. after about an hour of work, here is the result.

Now that that's taken care of, back to the tin.
EDIT: Trying to get all of these picture back up since I lost photobucket. Looks like I lost this on as well. If I find it ill get it uploaded again.

Now that that's taken care of, back to the tin.
EDIT: Trying to get all of these picture back up since I lost photobucket. Looks like I lost this on as well. If I find it ill get it uploaded again.
Last edited by Electroman on Sun Mar 27, 2022 3:29 pm, edited 1 time in total.
Joshua Taitt
1967 Beetle w/ type 4 conversion in progress
1967 Beetle w/ type 4 conversion in progress
-
Electroman
- Posts: 181
- Joined: Tue Oct 20, 2009 12:04 am
Re: 1911 Build
It's been a few weeks since I posted an update, progress has been made but not as much as I would have liked.
Over these past few weeks I focused on the engine tin, the main fan shroud to be specific. I also picked up the parts I need to convert my 914 transmission to a 911 transmission, so Ill be getting back to fitting that to the car soon. With the fan shroud I managed to get it all roughed out and welded together. Now I need to clean up all the welds fill in some holes and start hammering it all out. here are some more pictures.


EDIT: Trying to get all of these pictures back after loosing photobucket. Looks like I lost these too. Will upload if I find them.
Last edited by Electroman on Sun Mar 27, 2022 3:30 pm, edited 1 time in total.
Joshua Taitt
1967 Beetle w/ type 4 conversion in progress
1967 Beetle w/ type 4 conversion in progress
-
Electroman
- Posts: 181
- Joined: Tue Oct 20, 2009 12:04 am
Re: 1911 Build
Another month has gone by and I haven't gotten much done at all, between a vacation, getting a new job, and the honey do list there hasn't been much time for my car.
But needles to say I made a small amount of progress. I managed to get the 911 nose cone bolted up to the trans and tried fitting it to the car, to my surprise it fit perfectly, I guess all the clearancing I did with the 914 nose cone paid off. I haven't started fabricating the front mount yet but I have an idea for one using super-beetle control arm rubber bits.
As for the fan shroud I started cleaning up welds and hammering half of it into a more refined shape, ended up having to split it back into two pieces as the whole thing started to twist as I hammered it. found quite a few more holes that need to be welded up as well. At this point I would like some peoples opinions on something that crossed my mind a few days ago. I have scoured the internet looking for pictures of setups that a similar to what I'm building and it looks like none of them have addressed this, maybe I'm over-thinking things.
Anyway as I'm constructing this fan shroud its kinda ending up like a plenum that sits on-top of the engine the the fan pressurizes with air that obviously travels down through the cooling fins ect. what I'm thinking about involves the fan itself, in this case it sits inside of the plenum, so for all intensive purposes its basically spinning in free air with with no means to carefully direct the air through the fan. What I'm thinking is, would the fan become more efficient (move more air, less power, ect) if the shroud fit the fan tighter? I'll add a picture to show what I mean. First here is a cutaway view. The second picture is what I'm talking about, adding metal where the red lines are.


Here is and overall view, just because

EDIT: Trying to get all of these pictures added back after loosing photobucket. Yup lost these too. Will upload if I find them.
Last edited by Electroman on Sun Mar 27, 2022 3:33 pm, edited 1 time in total.
Joshua Taitt
1967 Beetle w/ type 4 conversion in progress
1967 Beetle w/ type 4 conversion in progress