Was thinking maybe i could put one of those dual cans on it?
Also have an NOS HyFireVII CDI box as well.
Newbie Got a Basket Case
-
Clatter

- Posts: 2056
- Joined: Sun Apr 28, 2002 1:01 am
Re: Newbie Got a Basket Case
Speedier than a Fasting Bullet!
Beginners' how-to Type 4 build thread ---> http://shoptalkforums.com/viewtopic.php?f=1&t=145853
Beginners' how-to Type 4 build thread ---> http://shoptalkforums.com/viewtopic.php?f=1&t=145853
-
madmike
- Posts: 3146
- Joined: Mon Jul 24, 2006 3:11 pm
Re: Newbie Got a Basket Case
You can set up the Retard with a Hyfire VII in different stages 
-
Clatter
- Posts: 2056
- Joined: Sun Apr 28, 2002 1:01 am
Teardown
Finally got a chance to open this up.
A couple cylinders took on water.
Not super sad because there were a few broken fins already.

Was stoked (at first) to see 10mm head studs, due to their popularity with the turbo crowd.
Looking more closely, several were big enough to be cutting thru into the case register.
About half of the inserts pulled out with the head studs.
Not sure what to do about this one; hope they'll hold once back in.
Any ideas?

Somebody really loved his bulletproof sealer. Pretty sure it's Yamabond.
Stuff just sucks to clean up!
Spent several hours scraping this stuff and still more to go.
Also minus three points for not brazing the sump extension on...

Here it is in all of it's glory!
There's that ingenious Bergmann o-ring;
Now filled full of Yamabond!
Stoked to see six shuffle pins, but surprised no straight-cuts?
Didn't think to stop and measure, but will be putting the old cam bearings in for a look-see.
A big FK-45 and dual springs 'should need' straight cuts to keep from eating the thrust.
Will be interesting to see if there's a myth busted here.
Even though not the best experiment, because i think this motor was only running for a short time.

Check out the cam gear...
Was at first expecting a wasted cam bearing thrust and maybe the gear 'self-machined' as a result.
Doesn't look like it, though. Maybe a trick cutting a cam gear down to reduce windage?
Kind of like when they groove these gears?
Either way, the crank gear is loose on the crank.
Went to check back-lash and it slops around.

Can honestly say I've never been so excited to see a set of stock relief valve pistons in my life!
Having been victim of a ball-valve conversion in the past,
I'm holding out hope the bores are still good in there.
Clutch is a Stage1 and stock organic disc.
They say a 2275 will hold up to 10# boost like that,
But I'm betting that's pushing it with the rest of this setup being big like it is.
Have a KEP 'copper' disc here, but if I'm sending the bottom end out for spin-balance,
I'm guessing it'll be smarter to just start with a Stage2.
Should probably do the trick with the organic disc, if not, it's 'easily' changed.
We'll know more once i get the flywheel off and the case cleaned up/measured,
But so far the list looks like:
P&L - (maybe just cylinders)?
rod bearings
straight-cut cam gear set
KEP Stage2
A couple cylinders took on water.
Not super sad because there were a few broken fins already.
Was stoked (at first) to see 10mm head studs, due to their popularity with the turbo crowd.
Looking more closely, several were big enough to be cutting thru into the case register.
About half of the inserts pulled out with the head studs.
Not sure what to do about this one; hope they'll hold once back in.
Any ideas?
Somebody really loved his bulletproof sealer. Pretty sure it's Yamabond.
Stuff just sucks to clean up!
Spent several hours scraping this stuff and still more to go.
Also minus three points for not brazing the sump extension on...
Here it is in all of it's glory!
There's that ingenious
Now filled full of Yamabond!
Stoked to see six shuffle pins, but surprised no straight-cuts?
Didn't think to stop and measure, but will be putting the old cam bearings in for a look-see.
A big FK-45 and dual springs 'should need' straight cuts to keep from eating the thrust.
Will be interesting to see if there's a myth busted here.
Even though not the best experiment, because i think this motor was only running for a short time.
Check out the cam gear...
Was at first expecting a wasted cam bearing thrust and maybe the gear 'self-machined' as a result.
Doesn't look like it, though. Maybe a trick cutting a cam gear down to reduce windage?
Kind of like when they groove these gears?
Either way, the crank gear is loose on the crank.
Went to check back-lash and it slops around.
Can honestly say I've never been so excited to see a set of stock relief valve pistons in my life!
Having been victim of a ball-valve conversion in the past,
I'm holding out hope the bores are still good in there.
Clutch is a Stage1 and stock organic disc.
They say a 2275 will hold up to 10# boost like that,
But I'm betting that's pushing it with the rest of this setup being big like it is.
Have a KEP 'copper' disc here, but if I'm sending the bottom end out for spin-balance,
I'm guessing it'll be smarter to just start with a Stage2.
Should probably do the trick with the organic disc, if not, it's 'easily' changed.
We'll know more once i get the flywheel off and the case cleaned up/measured,
But so far the list looks like:
P&L - (maybe just cylinders)?
rod bearings
straight-cut cam gear set
KEP Stage2
Last edited by Clatter on Fri May 20, 2022 9:25 am, edited 1 time in total.
Speedier than a Fasting Bullet!
Beginners' how-to Type 4 build thread ---> http://shoptalkforums.com/viewtopic.php?f=1&t=145853
Beginners' how-to Type 4 build thread ---> http://shoptalkforums.com/viewtopic.php?f=1&t=145853
-
V8Nate

- Posts: 850
- Joined: Mon Sep 03, 2018 12:34 pm
Re: Newbie Got a Basket Case
The stroker that I recently built was a stroker in the past 78x90 something npr pistons. Well it had the 10mm studs with case savers and instead of cutting the case more to fit the 90.5's(and have it break out like yours) I had the machinist cut down the jugs to fit the block. One way to find out if it holds is to boost it, can't do much now besides run it and check your head torque I suppose
-
Clatter
- Posts: 2056
- Joined: Sun Apr 28, 2002 1:01 am
Re: Newbie Got a Basket Case
Ya, trying to figure out the best course of action with those head studs..
Will try and get some more pics, but it's not pretty.
The inserts got kissed not just on top when the case was decked, but also on the sides where they bust thru to the bore.
Additionally, the inserts that pulled, the threads in the case are pretty buggered.
My first instinct is to figure out a way to remove the inserts that are stuck to the studs.
Maybe double-nutting them?
Then drive them back in using a ball at the bottom, lube the stud and lock-tite the OD of the insert.
That way i can hopefully get the inserts in place sans studs, and then deck the case again.
Maybe even re-bore to kiss off the threads that poke thru?
Probably what will happen is I'll just run the motherfuskers back in.
If they need touched up so the cylinders seat right, I'll just to it with a Dremel or something.
Maybe use JB Weld instead of Locktite..
Ugh. If i woulda known the case was otherwise good, I'd a left the studs in place.
Seeing the main saddles in good shape was heartening, but here's why:

They wallered out the center cam bearing oil passage something huge!


Thought they might have Hoover modded it, but nope.

Got all the galley plugs out and gave them a clean-up chase.

Since the thing's all opened up I'll give it the Hoover drillings.
Wailed and wailed on the gland nut with my impact to no avail.
Cheater pipe just bent the breakover bar.
Looks like we got one of those "600 ft. lbs. with red locktite" situations.
With a wedgemate, one has to wonder why.
Crank seems like it could use a polish.
Gear came off the crank by hand.

My instinct is to go super-nice and build this up all pretty and proper.
Have the case tanked and vapor-blasted and re-decked,
New lifters, Stage 2 PP, crank polished and spin balanced, new mains, 650 springs, Magnum straight-cuts, etc.
But then, looking at it some more.
If the head studs are going gooshy on me, and it's already on it's last line-bore,
I might just go ahead and throw the fugger back together and beat on it.
Polish crank myself, gasket set, rod bearings, done.
That way if i blow it up i'll be laughing and not crying.
Will try and get some more pics, but it's not pretty.
The inserts got kissed not just on top when the case was decked, but also on the sides where they bust thru to the bore.
Additionally, the inserts that pulled, the threads in the case are pretty buggered.
My first instinct is to figure out a way to remove the inserts that are stuck to the studs.
Maybe double-nutting them?
Then drive them back in using a ball at the bottom, lube the stud and lock-tite the OD of the insert.
That way i can hopefully get the inserts in place sans studs, and then deck the case again.
Maybe even re-bore to kiss off the threads that poke thru?
Probably what will happen is I'll just run the motherfuskers back in.
If they need touched up so the cylinders seat right, I'll just to it with a Dremel or something.
Maybe use JB Weld instead of Locktite..
Ugh. If i woulda known the case was otherwise good, I'd a left the studs in place.
Seeing the main saddles in good shape was heartening, but here's why:
They wallered out the center cam bearing oil passage something huge!
Thought they might have Hoover modded it, but nope.
Got all the galley plugs out and gave them a clean-up chase.
Since the thing's all opened up I'll give it the Hoover drillings.
Wailed and wailed on the gland nut with my impact to no avail.
Cheater pipe just bent the breakover bar.
Looks like we got one of those "600 ft. lbs. with red locktite" situations.
With a wedgemate, one has to wonder why.
Crank seems like it could use a polish.
Gear came off the crank by hand.
My instinct is to go super-nice and build this up all pretty and proper.
Have the case tanked and vapor-blasted and re-decked,
New lifters, Stage 2 PP, crank polished and spin balanced, new mains, 650 springs, Magnum straight-cuts, etc.
But then, looking at it some more.
If the head studs are going gooshy on me, and it's already on it's last line-bore,
I might just go ahead and throw the fugger back together and beat on it.
Polish crank myself, gasket set, rod bearings, done.
That way if i blow it up i'll be laughing and not crying.
Speedier than a Fasting Bullet!
Beginners' how-to Type 4 build thread ---> http://shoptalkforums.com/viewtopic.php?f=1&t=145853
Beginners' how-to Type 4 build thread ---> http://shoptalkforums.com/viewtopic.php?f=1&t=145853
-
Ol'fogasaurus
- Posts: 17881
- Joined: Mon Nov 13, 2006 10:17 pm
Re: Newbie Got a Basket Case
Clatter, a little confused on this but if you are dealing with head stud removal an old "Flathead" Ford and other "valve in block" (using head studs) engine design trick might help.
If you double nut the stud on the top, you will still get rotational torquing of the stud involved which you could end up fracturing the stud (usually, but not always) at where the threads start) in the process making things worse.
Flathead Ford V-8 used studs and there are special, very simple tools designed for specifically for this. The old tool, which is still around, has basically 2 different parts, one is the base that slides down the stud and there is a rotating part that has short teeth on it that connects to a wrench or ratchet. You start turning the second part, it rotates and grabs on to the stud with the teeth down low usually allowing you to get the stud moving out. You take a chance of dam(N)aging the stud but then, depending on the stud design in the first place, there is an age and torsional loading limit in play also, e.g., the number of uses just like a bolt, nut or screw has (nothing is simple is it).
https://www.bing.com/search?q=head+stud ... a2dd23c179
There are several designs here but the one I talked about it shown.
It's been a long time, but I think there might be a spray that can help also.
Lee
You do not have the required permissions to view the files attached to this post.
-
Clatter
- Posts: 2056
- Joined: Sun Apr 28, 2002 1:01 am
Re: Newbie Got a Basket Case
Hi Lee,
Thanks for your input.
More on what's going with my head stud issue..
Maybe you can help me out with some ideas.
I'm all ears with anything someone can add here.
First off, there's no "beat head against wall" icon, otherwise I'd use it.
Why did i not leave these head studs in-situ?
Coulda just let sleeping dogs lie and likely been fine!
Now that that's over,
Check out how the threads get thicker with flat thread tips?
Down at the end.. see the threads?
They're all like that.
I'm -guessing- that they do this to hold/lock the insert in place?

What this does is make the threads not get a proper bite/purchase.
They chew up the case all the way out..
Notice the thread shape.
With glue still in place (assuming red loctite):

After cleaning:


Also,
They get faced when the case is decked, but also the edge gets kissed off when the spigot bore is cut.

Was going to try and just put some red locktite on and run the studs and inserts back in,
But if i don't guess right then the machined parts won't line up.
Additionally, some of the inserts turned just a bit but didn't come free, so are now proud of the deck surface.
Say i run the inserts and studs back in all the way around;
Now the studs are in the way getting the deck and bore re-cut.
Have to figure out how to get the stuck inserts off the studs.
Maybe some double-nutting and heat..
Then, how to get the inserts back in, but then the studs back out?
Can't see it in the pics, but the inserts have open bottoms; they aren't blind.
Maybe more double-nutting to back up the face as they're driven in?
A slightly oversize set of inserts would be great, but there's no more room,
And such things likely don't exist anyways..
Ugh.
If anyone has a strategy for me here I'm all ears.
Thanks for your input.
More on what's going with my head stud issue..
Maybe you can help me out with some ideas.
I'm all ears with anything someone can add here.
First off, there's no "beat head against wall" icon, otherwise I'd use it.
Why did i not leave these head studs in-situ?
Coulda just let sleeping dogs lie and likely been fine!
Now that that's over,
Check out how the threads get thicker with flat thread tips?
Down at the end.. see the threads?
They're all like that.
I'm -guessing- that they do this to hold/lock the insert in place?
What this does is make the threads not get a proper bite/purchase.
They chew up the case all the way out..
Notice the thread shape.
With glue still in place (assuming red loctite):
After cleaning:
Also,
They get faced when the case is decked, but also the edge gets kissed off when the spigot bore is cut.
Was going to try and just put some red locktite on and run the studs and inserts back in,
But if i don't guess right then the machined parts won't line up.
Additionally, some of the inserts turned just a bit but didn't come free, so are now proud of the deck surface.
Say i run the inserts and studs back in all the way around;
Now the studs are in the way getting the deck and bore re-cut.
Have to figure out how to get the stuck inserts off the studs.
Maybe some double-nutting and heat..
Then, how to get the inserts back in, but then the studs back out?
Can't see it in the pics, but the inserts have open bottoms; they aren't blind.
Maybe more double-nutting to back up the face as they're driven in?
A slightly oversize set of inserts would be great, but there's no more room,
And such things likely don't exist anyways..
Ugh.
If anyone has a strategy for me here I'm all ears.
Speedier than a Fasting Bullet!
Beginners' how-to Type 4 build thread ---> http://shoptalkforums.com/viewtopic.php?f=1&t=145853
Beginners' how-to Type 4 build thread ---> http://shoptalkforums.com/viewtopic.php?f=1&t=145853
-
Ol'fogasaurus
- Posts: 17881
- Joined: Mon Nov 13, 2006 10:17 pm
Re: Newbie Got a Basket Case
The bottom pix the threads on the fastener are dam(N)aged and it looks (in one of the pix) that the threads in the block may have been damaged also. Clean out the threaded area in the block and look to see if the threads are wider than the studs threads are.
It looks like at some time the threads on the studs may have been clamped up in a vice and flattened out (the threads are wider in the flat spots) or machined/worn being exposed to thing also the flat areas may have damaged the block's threads. Just a guess based on what I think I am seeing.
This along with the flat spots on the threads bothers me. Has the block or heads been machined? Threads should not go through the block into a open area like this. This area has been weakened for "clamping" (bolts and nuts [threaded holes] clamp things together putting loads on the threads of the fastener and the threaded area they connect to.
Lee
You do not have the required permissions to view the files attached to this post.
-
Clatter
- Posts: 2056
- Joined: Sun Apr 28, 2002 1:01 am
Re: Newbie Got a Basket Case
When using a 94 bore and 10mm studs with inserts, this type of thing is inevitable.
Many builders feel it's worth it to get the bigger studs.
The inserts are installed first, then the deck is faced and the cylinder register is bored.
Insert faces are all hit quite a bit, and a few inserts get kissed on the sides during boring.
Again, it's a fairly common practice. Lots of people like 10mm studs and 94s.
And you gotta run inserts (a.k.a. "case savers") to keep the studs from pulling.
Problem comes along when some dummy decides to pull the studs and then doesn't keep track of which hole they came from!
How to get them glued back in with the flat machined parts lined back up correctly?
Too many inserts pulled to just run them back in and luck into them lining back up.
First, I'll need to free the inserts from studs where they pulled and are stuck together.
Some heat and some double-nutting, and maybe a stud puller should do this.
Then i have to figure out how to run the inserts back in (with lock tite or maybe even JB Weld?) and get the studs back out again.
Once the inserts are all back in, the ones that are oriented wrong I'll just kiss off with a dremel.
The inserts just need clearanced. The surrounding aluminum is substantial enough and supports the cylinders.
If there's some leaking, well, whatever. I'll Ultra Grey that whole area and there's a stack of shims anyway.
Was going to have the case re-decked and maybe even another pass with the register bore,
But that would be stupid with this old beat case, and they just need clearance anyways..
Right?
Speedier than a Fasting Bullet!
Beginners' how-to Type 4 build thread ---> http://shoptalkforums.com/viewtopic.php?f=1&t=145853
Beginners' how-to Type 4 build thread ---> http://shoptalkforums.com/viewtopic.php?f=1&t=145853
-
Ol'fogasaurus
- Posts: 17881
- Joined: Mon Nov 13, 2006 10:17 pm
Re: Newbie Got a Basket Case
I wondered if what I was seeing were inserts on the ends of the studs but wasn't sure as there are some really weird fastener designs out there. The flat spots, as long as the machined areas are still tapered like the threads on a bolt should be OK but if there is any flashing on the machined sides of the inserts when removing them can cause the threads in the block to become damaged and weakening them. The same with the open spots or close to open spots which weaken the block where the machining has been done.
Inserts have been a pain in the poo-poo for a long time, there are both good and bad reasons for them such as for repair purposes. Sometimes they work out but other times they don't. Not something I would have been allowed to be used and for many reasons. Again, too many pros and cons to them.
Lee
If you are "puffing" an engine you are putting a lot more load on the block, heads and fasteners than they were designed for so the protentional weakening of these things... this is what I am talking about.
-
Ol'fogasaurus
- Posts: 17881
- Joined: Mon Nov 13, 2006 10:17 pm
Re: Newbie Got a Basket Case
This is what I was talking about. First of all I have never seen or even heard of a fastener being tack welded on to a threaded insert. There could be some weakening to each of the components when the heat is added.
The machining cuts along the threads, are they still in the stock taper or, because of my not being able to clean up the pix so the dark lines that are along the flat area that are there possibly indicating a shadow which could potentially be indicating a flange was on the threads themselves which could cause damage to the threads it is inserted into. Also, the fastener's grain is or may be compromised. This is something I would have called in a specialist engineer or two in or a manufacturing engineer also when I was still working.
Again, the thing the threads are in has been structurally damaged or weakened. I have heard of this being done before but it isn't a real good idea. "Edge margins" themselves are applied to many different things and are very important structurally. Because it was important where I worked and it was part of my job to notice things so I still look at and notice not just the big things but the small things too that are done that can end up being a real big thing.
Again, an opinion.
Lee
You do not have the required permissions to view the files attached to this post.
-
Ol'fogasaurus
- Posts: 17881
- Joined: Mon Nov 13, 2006 10:17 pm
Re: Newbie Got a Basket Case
I know that the has been done a lot in the past, so this is for knowledge, and it is for what it is worth.
Usually, when threaded inserts at put into something, the inserts are to stay there and it is the fasteners that go in and out, not with the inserts. Most of the times I have seen it used is when the threads in the block have been damaged and need to be replaced.
The area between the two red lines has lost the strength of the block's material (or whatever the threaded insert is installed in) to support the studs. Remember, not only pressure from a "puffed engine" is involved but the expansion and contraction of the inserts and the fasteners are involved also.
Also, even the heat of the tacking of the studs into the inserts can/could weaken the strength of the two objects. When metal is made and formed heat treating is done at least once during the stretching and forming of the material and again, heat is part of the forming of the grain of the metal for strength.
There are several videos on how fasteners are made but I am not sure about the threaded inserts especially the threading parts (https://www.bing.com/search?q=video+of+ ... 16c4f79b44). This is Heli coil and not quite the same thing as inserts are blocks that end up doing the same thing.
Lee
You do not have the required permissions to view the files attached to this post.
-
Clatter
- Posts: 2056
- Joined: Sun Apr 28, 2002 1:01 am
Re: Newbie Got a Basket Case
Ok, a few months go by...
Stopped posting dumb motor building details here so as not to clog up this thread.
Will stick to forced induction here from now on, promise.
If you want a million details here's the thread on TOS-->
https://www.thesamba.com/vw/forum/viewt ... p?t=764938
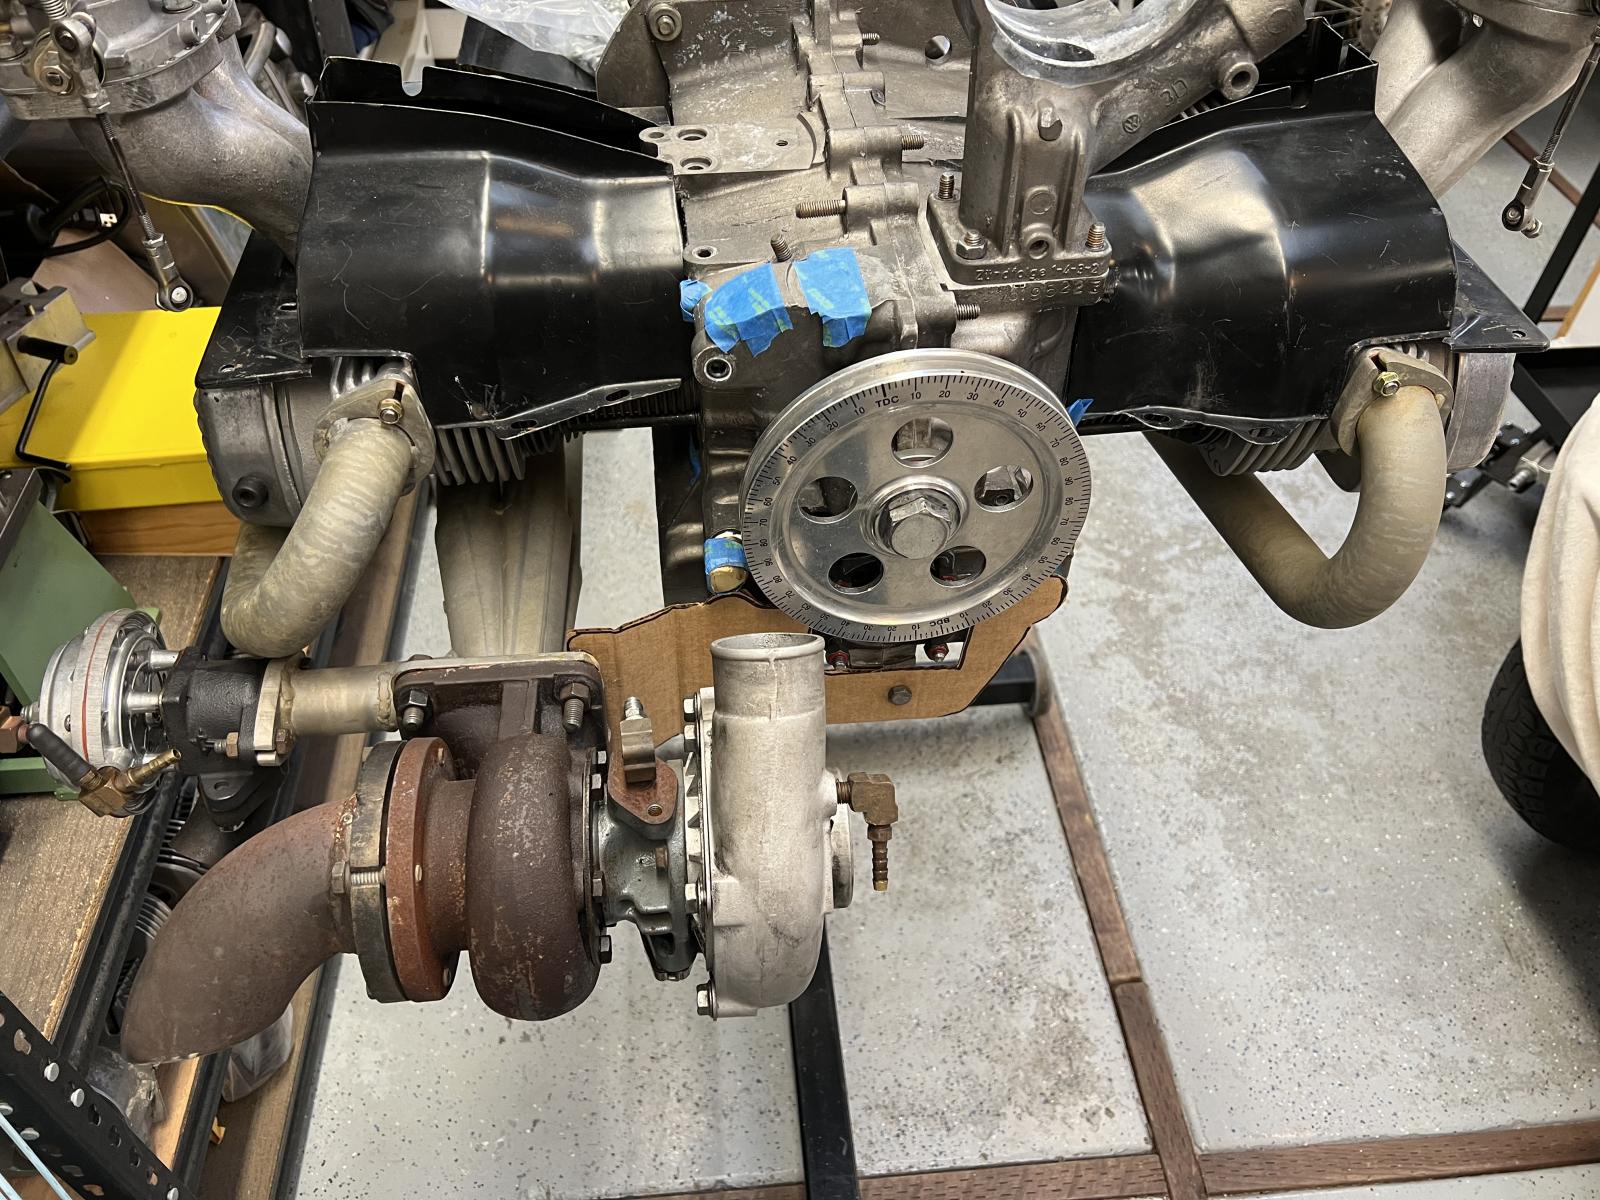
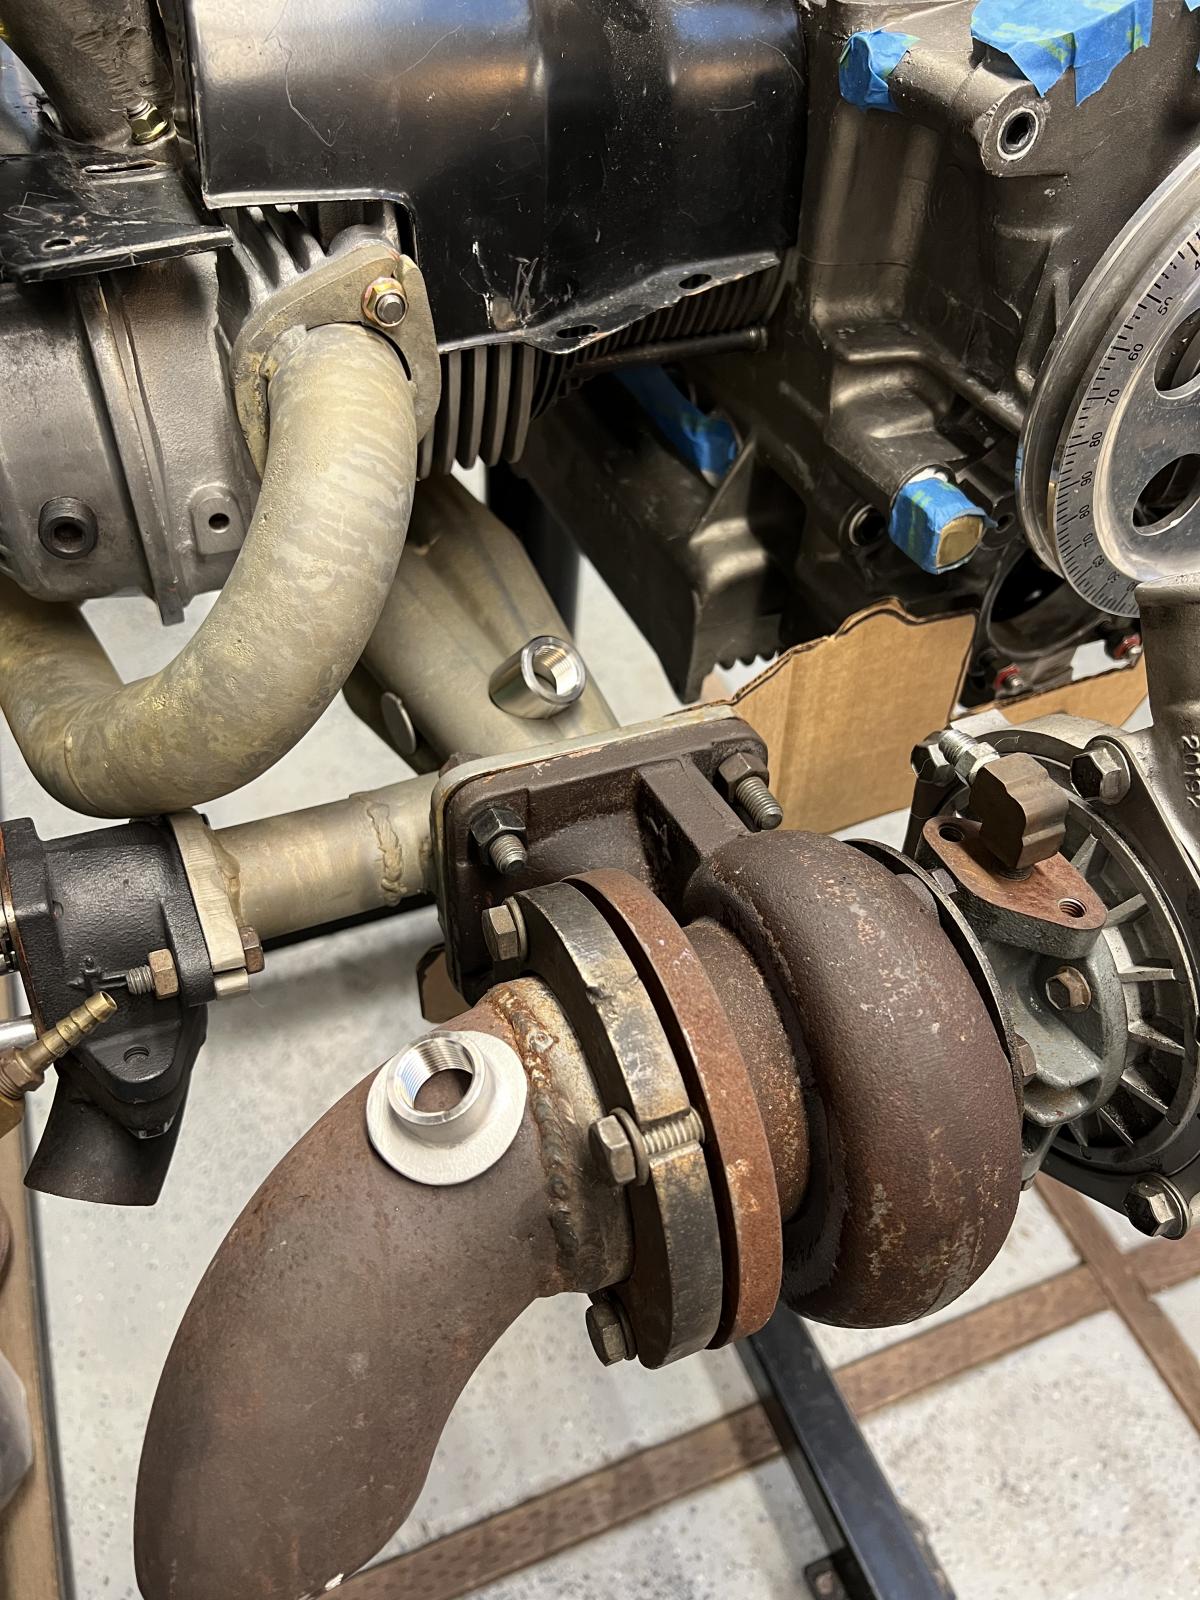
Questions for the real turbo guys...
1. Should i build a bracket to support my turbo?
Seems this big T4 is a lot of weight to hang off of the exhaust only.
Could pick up the case mounting like so:
But am i just going to make it break somewhere else?

2. Where to tap the O2 sensor?
Not expecting it to work well at idle... But after it's flowing, think it'll give a good reading?
Have to make the pipe longer? Hope not...
3. Get a cheap BOV?
These are just so tempting...
Anyone ever run one?
V-band or flange?
https://www.ebay.com/itm/195302253858?h ... BMmp_joKBh
https://www.ebay.com/itm/204065895190?h ... BMnJ_joKBh
Any input is appreciated.
Stopped posting dumb motor building details here so as not to clog up this thread.
Will stick to forced induction here from now on, promise.
If you want a million details here's the thread on TOS-->
https://www.thesamba.com/vw/forum/viewt ... p?t=764938
Questions for the real turbo guys...
1. Should i build a bracket to support my turbo?
Seems this big T4 is a lot of weight to hang off of the exhaust only.
Could pick up the case mounting like so:
But am i just going to make it break somewhere else?
2. Where to tap the O2 sensor?
Not expecting it to work well at idle... But after it's flowing, think it'll give a good reading?
Have to make the pipe longer? Hope not...
3. Get a cheap BOV?
These are just so tempting...
Anyone ever run one?
V-band or flange?
https://www.ebay.com/itm/195302253858?h ... BMmp_joKBh
https://www.ebay.com/itm/204065895190?h ... BMnJ_joKBh
Any input is appreciated.
Speedier than a Fasting Bullet!
Beginners' how-to Type 4 build thread ---> http://shoptalkforums.com/viewtopic.php?f=1&t=145853
Beginners' how-to Type 4 build thread ---> http://shoptalkforums.com/viewtopic.php?f=1&t=145853
-
Clonebug
- Posts: 4756
- Joined: Thu Feb 15, 2007 9:28 pm
Re: Newbie Got a Basket Case
Here is a cheap BOV and it's easy to install. It has 1.0 inch inlet and outlet and I just use some hose with clamps to attach it.Clatter wrote: ↑Sun Dec 11, 2022 9:00 am Ok, a few months go by...
Stopped posting dumb motor building details here so as not to clog up this thread.
Will stick to forced induction here from now on, promise.
If you want a million details here's the thread on TOS-->
https://www.thesamba.com/vw/forum/viewt ... p?t=764938
Questions for the real turbo guys...
1. Should i build a bracket to support my turbo?
Seems this big T4 is a lot of weight to hang off of the exhaust only.
Could pick up the case mounting like so:
But am i just going to make it break somewhere else?
2. Where to tap the O2 sensor?
Not expecting it to work well at idle... But after it's flowing, think it'll give a good reading?
Have to make the pipe longer? Hope not...
3. Get a cheap BOV?
These are just so tempting...
Anyone ever run one?
V-band or flange?
https://www.ebay.com/itm/195302253858?h ... BMmp_joKBh
https://www.ebay.com/itm/204065895190?h ... BMnJ_joKBh
Any input is appreciated.
I've been using it since 2011 and have close to 50,000 miles on it up to 26 lbs. boost.
https://www.ebay.com/itm/195512103705?h ... R57MnaWgYQ
Installed on my buggy.
This was when I upgraded the induction system to add an intercooler.
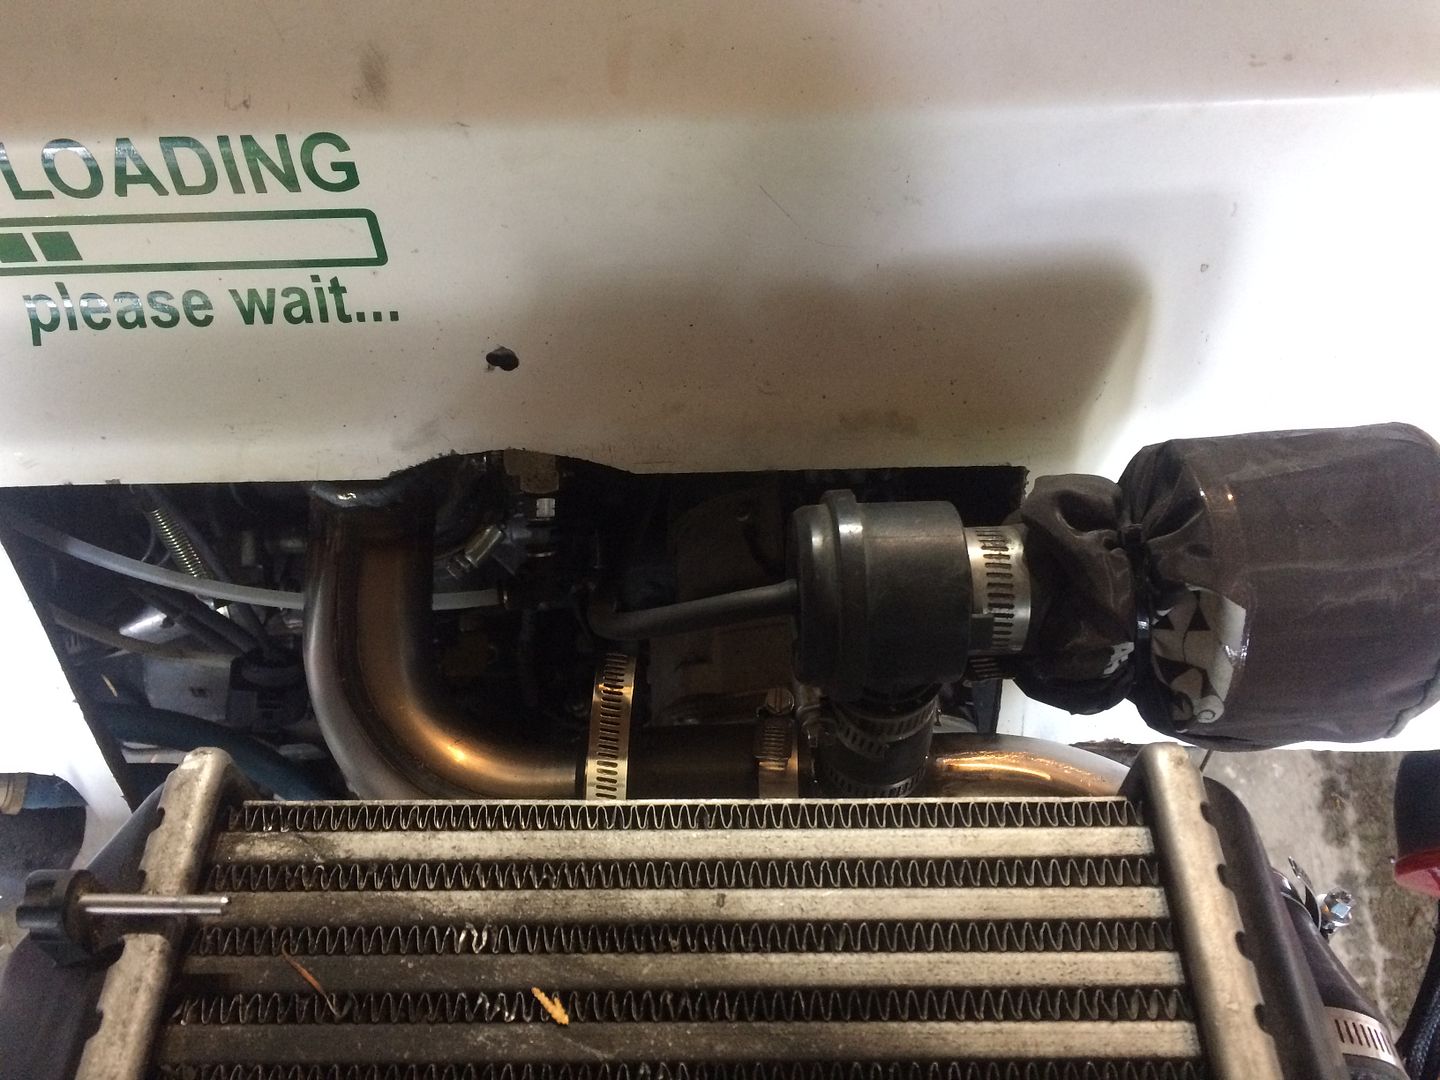
It will require a filter on it or dump it back into the intake before the turbo due to the fact it is really a bypass valve and is open a bit at idle depending on how much vacuum your engine will make at idle.
Also, I have the same BOV in your link sitting on a shelf in my garage if you are interested in it. PM me for more info.
As for the O2 sensor......yeah.....your'e going to need a long dump pipe to get good readings. Better yet is to add a decent muffler.
You can put the muffler along side the valve cover or in the fender....or just extend the dump pipe to go forward and dump by the back of the tire or 180 and come back again. You can then use a hanger on that to support the turbo.
Use a decent gauge of exhaust tubing so you have some strength in the support.
I have all my turbo junk hanging off my cheap sedan header and have had it like that for the above mentioned time and mileage. The exhaust has never cracked but I do have a couple braces supporting the intercooler that clamp onto the header crossover pipes. I also made a brace that supports the up-pipe and clamps to the #4 exhaust pipe to support the weight a bit. I never had any supports when I was just running a turbo without the intercooler.
The hose fittings on the cold side give it a little give for expansion and flex. The hot side is made with 16 ga. mild steel tubing bought from any mandrel bend store and the header is a cheap Empi style header that I have modified to use thicker flanges and also gotten rid of the doughnut connection on the 1/3 pipes. I ran them with donuts and thin flanges for years without issue and just used Copper Seal on the copper gaskets I installed.
It is leak free and sees 30 lbs. of back pressure at full boost.
Stripped66 wrote:The point wasn't to argue air temps with the current world record holder, but to dispel the claim that the K03 is wrapped up at 150 HP. It's not.
-
Clonebug
- Posts: 4756
- Joined: Thu Feb 15, 2007 9:28 pm
Re: Newbie Got a Basket Case
One more thing......if you do build a support like you have pictured....I would modify it to mount to the turbo flange bolts of the header instead of welding it to the collector. You might also put a flex joint in it using some thick rubber like an exhaust hanger.
Those pipes can glow bright red under a longer boost cycle so it wouldn't hurt to have some flex.
I myself think that the header is built strong enough to support the turbo weight along with a decent dump pipe. Just support the dump pipe with a rubber strapped exhaust hanger.
Those pipes can glow bright red under a longer boost cycle so it wouldn't hurt to have some flex.
I myself think that the header is built strong enough to support the turbo weight along with a decent dump pipe. Just support the dump pipe with a rubber strapped exhaust hanger.
Stripped66 wrote:The point wasn't to argue air temps with the current world record holder, but to dispel the claim that the K03 is wrapped up at 150 HP. It's not.