OK here is one more from my hurting brain?
Isn't there really 4 arcs in play?
Upper arm
Lower arm
Those two create the 3rd...the spindle/outer tie rod mount
and the 4th is the arc up and down that the tie rod itself travels.
That all together really just creates the two arcs that the outer tie rod mount travels on?
And I suppose the the inner mount is not exactly able to center on the pivot (axis? is that the right term?) because the beam is in the way...and that is what it needs to do to make those two play nice together?
Central WA Baja
-
CentralWAbaja
- Posts: 4291
- Joined: Fri Feb 05, 2010 9:05 pm
Re: Central WA Baja
It is not Mickey Moused.....It's Desert Engineered!
-
Ol'fogasaurus
- Posts: 17881
- Joined: Mon Nov 13, 2006 10:17 pm
Re: Central WA Baja
desertguy; If I understood, from his pictures, what he was doing to get his measurements (and I could have easily misunderstood what he was doing), it looked like he was using the/a flat on the spindle boss, not the bung itself to get his measurements. To edit down a maybe long confusing post; if the spindle bung is not in the proper relationship to the spindle itself (or the trailing arms are not up to spec) for any reason, it is going to change your tire reference points and possibly the answer you get from the measurements is it is not? As I remember, tire diameter or rim off-set can also change an answer depending on how picky you are in that area. My point was meant just a reminder to be sure to measure from the proper points… just in case.  I think he is going a great job of it and it is interesting to follow.
Lee
Lee
-
CentralWAbaja
- Posts: 4291
- Joined: Fri Feb 05, 2010 9:05 pm
Re: Central WA Baja
Update time.... I got a weekend to work on the baja 
Got started on fabrication of the front shock towers.
Glad to have this part finally coming together. After months of thinking about this part, I finally have something I like. It took a while to figure out just exactly where to locate this upper mount. Because I am not running a solid bump stop, I will be using the 3rd bypass circuit on the shock, set up extremely stiff to serve as a dampened bump stop. This means that the upper mount is very critical, in that I needed to make sure it will be using all of the travel of the shock at the compression end of the stroke, otherwise that circuit would not get to do it's job.
Then I had to position it front to rear so that the coilover springs do not bind on the beam or hit the tie rods. Also had to make sure that the bypass tubes don't interfere with the tie rods or get hit by the trailing arms. Oh yea can't forget about the piggyback reservoirs...need to make sure they don't hit anything either. (Wouldn't do those again, if I was starting from scratch) What a lot of crap to think about.
Started out by laying it out full scale on a piece of plywood

Got dad going on the lathe to make these

Couple pieces of angle with ears welded on and then clamped to the beam. Holes were drilled in the ears to accept a 1x.250 wall tube cut to length to space the shock bosses accurately. A couple pieces of 1/8 flat stock with holes drilled at the compressed length to position the boss up an down. And a piece of all thread to hold it all together.


After a couple hours on the Bend Tech program.... cutting paper wrappers.... a day and a half of cutting, bending and notching...This is what I have so far.


Next up.... fab the inner mounts for the double shear. After I mount the shocks and cycle them to make sure nothing hits....Yea haven't done that yet.
Oh yea... got the main cage tied into the rear torsion also...kinda helps give it an idea of the look it will end up with. Not to mention, I needed it to help keep things moving up front.


Got started on fabrication of the front shock towers.
Glad to have this part finally coming together. After months of thinking about this part, I finally have something I like. It took a while to figure out just exactly where to locate this upper mount. Because I am not running a solid bump stop, I will be using the 3rd bypass circuit on the shock, set up extremely stiff to serve as a dampened bump stop. This means that the upper mount is very critical, in that I needed to make sure it will be using all of the travel of the shock at the compression end of the stroke, otherwise that circuit would not get to do it's job.
Then I had to position it front to rear so that the coilover springs do not bind on the beam or hit the tie rods. Also had to make sure that the bypass tubes don't interfere with the tie rods or get hit by the trailing arms. Oh yea can't forget about the piggyback reservoirs...need to make sure they don't hit anything either. (Wouldn't do those again, if I was starting from scratch) What a lot of crap to think about.
Started out by laying it out full scale on a piece of plywood
Got dad going on the lathe to make these
Couple pieces of angle with ears welded on and then clamped to the beam. Holes were drilled in the ears to accept a 1x.250 wall tube cut to length to space the shock bosses accurately. A couple pieces of 1/8 flat stock with holes drilled at the compressed length to position the boss up an down. And a piece of all thread to hold it all together.
After a couple hours on the Bend Tech program.... cutting paper wrappers.... a day and a half of cutting, bending and notching...This is what I have so far.
Next up.... fab the inner mounts for the double shear. After I mount the shocks and cycle them to make sure nothing hits....Yea haven't done that yet.
Oh yea... got the main cage tied into the rear torsion also...kinda helps give it an idea of the look it will end up with. Not to mention, I needed it to help keep things moving up front.
It is not Mickey Moused.....It's Desert Engineered!
-
david58

- Moderator
- Posts: 14100
- Joined: Sun Oct 23, 2005 6:14 pm
Re: Central WA Baja
Very nice shock towers your car is really taking shape. I admire your fabrication skills. Now get back to work.
Hot, humid air is less dense than cooler, drier air. This can allow a golf ball to fly through the air with greater ease, as there won't be as much resistance on the ball.
-
Ol'fogasaurus
- Posts: 17881
- Joined: Mon Nov 13, 2006 10:17 pm
Re: Central WA Baja
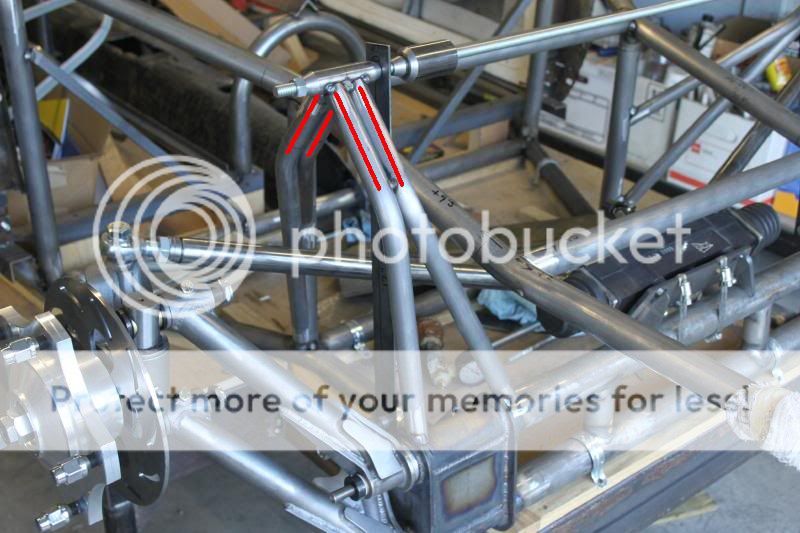
On the side view of your front end showing the mounts, you show a second (upper) tube support coming down and joining a vertical tube; about half way up it. Is there a reason you didn't go to the top of that tube and connect it to the "join area" there rather than connecting the support tube part way up the vertical tube? I think it would be a stronger join at the tube nest rather than putting a load in a less supported location in the middle of the tube. If a strong enough load came down those two tubes, even though you formed a triangle, I am pretty sure it would have a tendency to load up the upper tube, part way up the vertical tube, before the load went to the lower join.
Put your fists together in front of you (opposing each other), knuckle to knuckle, then push with both fists. Next, put your right fist (if you are right handed) against your left forearm and push with the right arm and try to support the load with your left arm. Notice the difference in what happens.
You sure are spending a lot of brain power on this. Good to see someone do it to this extent once-in-a-while. There have been some fantastic builds on this site and another one, with a little bit different approach, is fun to watch. Good job!
Reminds me of what I did when I still worked. Holey crud; I still get chills thinking about that.
Lee
(sorry about the emocons but I am in one of those moods today)
-
ajdenette

- Posts: 717
- Joined: Wed Jan 20, 2010 1:18 pm
Re: Central WA Baja
Lee i belive if you look at other photos of that area all 4 tubes on either side run from botom all the way to the top mount they just run paralell from half way to the top.
Great progress its looking great
Great progress its looking great
Alex
|_________oo_oo
/ /__/____[_____\
I I======[]IIIIIII[]
()_)-----()_)----)_)
|_________oo_oo
/ /__/____[_____\
I I======[]IIIIIII[]
()_)-----()_)----)_)
-
CentralWAbaja
- Posts: 4291
- Joined: Fri Feb 05, 2010 9:05 pm
Re: Central WA Baja
david58, ajdenette, Thanks for the compliment.
Lee, Thank you for the compliment as well. I appreciate your insight. Your posts here are probably half the reason I “over-think” my details…(my dads background is the other half) I mean that in a good way. Your background and knowledge is appreciated.
I do see what you are saying and with my structural/home building background, I think I understand pretty well about mid-span loading as you are commenting about. My thoughts in this case is that the longer 1 inch tube of the shock tower would give before the larger diameter, yet shorter 1-1/2 down tube of the main chassis.
I have seen a lot of pictures of the shock towers done a lot of different ways (on race cars as well as play cars)…this is just MY interpretation (version). I have seen a lot of them tying in at the top or bottom as well as the mid span. I chose to do the towers out of two 1 inch .120 tubes rather than one 1-1/2 tube like a lot of others that I have seen in pictures are done. Honestly I just thought it looked “Cool” and would probably be stronger with minimal increase in weight over a single 1-1/2.
I definitely do not have the math skills or the engineering background, to know for sure if I am correct. All I have is… just a gut feeling that it will be strong enough…. hopefully.
Now when I do the inner mounts, I will be doing something similar with the 1 inch tubing and the back ones will tie into the upper junction point that you are describing….you’ll see….next month…when I get to work on it again.
My thought is that the 2 mounts will work together to be a fairly strong set up?
Seriously…I welcome any and all comments on my design…as I have said before….I have never done this before and have never even seen one of these kind of cars in person. I truly do not know what I am doing…I just spend a lot of time thinking about this stuff, looking at pictures and reading informative (and not so informative) post here and elsewhere.
Thanks again
It is not Mickey Moused.....It's Desert Engineered!
-
Ol'fogasaurus
- Posts: 17881
- Joined: Mon Nov 13, 2006 10:17 pm
Re: Central WA Baja
Deleted
Last edited by Ol'fogasaurus on Mon Jul 19, 2010 9:16 pm, edited 1 time in total.
-
trackersteve

- Posts: 330
- Joined: Sat May 30, 2009 1:59 pm
Re: Central WA Baja
looking great!
How much wider is the body then stock?
How much longer is the body the stock?
How much wider is the body then stock?
How much longer is the body the stock?
-
CentralWAbaja
- Posts: 4291
- Joined: Fri Feb 05, 2010 9:05 pm
Re: Central WA Baja
Windshield is +4"trackersteve wrote:looking great!
How much wider is the body then stock?
How much longer is the body the stock?
Body at the back of doors is +6"
Back of the fenders is +4"
Kinda just exaggerated the stock lines a bit
No...I have no idea how I will widen the hood yet....don't have the brain power to spare to think about that yet. I am sure "We" (the STFrs) will figure that one out as the time gets closer
Added 8" to the length of the body behind the doors
Beam is pushed forward 6"
Wheelbase should come in around 110"
It is not Mickey Moused.....It's Desert Engineered!
-
Ol'fogasaurus
- Posts: 17881
- Joined: Mon Nov 13, 2006 10:17 pm
Re: Central WA Baja
Lookes like we are going to be at or near Moses Lake in a couple of weeks. No toys though.
Lee
Lee
-
560
- Posts: 986
- Joined: Mon Jul 12, 2010 12:08 am
Re: Central WA Baja
Great looking car, looking forward to more photo's with updates.
Mike
Mike
Jackpot motorsports
-
CentralWAbaja
- Posts: 4291
- Joined: Fri Feb 05, 2010 9:05 pm
Re: Central WA Baja
Tried to mount the shocks to cycle them....


So much for all that planning.....thinking......full size layout B.S.
These damn piggyback reservoirs are an absolute pain in the butt.
I definitely would not do piggybacks on the coilovers if I was starting from scratch.
They were part of the original parts purchase that got this project started
A "good deal" is a "good deal" I know.... but, I sure wish I would have had the shock guy switch those out to remote resi's, back when we re-valved these, and I bought the bypasses.
So I put the resi to the rear to see what would happen...hoping maybe that is what I was originally thinking of doing anyway?
And with about 1/2 inch of stroke left.....

The tie rod hits the resi That hurts the ego a bit.

OK....I cried for a few minutes and then started cutting tacks.
Went ahead and did a couple of braces to tie into the beam that I wanted to do anyway... and then reworked the one tube that was having the issue. Still able to keep the look I wanted and I think it will be fine now.
It cycles without any interference but I can still get the resi's to pivot over and hit/rub the tower. I don't know if this will be an issue while driving or not? Not sure how much they will move on the hiems. Don't need them rattling like a mofo.

I really just didn't want to s-can the whole shock mount design and start over.... but I did modify only one side for now....I guess I will noodle on it for now. Probably end up shipping the shocks back to be modified into remote resi's at some point...Think I''ll just wait till testing time.


So much for all that planning.....thinking......full size layout B.S.
These damn piggyback reservoirs are an absolute pain in the butt.
I definitely would not do piggybacks on the coilovers if I was starting from scratch.
They were part of the original parts purchase that got this project started
A "good deal" is a "good deal" I know.... but, I sure wish I would have had the shock guy switch those out to remote resi's, back when we re-valved these, and I bought the bypasses.
So I put the resi to the rear to see what would happen...hoping maybe that is what I was originally thinking of doing anyway?
And with about 1/2 inch of stroke left.....
The tie rod hits the resi
OK....I cried for a few minutes and then started cutting tacks.
Went ahead and did a couple of braces to tie into the beam that I wanted to do anyway... and then reworked the one tube that was having the issue. Still able to keep the look I wanted and I think it will be fine now.
It cycles without any interference but I can still get the resi's to pivot over and hit/rub the tower. I don't know if this will be an issue while driving or not? Not sure how much they will move on the hiems. Don't need them rattling like a mofo.
I really just didn't want to s-can the whole shock mount design and start over.... but I did modify only one side for now....I guess I will noodle on it for now. Probably end up shipping the shocks back to be modified into remote resi's at some point...Think I''ll just wait till testing time.
It is not Mickey Moused.....It's Desert Engineered!
-
Ol'fogasaurus
- Posts: 17881
- Joined: Mon Nov 13, 2006 10:17 pm
Re: Central WA Baja
It is good you only tacked things in place; I have a tendency to go to the other extreme and do a final weld (I get too excited). Also; a good deal is not necessarily a good deal if there is a problem with (in this case mounting) the good deal.
Most car guys I know have a bigger than normal ego and while some get it bruised once in a while; some don’t even notice and forge ahead without change;
“Damn the torpedoes…”. That you noticed something not right and are ready to move to correct it is a positive to you; ‘frustration be damned, lets fix it’ now is the positive lesson here. (The ego smoothing is now over )
)
I just went back and read the first part of your initial post and whew, it tired me out looking at the list of work that you have planned.
Looking over the last few sets of pictures, I can see where you say where your tie-rod problem is. Now that you have the real thing available to play with; did you go to full suspension hang and turn the spindles from lock to lock (via the R&P) as well as go to full suspension compression and do the same thing? Did you check things though the arc of travel too?
Questions:
• Why do you feel that need dual shocks in front anyway (not a belligerent question)? It looks impressive, but do you really need all of it? If you were doing all of this just for just looks then a walking arm style of shock and spring mount that some race cars have would be truly impressive (Rube Goldberg style if you please) and with the fuel tank in the rear, you would have room for it (not trying to be a smart ass here… well maybe a little ).
• Is your fuel 22 gallon cell going to stay in front or is it moving to the back of the car (there are good points for mounting it in either location)
Can you change to one shock per side which would (may) allow you to move the single shock out of the way of the suspension and steering linkage. Two shocks on a single stud are probably too much for the stud to handle in single shear.
Lee
Most car guys I know have a bigger than normal ego and while some get it bruised once in a while; some don’t even notice and forge ahead without change;
“Damn the torpedoes…”. That you noticed something not right and are ready to move to correct it is a positive to you; ‘frustration be damned, lets fix it’ now is the positive lesson here. (The ego smoothing is now over
I just went back and read the first part of your initial post and whew, it tired me out looking at the list of work that you have planned.
Looking over the last few sets of pictures, I can see where you say where your tie-rod problem is. Now that you have the real thing available to play with; did you go to full suspension hang and turn the spindles from lock to lock (via the R&P) as well as go to full suspension compression and do the same thing? Did you check things though the arc of travel too?
Questions:
• Why do you feel that need dual shocks in front anyway (not a belligerent question)? It looks impressive, but do you really need all of it? If you were doing all of this just for just looks then a walking arm style of shock and spring mount that some race cars have would be truly impressive (Rube Goldberg style if you please) and with the fuel tank in the rear, you would have room for it (not trying to be a smart ass here… well maybe a little
• Is your fuel 22 gallon cell going to stay in front or is it moving to the back of the car (there are good points for mounting it in either location)
Can you change to one shock per side which would (may) allow you to move the single shock out of the way of the suspension and steering linkage. Two shocks on a single stud are probably too much for the stud to handle in single shear.
Lee
-
CentralWAbaja
- Posts: 4291
- Joined: Fri Feb 05, 2010 9:05 pm
Re: Central WA Baja
Dual shocks?...mostly for adjustability...and... I will admit it. I think it looks "Cool"Ol'fogasaurus wrote: Questions:
• Why do you feel that need dual shocks in front anyway (not a belligerent question)? It looks impressive, but do you really need all of it? If you were doing all of this just for just looks then a walking arm style of shock and spring mount that some race cars have would be truly impressive (Rube Goldberg style if you please) and with the fuel tank in the rear, you would have room for it (not trying to be a smart ass here… well maybe a little
• Is your fuel 22 gallon cell going to stay in front or is it moving to the back of the car (there are good points for mounting it in either location)
Can you change to one shock per side which would (may) allow you to move the single shock out of the way of the suspension and steering linkage. Two shocks on a single stud are probably too much for the stud to handle in single shear.
Lee
Fuel cell? It will go directly behind seats as low as possible and still clear tunnel or shift rod....we'll see when we get there.
The single piggyback looked like it would have worked OK with the Tweeds beam that they came with. At this point a single shock option is not one I wish to explore...I will go back to the drawing board first.
And as far as single shear? That one can be debated a bit and has here a lot already.Probably gunna spend the $$$ on some high strength shear bolts and go with that for now.
Lastly yea I did cycle left & right as well as up and down and it all clears pretty well now.
It is not Mickey Moused.....It's Desert Engineered!