More info:
Throttle bodies
This topic is still kicked around a lot, here is some data of flow bench numbers of different throttle bodies and manifolds. As stated earlier in this thread above, if the engine's ability to draw more air into the cylinders(the part past the intake valves) is not enough to necessitate a bigger throttle body, you may be losing a huge amount of driveability/tuneability and or wasting money and time fitting something your engine cannot handle. Air flow is a very dark art and not an exact science, most times determined by trial and error. For example, take the case listed below of the weber center section by itself with no end castings which flows 181.5cfm, but with dual port end castings flow is increased to 186cfm. It may seem that in this case the manifold would see less restriction to the outside air by having no end castings at all, but the air is actually channeled through the end castings to give better flow. This is also the case with the Digifant throttle body which flows 393cfm by itself, but with a 3" intake pipe mounted it flows 404cfm.
Ford Throttle Bodies-
Size Make CFM flowed @ 28in. of mercury
60mm Ford 526 cfm
65mm AccuFab 616 cfm
70mm BBK 726 cfm
75mm AccuFab 845 cfm
90mm AccuFab 1190 cfm
90mm AccuFab 1225 cfm
Solex Carbs.-
Solex 30 PICT 2 – no choke assembly
71.8cfm @ 20.4in. of mercury
Solex 28 PICT
64.65cfm @ 20.4in.
Single port manifold
96cfm @ 20.4in.
Weber progressive carb. manifold center section
181.5cfm @ 20.4in.
Weber prog. center section with DP carb. end castings
186cfm @ 20.4in.
Weber prog. center section with ’75 bug EFI end castings
175cfm @ 20.4in.
Watercooled VW Progressive TBs(Rabbit, Golf, etc.):
Early rabbit/scirocco 32/40mm(with insert)
280.76cfm @ 10in. of mercury
Primary only – 51.42cfm @ 20.4in.
Early rabbit/scirocco 36/45mm
349.87cfm @ 10in.
Primary only – 72.59cfm @ 20.4in.
Digifant/post-'85 throttle body 35/52mm
393.2cfm @ 10in.
Primary only – 60.5cfm @ 20.4in.
Digifant throttle body with stock intake pipe
337cfm @ 10in.
Digifant throttle body with 3” intake pipe
404cfm @ 10in.
Late '70s bug throttle body size 45mm
Mexican late model bug throttle body 42mm
Vanagon 1.9 is 45mm, 2.1 is 50mm
CIS,Megasquirt, Bosch, or other FI conversion->Start here
-
Jadewombat

- Posts: 1447
- Joined: Sat Jun 22, 2002 12:01 am
Last edited by Jadewombat on Sat Aug 17, 2013 5:47 am, edited 3 times in total.
-
Canuck70Ghia
- Posts: 102
- Joined: Sat Oct 25, 2008 1:10 pm
Mexican Conversion
One great thing about stock parts is the lack of hassle in assembly and fit out. This cuts down dramatically on assembly time, maintenance costs and time and general fitting issues. All of the words above are wonderful, and I have read them and used every scrap of knowledge available here in this forum and in others to come up with a reasonable and budget minded EFI conversion. Here is a list of what has worked for me:
Carb Conversion to EFI
Mexican Dual Tube Fuel Injection Manifolds
Mexican Dual Tube Plenum
Mexican VW Throttle Body (IAT and TPS sensors included)
MegaSquirt-II Engine Management System w/PCB3
MegaSquirt Relay Board
MegaSquirt-I or II Relay Cable
MegaSquirt Wiring Bundle - 23" Long
Mexican VW Digital Distributor with Hall Sensor
Weld Bung for O2 Sensor
O2 Sensor
Cylinder Head Temperature Sensor
Mexican VW EFI Ignition Module and Coil
Mexican VW Fuel Regulator
Fuel Injector Pigtails - Bosch EV1
24 lb/hr EV1 Style Fuel Injector
Mexican VW Plastic Fuel Rails
Used Engine Idle valve - Mexican VW
Used Fuel Pump - Mexican VW
Ignition Coil Sensor Connectors, seals and Housing (VW NA)
HAL Sensor Connectors, seals and Housing (VW NA)
TPS Sensor Connectors, seals and Housing (VW NA)
IAT Sensor Connectors, seals and Housing (VW NA)
Stock Mexican High Pressure VW Fuel Line system
Next spring I will send pictures of the whole setup but you can get a taste of the process and price from the above list. Total cost is around $2000USD and many of the parts can be found at the local VW dealership. Here is a hint: The 1993 NA Passat had very similar components...
-
Jadewombat
- Posts: 1447
- Joined: Sat Jun 22, 2002 12:01 am
Some popular recurring discussions:
Make Your Own Digifant Test Tool 1986-1991
Weld-in Injector Bungs
Crank Trigger/EDIS related, VR Sensor Mounting
Hall Effect Sensor with Flywheel
Megajolt/EDIS Install notes
Motorcycle throttle bodies
DIY Fuel Injector testor/cleaner
Center mount setup, Center mount,
Dual throttle bodies vs. center mount
Motorcycle Throttle Bodies
Adapting L-jet system
DIY fitting of CIS injectors with L-jet manifolds
T3-T4 D-Jet Manual
Cable linkage how-to for dual throttle bodies or carbs (instead of running linkage arms)
Easy fuel return line without having to modify the gas tank
Vanagon Injector info.
Last edited by Jadewombat on Tue Feb 10, 2015 1:46 pm, edited 19 times in total.
-
sandrail2k
- Posts: 228
- Joined: Tue May 05, 2009 6:59 am
For Everyone's Information
I am running this intake on my rail:
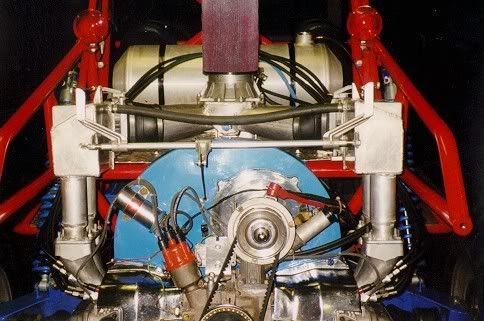
Not a copy, this EXACT system.
It used to be on the red rail in this pic, it has been on mine for years.
I love it.
I ran it on my 2110 (mid cam 044 heads), I now have a stock 1600.
I still love it.
If you have any questions about it, please ask.
sandrail2k
I am running this intake on my rail:
Not a copy, this EXACT system.
It used to be on the red rail in this pic, it has been on mine for years.
I love it.
I ran it on my 2110 (mid cam 044 heads), I now have a stock 1600.
I still love it.
If you have any questions about it, please ask.
sandrail2k
-
Svwerker
- Posts: 6
- Joined: Mon Sep 01, 2003 12:59 pm
Re: CIS,Megasquirt, Bosch, or other FI conversion->Start here
Wow. A pic on my K-jetronic 1835!
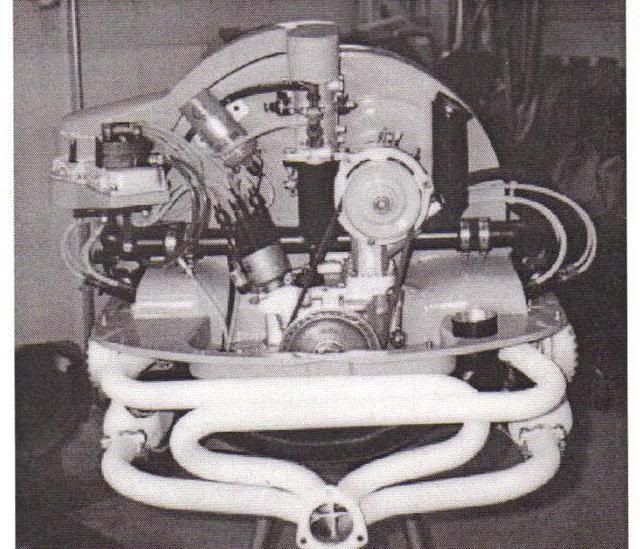
This engine lost its injection and got a pair of IDA's after a year of struggling.
This engine lost its injection and got a pair of IDA's after a year of struggling.
Last edited by Svwerker on Sat Apr 03, 2010 1:28 am, edited 1 time in total.
-
Frick

- Posts: 13
- Joined: Mon Feb 25, 2002 12:01 am
Re: CIS,Megasquirt, Bosch, or other FI conversion->Start here
And I know where the exhaust system found a new home... 
-
alex77
- Posts: 10
- Joined: Tue Sep 14, 2010 3:30 am
Re: CIS,Megasquirt, Bosch, or other FI conversion->Start here
I'm in the process to start my CIS Basic system on 1641 hydraulic lifter vw thing
i just need to get the 75 and later end castings but i just wanted to know if any of you guys have the the wiring diagram so i can fabricate it
i just need to get the 75 and later end castings but i just wanted to know if any of you guys have the the wiring diagram so i can fabricate it
-
helowrench
- Posts: 1925
- Joined: Wed Aug 11, 2004 6:20 am
Re: CIS,Megasquirt, Bosch, or other FI conversion->Start here
what wires?alex77 wrote:I'm in the process to start my CIS Basic system on 1641 hydraulic lifter vw thing
i just need to get the 75 and later end castings but i just wanted to know if any of you guys have the the wiring diagram so i can fabricate it
CIS basic only has a few.
Calling Ray Greenwood and Piledriver
-
alex77
- Posts: 10
- Joined: Tue Sep 14, 2010 3:30 am
Re: CIS,Megasquirt, Bosch, or other FI conversion->Start here
yes I know but i dont have the wire harnes And the fuel pump relay so i just need to know how to wire itwhat wires?
CIS basic only has a few.
-
helowrench
- Posts: 1925
- Joined: Wed Aug 11, 2004 6:20 am
Re: CIS,Megasquirt, Bosch, or other FI conversion->Start here
since this is a information thread, why don't you start your own thread so we do not clutter this one up?
Rob
Rob
-
alex77
- Posts: 10
- Joined: Tue Sep 14, 2010 3:30 am
Re: CIS,Megasquirt, Bosch, or other FI conversion->Start here
helowrench wrote:since this is a information thread, why don't you start your own thread so we do not clutter this one up?
Rob
if this is an information thread that covers the FI conversion why not post the how to wire or make your own
I´m just asking if they have the wiring diagram to wire the cold start valve, fuel pump, fuel pump relay, warm up regulator and thermo time switch.
-
Piledriver

- Moderator
- Posts: 22753
- Joined: Sat Feb 16, 2002 12:01 am
Re: CIS,Megasquirt, Bosch, or other FI conversion->Start here
This is a generic FI intro thread--- Sort of a welcome mat. 
For detailed questions/info, perhaps put a link to your thread here...
For detailed questions/info, perhaps put a link to your thread here...
Addendum to Newtons first law:
zero vehicles on jackstands, square gets a fresh 090 and 1911, cabby gets a blower.
EZ3.6 Vanagon after that.(mounted, needs everything finished) then Creamsicle.
zero vehicles on jackstands, square gets a fresh 090 and 1911, cabby gets a blower.
EZ3.6 Vanagon after that.(mounted, needs everything finished) then Creamsicle.
-
helowrench
- Posts: 1925
- Joined: Wed Aug 11, 2004 6:20 am
Re: CIS,Megasquirt, Bosch, or other FI conversion->Start here
that way your specific q's can be covered, and yes please link it here.Piledriver wrote:This is a generic FI intro thread--- Sort of a welcome mat.
For detailed questions/info, perhaps put a link to your thread here...
Rob
-
Piledriver
- Moderator
- Posts: 22753
- Joined: Sat Feb 16, 2002 12:01 am
Re: CIS,Megasquirt, Bosch, or other FI conversion->Start here
General FI fuel system layout/fab info...
http://fordfuelinjection.com/?p=95
good basic info.
Gaze in wonder at the $70 fuel filter/accumulator//sump...

It's a ~$10 remote oil filter mount with a high capacity (oil filter like) screw-on fuel filter attached, in and out fittings, with a third (and should be 4th...) return line.
This is fed by a low pressure fuel pump, like for a carb, a clacker pump will keep it full fine. The TANK return here is to send any air/vapor back to the tank with the excess low pressure fuel, and air away from the high pressure pump feed.
(The Bosch sump from a Mk1 Golf cabby/VW fox etc for ~$25 does the same thing, but this idea adds a nice huge fuel filter in the right place, and this skips ~8 hose clamps and rubber lines)
If your fuel tank does NOT have a return... It's MOSTLY OK to hook the return from the sump to the tank to the filler neck ... 1/4" line is fine for THIS low volume "vent/tank return" loop... filler neck not ideal as you will get more evaporation in tank, it really should return under liquid level.
The high pressure side is then easy... from sump outlet, to HP fuel pump, through fuel rails, back to top of sump.
The high pressure loop (most of the fuel flow) goes back to the SUMP and recirculates.
Any vapor or air in the HP loop "floats" and is shoved back to the tank via the low pressure/volume return line.
Metal brake line/fittings makes for AWESOME fuel line, only use the rubber EFI line where required, and try to keep the number of clamps to an absolute minimum.
For example, that fuel sump, hard mounted as it should be, can and should be connected with hardline and NPT fittings... Only use that $5/ft EFI rubber hose/clamps where flex is required for movement or for service loop.
A "double" bubble flare tool is great for putting a bubble end on the steel line the clamp/hose will not slide past under pressure. You can usually borrow/rent one from an auto parts place.
(IMHO) ONLY buy IDEAL EFI hose clamps, OReillys and NAPA sell them, they cost the same as worm gear std steel hose clamps... do not use the "cheap" ones, most will make you swear and can burn down your car.
http://fordfuelinjection.com/?p=95
good basic info.
Gaze in wonder at the $70 fuel filter/accumulator//sump...
It's a ~$10 remote oil filter mount with a high capacity (oil filter like) screw-on fuel filter attached, in and out fittings, with a third (and should be 4th...) return line.
This is fed by a low pressure fuel pump, like for a carb, a clacker pump will keep it full fine. The TANK return here is to send any air/vapor back to the tank with the excess low pressure fuel, and air away from the high pressure pump feed.
(The Bosch sump from a Mk1 Golf cabby/VW fox etc for ~$25 does the same thing, but this idea adds a nice huge fuel filter in the right place, and this skips ~8 hose clamps and rubber lines)
If your fuel tank does NOT have a return... It's MOSTLY OK to hook the return from the sump to the tank to the filler neck ... 1/4" line is fine for THIS low volume "vent/tank return" loop... filler neck not ideal as you will get more evaporation in tank, it really should return under liquid level.
The high pressure side is then easy... from sump outlet, to HP fuel pump, through fuel rails, back to top of sump.
The high pressure loop (most of the fuel flow) goes back to the SUMP and recirculates.
Any vapor or air in the HP loop "floats" and is shoved back to the tank via the low pressure/volume return line.
Metal brake line/fittings makes for AWESOME fuel line, only use the rubber EFI line where required, and try to keep the number of clamps to an absolute minimum.
For example, that fuel sump, hard mounted as it should be, can and should be connected with hardline and NPT fittings... Only use that $5/ft EFI rubber hose/clamps where flex is required for movement or for service loop.
A "double" bubble flare tool is great for putting a bubble end on the steel line the clamp/hose will not slide past under pressure. You can usually borrow/rent one from an auto parts place.
(IMHO) ONLY buy IDEAL EFI hose clamps, OReillys and NAPA sell them, they cost the same as worm gear std steel hose clamps... do not use the "cheap" ones, most will make you swear and can burn down your car.
Addendum to Newtons first law:
zero vehicles on jackstands, square gets a fresh 090 and 1911, cabby gets a blower.
EZ3.6 Vanagon after that.(mounted, needs everything finished) then Creamsicle.
zero vehicles on jackstands, square gets a fresh 090 and 1911, cabby gets a blower.
EZ3.6 Vanagon after that.(mounted, needs everything finished) then Creamsicle.
-
alex77
- Posts: 10
- Joined: Tue Sep 14, 2010 3:30 am