Be careful what yu are looking at. $50+ is the going rate for a complete assymmetrical assembly...which is not needed. You just need teh bearing cartridge. At one point in time, they were available as rubber donut and bearing seperate. Its nor,ally $85 for early symmetrical bonded bushings...which are worthless in the long run.
Oh...here it is:
www.rockauto.com
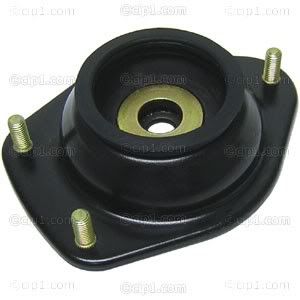
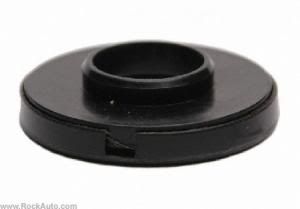
Part# 5201053 (raybestos) Strut bearing plate insulator (the rubber donut bushing for the assymetrical assembly) $6.66 each
Part # 901941 Bushing assembly with bearing....includes the above part and a new bearing cup. $17.67 each.
This was under rthe listing for 1976 VW superbeetle. Same parts. Ray
Ray
upper strut assembly
-
herr_sparky
- Posts: 145
- Joined: Wed Oct 24, 2001 1:01 am
sweet... i knew they had to be available somewhere. i figured on buying the whole assembly because i need the white friction ring too...although in the pictures it looks like it might be rubber now. dunno, its black.
wildthings: do you mean Milwaukie, OR? D.I. on 99E? forgot about them...didnt know you were a local...
EDIT: cip1.com just put these on sale at only $35 (with free shipping)... couldnt pass that up:
http://www2.cip1.com/ProductDetails.asp ... C-C10-4023
wildthings: do you mean Milwaukie, OR? D.I. on 99E? forgot about them...didnt know you were a local...
EDIT: cip1.com just put these on sale at only $35 (with free shipping)... couldnt pass that up:
http://www2.cip1.com/ProductDetails.asp ... C-C10-4023
-
raygreenwood

- Posts: 11907
- Joined: Wed Jan 22, 2003 12:01 am
-
herr_sparky
- Posts: 145
- Joined: Wed Oct 24, 2001 1:01 am
i'm going to try to find the Mazda bearing locally...rockauto wants $16 for shipping...!
i found this post on a mazda forum about them:
http://www.mx6.com/forums/uk-lounge/113 ... rings.html
a user posted two different part #s:
early models (92 - 94) GA2A-34-38XA
late models (94 on) GA5R-34-38X
rockauto, however, lists the same replacement part for both groups of model years and both models (626 & MX6)
for clarification: once installed with the milled out spring plate, the bearing cone will rest directly on the shoulder of the strut rod, and its skirt will rest against the top of the Mazda bearing, right? this should shorten the necessary length of the threads by 20-some mm...
-
raygreenwood
- Posts: 11907
- Joined: Wed Jan 22, 2003 12:01 am
-
herr_sparky
- Posts: 145
- Joined: Wed Oct 24, 2001 1:01 am
-
raygreenwood
- Posts: 11907
- Joined: Wed Jan 22, 2003 12:01 am
-
herr_sparky
- Posts: 145
- Joined: Wed Oct 24, 2001 1:01 am
i've discovered a problem with using the Mazda bearing/bored-out spring plate: it eliminates the bump stop & bushing, since the damper shaft now passes completely through the spring plate/mazda bearing and its shoulder rests directly against the inner race of the strut mount/bearing. so what about an aftermarket bump stop/bellows? i thought i'd look at what the 626 uses, since the shaft diameter is the same, but its actuall been difficult to find a good exploded diagram to see how everything fits together. i did find that the Ford Probe from the same years shared some of these parts, so this is what its struts look like (#4 being the plastic thrust bearing):

and the OE replacement bumper/bellows:

it looks to me like the 626/probe bellows clamp to some large-diameter ring or lip on the underside of the upper spring plate (#5) and the bumper sits down at the bottom, against the face of the cap on the strut body... so without some large diameter to clamp to, it wouldnt work with the other mods, but i wonder if it would be useful as a replacement for the stock bellows...
 anyway... ideas for a bump stop/bellows arrangement for a bare 22mm shaft? screwed to the plate? maybe an extra long bellows that has enough "spring" to it to keep it in place between the spring seats?
also: the distance between the spring seats was indeed roughly 11", and i actually ran out of threads on the compressor before all the tension was released... the coil's free length once removed from the strut assembly was also a little short...around 17" (probably a result of running with 180lbs of ballast for the last 10 years ), so the preload was in fact the seemingly excessive 6"...
my curiosity is this: every post i can find on this topic says the assembled distance between spring seats should be somewhere in the upper 'teens (lots of variation), resulting in a moderate pre-compression of just a few inches...can anyone supply the actual, stock dimension? i would like to figure out if my existing setup is fundamentally flawed before i duplicate the spring seat distance for the new Audi cartridges...
and the OE replacement bumper/bellows:
it looks to me like the 626/probe bellows clamp to some large-diameter ring or lip on the underside of the upper spring plate (#5) and the bumper sits down at the bottom, against the face of the cap on the strut body... so without some large diameter to clamp to, it wouldnt work with the other mods, but i wonder if it would be useful as a replacement for the stock bellows...
also: the distance between the spring seats was indeed roughly 11", and i actually ran out of threads on the compressor before all the tension was released... the coil's free length once removed from the strut assembly was also a little short...around 17" (probably a result of running with 180lbs of ballast for the last 10 years
-
btectonic
- Posts: 41
- Joined: Sun Jul 20, 2008 9:38 am
Sparky, I can't claim to be an expert here, but I've been digging thru past threads on this and Ray was quoted as once having said:
Lahti411....in looking at your renderings...you are not too far off. You end up with a shorter stroke on the strut rod than stock has...because you don't need it.
The 411/412 NEVER bottoms out its bump stop. Its physically impossible because the strut rod itself bottoms out in the casing before that happens. The 411/412 uses a grand total of about 4.5" of stroke even at extremes.
On the Audi strut......you have more than enough especially since the audi strut is stiffer and your spring now has more pre-compression. Ray
that's here:
http://www.shoptalkforums.com/viewtopic.php?t=107415
Your blog is great, thanks for that. All this work is in my future so I appreciate the documentation. And of course thanks to Ray.
-
herr_sparky
- Posts: 145
- Joined: Wed Oct 24, 2001 1:01 am
thanks for the feedback... i'm mostly concerned with having the bellows. leaving them out would be like running a suspension fork without boots and i dont do that either...
yep...read that one, too. (there are soooo many). there actually seems to be so much variation in each persons experience and opinion that i've more or less decided to just go on what i observe with what i have, rather than try to replicate someone elses method.
here's what i noticed about the bump stop issue: if you assemble a strut (using the KYB) minus the coil (so really just the bump stop & its bushing and the rest of the upper assembly), then push the damper all the way down till it stops, it does indeed run out of travel just as the rubber is about to touch the cap on top of the strut. however, this is not the case with the OEM damper (mine at least, they're actually replacement BOGEs)... it still has plenty of travel left...
either way, maybe the coils would "pack up" and prevent any more compression by then...at least with what i'm working with, that is. after 4-5" of travel the spring seats are are only 5" apart... dunno.
Sparky, I can't claim to be an expert here, but I've been digging thru past threads on this and Ray was quoted as once having said:
Lahti411....in looking at your renderings...you are not too far off. You end up with a shorter stroke on the strut rod than stock has...because you don't need it.
The 411/412 NEVER bottoms out its bump stop. Its physically impossible because the strut rod itself bottoms out in the casing before that happens. The 411/412 uses a grand total of about 4.5" of stroke even at extremes.
On the Audi strut......you have more than enough especially since the audi strut is stiffer and your spring now has more pre-compression. Ray
yep...read that one, too. (there are soooo many). there actually seems to be so much variation in each persons experience and opinion that i've more or less decided to just go on what i observe with what i have, rather than try to replicate someone elses method.
here's what i noticed about the bump stop issue: if you assemble a strut (using the KYB) minus the coil (so really just the bump stop & its bushing and the rest of the upper assembly), then push the damper all the way down till it stops, it does indeed run out of travel just as the rubber is about to touch the cap on top of the strut. however, this is not the case with the OEM damper (mine at least, they're actually replacement BOGEs)... it still has plenty of travel left...
either way, maybe the coils would "pack up" and prevent any more compression by then...at least with what i'm working with, that is. after 4-5" of travel the spring seats are are only 5" apart... dunno.
-
raygreenwood
- Posts: 11907
- Joined: Wed Jan 22, 2003 12:01 am
I am back intown. I will have to find my original drawings. Also, I will have to ask a bit about your springs. I should have some spares...and need to dig them out to measure the uncompresssed length. Bear with me. My car is a long way from here.
I will have a drawing of the spacing diffrences you will need to have by tommorrow. Yes.....I had forgotten that adding the Mazda spacer gets rid of the bump stop. I have aftermarkets on mine....they work better than stock.
You will need to have two bushings made (bronze or brass is fine)....that are shaft diameter....that slip onto the narrow part of the shaft.
There are several measurements that go into obtaing the length:
(a) The thickness of the top spring plate
(b) The length of the existing bump stop bushing that originally was bearing upon the underside of the spring plate....measure from the inside step where it contacts the shaft step...and the top where it contacts the plate.
(c) The distance from the face of the bearing itself...and the depth of the cad plated conical cup where the outer edges contact the mazda bearing.
These three measurements added together are the length of the bushing.
Bear in mind that the factory replacment strut kits all had a slip on 15mm bushing like this of steel to spacer the steel bump stop holder bushing out for early or late usage. We are maing a longer version of that. This bushing is whatwill bearing against the ID of the Mazda bearing and keep proper strut spring spacing.
Just off the top of my head that bushing is about 2" long. I will get exact for you.
Don't leave the bellows out. Aftermarkets are simple to attache by means of trimming the upper end of the stop and mounting a washer under the bushing we are describing above to from a ledge for the bump stop to sit on.
Its worth it to bear in mind....somewher long ago...I noted that my bushings (for teh bump stops) were trimmed a small amount (by grinder) to give a little more spring compression. They easily corce their way to the top of the bump stop cavity. Some people did this, others id not. Some used teh stock 15mm spacer, others did not. Some used a late bearing, others did not. Some used thicker washers on top and bottom of strut bearing...others did not.
This is why you get a myriad of finished mearuerments that can vary by an inch or so.
Its also why...I have repeatedly told all......that you must first measure your car.
(a) how much too high out of level (with normal trunk contents like spare tire and average tools and at least 1/2 tank of gas)...is YOUR ar. They are all slightly different. This is measured at the rocker panel seam right at the trailing edge of the front fender. Make sure tires are aired properly and rear shocks are in good shape.
(b) Knowing this measurment you now know how far your front end needs to drop. The actual weight of the car does not compress the front strut springs very much at all.
(c) Measuere the assembled strut spring height with car weight on it...and then with car jacked up. Its common even with low pressure gas...that if your cars weight compresses your front springs an inch at rest...if that....it will compress them about teh sam when reassembled.
So if you measure and decide you need to drop almost an inch in the front end....common.....and your assembled but unloaded strut reads say...16" from plate to plate.....you need to remove 1". Thats what teh strut stub is desigend to do.
If your trunk weight is a little less and your springs a little stronger...you may need a little more drop. You can take up to 1/2" away at the stock steel bump stop bushing with grinding. Just make them equal. You can get another 1/4" with various combinations of wahers at the bearing. The late assymetrical bearing is more different still.
The origianal set height and assembled length of your struts are a crucial measurement....to see what adjustments you need.
Hang on...we will get you straightened out.
Is there a color code dot of paint on your springs near one end. Usually blue or yellow? Ray
-
herr_sparky
- Posts: 145
- Joined: Wed Oct 24, 2001 1:01 am
AHA! i knew you had to be out there somewhere...
it looks like i wrote 13.7mm for the skirt depth, and 5mm for the spring plate thickness, and 50mm for the bump stop bushing depth (between seats, as you describe).
also, the tank has only a couple gallons in it and the condition of the rear shocks is basically unknown. they dont leak or make any noises, and there seems to be some rebound control. thats all i really know right now. the tires were all aired, though.
(b) i guess i've averaged everything together, including what my subjective eyeballs tell me, and decided on around 1". not more than 1 1/2". i plan on making minor adjustments with a stack of forged washers...
(c) unfortunately i never measured this when the car was not off the ground, only on stands. i measured both when the strut was still installed and when it was removed but still assembled. it was a range of 10 3/4" - 10 7/8" depending on where i was measuring from because of the way the lower perch is "warped"...know what i mean?
good to have you back, i was starting to think you had given up on us...
P.S. if you're up for it, this link will provide much more detail...
yes, i've made all these measurements, although roughly just for the sake of comparison. i'm actually trying to find a simple (free/cheap) vectorial drawing application for my mac so i can draw up my chicken-scratch into a legible picture...You will need to have two bushings made (bronze or brass is fine)....that are shaft diameter....that slip onto the narrow part of the shaft.
There are several measurements that go into obtaing the length:
(a) The thickness of the top spring plate
(b) The length of the existing bump stop bushing that originally was bearing upon the underside of the spring plate....measure from the inside step where it contacts the shaft step...and the top where it contacts the plate.
(c) The distance from the face of the bearing itself...and the depth of the cad plated conical cup where the outer edges contact the mazda bearing.
it looks like i wrote 13.7mm for the skirt depth, and 5mm for the spring plate thickness, and 50mm for the bump stop bushing depth (between seats, as you describe).
what did you use? there are so many to choose from...Don't leave the bellows out. Aftermarkets are simple to attache by means of trimming the upper end of the stop and mounting a washer under the bushing we are describing above to from a ledge for the bump stop to sit on
(a) this measurement was taken at points a little closer to center, like where there was a seam in the body, so the difference was smallish: about 1/2". i also measured at the bumpers, although i couldnt verify they were mounted level with eachother (in the same plane, i guess), and the difference was 1 1/8".Its also why...I have repeatedly told all......that you must first measure your car.
(a) how much too high out of level (with normal trunk contents like spare tire and average tools and at least 1/2 tank of gas)...is YOUR ar. They are all slightly different. This is measured at the rocker panel seam right at the trailing edge of the front fender. Make sure tires are aired properly and rear shocks are in good shape.
(b) Knowing this measurment you now know how far your front end needs to drop. The actual weight of the car does not compress the front strut springs very much at all.
(c) Measuere the assembled strut spring height with car weight on it...and then with car jacked up. Its common even with low pressure gas...that if your cars weight compresses your front springs an inch at rest...if that....it will compress them about teh sam when reassembled.
also, the tank has only a couple gallons in it and the condition of the rear shocks is basically unknown. they dont leak or make any noises, and there seems to be some rebound control. thats all i really know right now. the tires were all aired, though.
(b) i guess i've averaged everything together, including what my subjective eyeballs tell me, and decided on around 1". not more than 1 1/2". i plan on making minor adjustments with a stack of forged washers...
(c) unfortunately i never measured this when the car was not off the ground, only on stands. i measured both when the strut was still installed and when it was removed but still assembled. it was a range of 10 3/4" - 10 7/8" depending on where i was measuring from because of the way the lower perch is "warped"...know what i mean?
both my spring sets are blue, although the ones that came out of this car (as opposed to the '74 parts car) are about 1/2" shorter and the actual color of blue is a little lighter...probably nothing...Is there a color code dot of paint on your springs near one end. Usually blue or yellow?
i'm (still) perplexed by this measurement...there are so many other posts/threads that state a distance like 16" or so...yet mine is so much less (~11")... i suppose that ultimately it doesnt matter what other cars measure since thats not what i'm working with.......and your assembled but unloaded strut reads say...16" from plate to plate....
good to have you back, i was starting to think you had given up on us...
P.S. if you're up for it, this link will provide much more detail...
-
raygreenwood
- Posts: 11907
- Joined: Wed Jan 22, 2003 12:01 am
-
herr_sparky
- Posts: 145
- Joined: Wed Oct 24, 2001 1:01 am
yep, i'm still working out its dimensions...i actually sent you a PM about it a while back...
my latest idea, now that i've confirmed that i must have one, is to fashion an extension/stub that has an integrated lip or shoulder for a bumper/bellows combo so that its all one piece that threads on. but to do that i have to settle on what aftermarket bumper/bellows i'm using...still shopping around.
also, i havent yet found a source locally for the Mazda bearing that isnt over $20 apiece, so i guess i'll just go with rockauto.com a swallow their $16 shipping, then i can finally have the plates bored and start trial-fitting all this stuff...
thanks...
-
Lahti411
- Posts: 127
- Joined: Sat Jan 29, 2005 2:23 pm
I made my upper adapters by cutting them out from an original type4 front shock absorber. This way you'll have the correct shank dimensions automatically. Then you only have to leave enough material for the inner thread, where the Audi cartridge screws in. If i remember correctly the thicker, lower part of the adapter was 62mm long and the inner thread was 42mm deep. The hole you need to drill inside the adapter has to be something like 52 mm deep, so there's enough room to make the thread.
If you don't have the original front shocks, check that the shock absorber saft you are cutting, has the same thicknes in diameter than the Audi shock has. I think the thicknes was 22mm in diameter. I've seen some aftermarket replacement shocks that had thinner shaft diameter and wouldn't have enough material to work on.
If you don't have the original front shocks, check that the shock absorber saft you are cutting, has the same thicknes in diameter than the Audi shock has. I think the thicknes was 22mm in diameter. I've seen some aftermarket replacement shocks that had thinner shaft diameter and wouldn't have enough material to work on.