Yes...I have seen the thinner strut rods too. I think Boge and F&S were those.
The one issue ...depending on brand...about drilling stock strut rod...is that its hard, hard, hard...metal. It can be especially hard to thread I had mine made of 01 tool steel.
The whole object of the Mazda 626 bearing is to allow the strut rod to turn through the upper plate...so that the spring assembly does not ever bind and load up by twisting. It makes steering slightly easier and smoother...and allows slightly tighter settings on idler bushing and the use of stronger steering dampers without an assoicated increase in steering difficulty.
The only thing I am 100% sure about for all application...without the mazda mod....is that the stub dimension I sent out...will properly lower teh front end of teh car about 1" when using the Audi 80/4000 cartridge.
When finding other brands of strut cartridge other than the KYB Gr-2 low pressure gas...just make sure that the yare low preessure gas or oil...and not high pressure gas like the KYB gas-a-just models. Those are waaaay too stiff.
We can only hope...that all of the manufactureres are following the same valving proportionality rules for each make of car. One strut can be stiffer than another in actual force level.....like the difference between oil, low pressure and high pressure even in the same make....but the proportionality of rebound to compression and the weight loading its designed for should be the same. Ray
upper strut assembly
-
Lahti411
- Posts: 127
- Joined: Sat Jan 29, 2005 2:23 pm
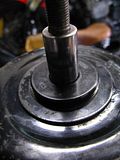
I was slightly worried how hard the metal is going to be but desided to try anyway. Atleast the original VW part had only hard-chrome plated (not sure about the exact english term) surface and the metal inside felt like normal tool steel, or maybe just slightly harder.
I bought new thread tool, as i didn't have the needed fine threaded one, so making threads wasn't hard at all. And ofcourse i was very careful with the lathe -if the new thread tool would have snapped into the adapter, i would have lost them both...
I bought new thread tool, as i didn't have the needed fine threaded one, so making threads wasn't hard at all. And ofcourse i was very careful with the lathe -if the new thread tool would have snapped into the adapter, i would have lost them both...
Last edited by Lahti411 on Thu Apr 02, 2009 11:25 am, edited 1 time in total.
-
raygreenwood

- Posts: 11907
- Joined: Wed Jan 22, 2003 12:01 am
-
herr_sparky
- Posts: 145
- Joined: Wed Oct 24, 2001 1:01 am
i would definitely go that route if i was reusing the same mounts/etc., but since i'm converting to the late-model asym. style and the Mazda bearing, i only need the 42mm of thread...I made my upper adapters by cutting them out from an original type4 front shock absorber. This way you'll have the correct shank dimensions automatically. Then you only have to leave enough material for the inner thread, where the Audi cartridge screws in. If i remember correctly the thicker, lower part of the adapter was 62mm long and the inner thread was 42mm deep. The hole you need to drill inside the adapter has to be something like 52 mm deep, so there's enough room to make the thread.
-
raygreenwood
- Posts: 11907
- Joined: Wed Jan 22, 2003 12:01 am
Mmmmm. No....you will need some strut rod length length as well....if you are using the Audi strut cartridge. It is just too short.
In reality the stub I made was designed to replicate the exact length and step of the stock cartridge...to use all stock parts....minus 1" of strut rod length.
The mazda modification...by letting the strut rod pas through changes the equation by requiring the step on the stub to be farther up to pass through the plate and mazda bearing and reach the bottom of the ball bearing...without letting the spring extend any further than the stock length minus 1" the the original stub modification set up.
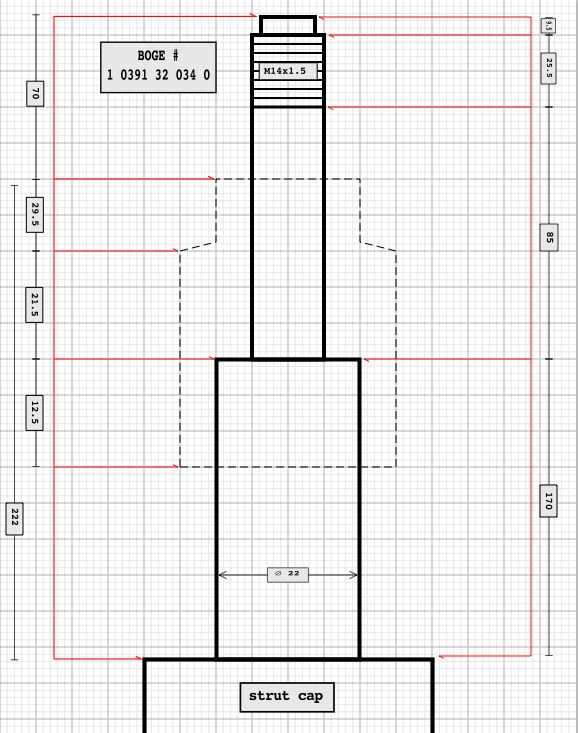
I started drawing this up the other night. Hope to have it finished by Saturday. Ray
In reality the stub I made was designed to replicate the exact length and step of the stock cartridge...to use all stock parts....minus 1" of strut rod length.
The mazda modification...by letting the strut rod pas through changes the equation by requiring the step on the stub to be farther up to pass through the plate and mazda bearing and reach the bottom of the ball bearing...without letting the spring extend any further than the stock length minus 1" the the original stub modification set up.
I started drawing this up the other night. Hope to have it finished by Saturday. Ray
-
herr_sparky
- Posts: 145
- Joined: Wed Oct 24, 2001 1:01 am
-
herr_sparky
- Posts: 145
- Joined: Wed Oct 24, 2001 1:01 am
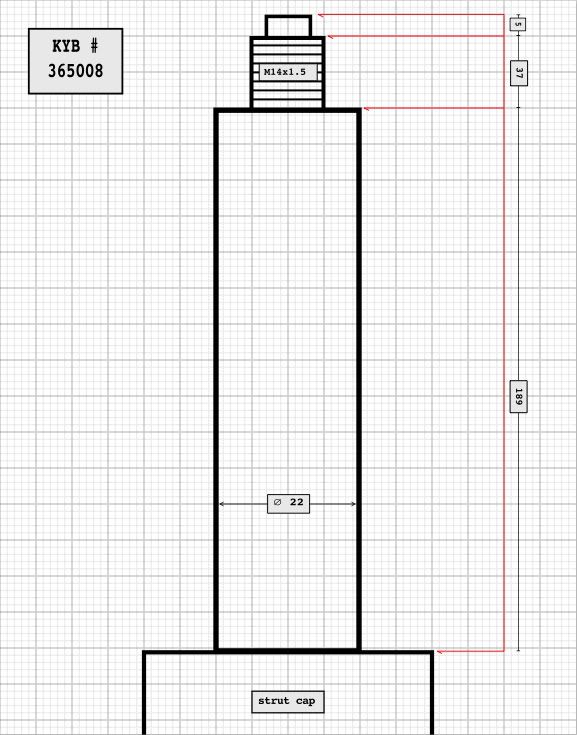
i found a demo for a drawing app. that will work with my out-of-date Mac and made a couple diagrams of each damper... they're not to scale and i rounded to the nearest .5mm, so its mostly just for reference. all measurements were taken with the damper mounted in the strut body just barely above flush with an 86mm spacer in the bottom of the strut body and the cap screwed on tight:
-
raygreenwood
- Posts: 11907
- Joined: Wed Jan 22, 2003 12:01 am
-
herr_sparky
- Posts: 145
- Joined: Wed Oct 24, 2001 1:01 am
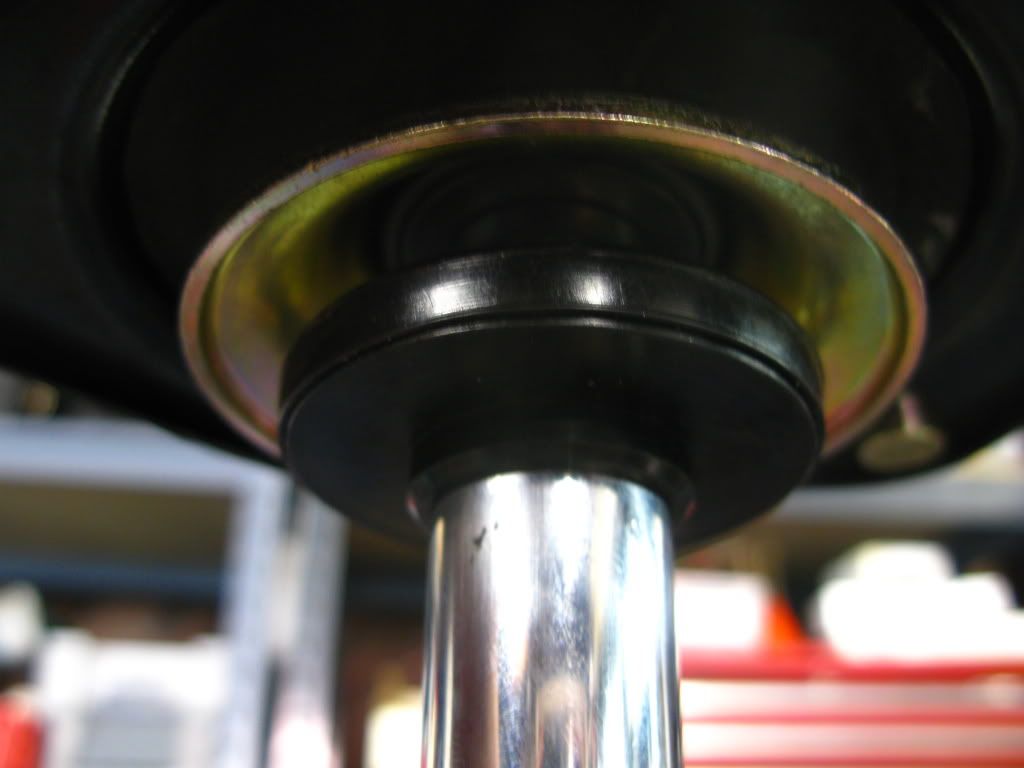
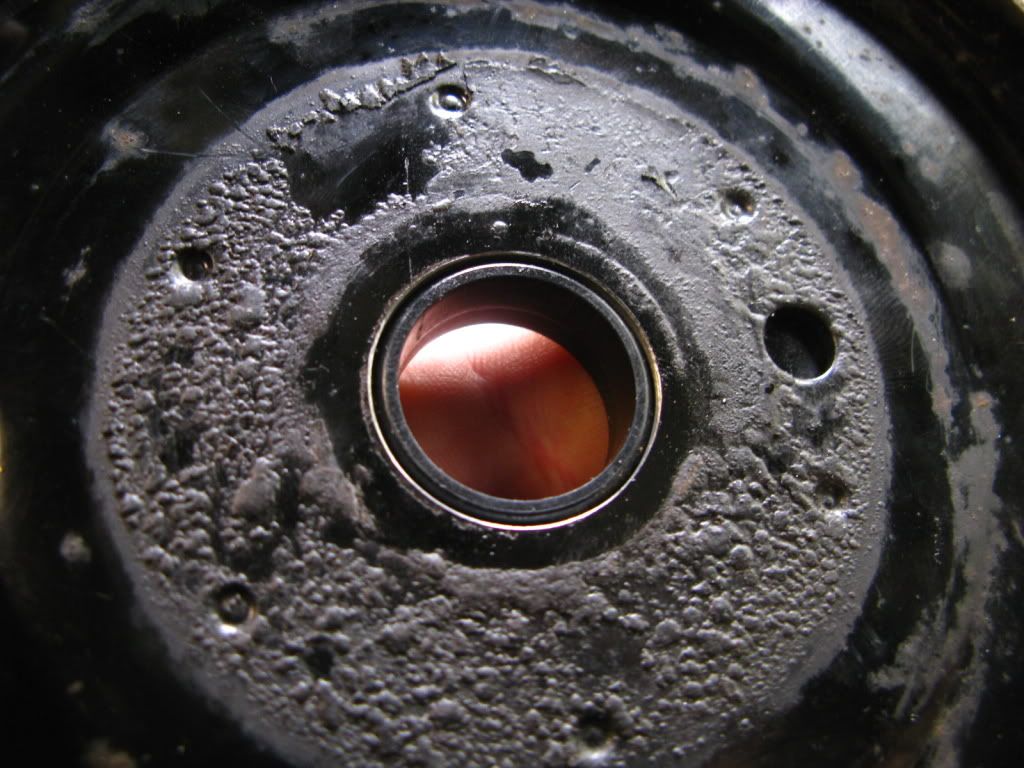
finally got the Mazda bearings in hand today and realized a couple things: the OD is smaller than the large diameter of the strut bearings' skirt, so it (the Mazda bearing) rests inside it:
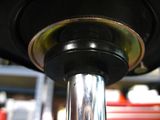
so that means there still needs to be a stack of washers/spacers in-between the two (strut bearing's inner race and the top face of the Mazda bearing)...i thought the mazda bearing was going to have an OD that was larger than the skirt, so that the skirt would be pressed against the top face of he Mazda bearing once installed...
anyway...now that i have the actual parts in hand the mock-up should proceed as planned...still need to calculate the bump stop/bellows arrangement...
-
raygreenwood
- Posts: 11907
- Joined: Wed Jan 22, 2003 12:01 am
Odd....my bearing cones are narrrower. Mine might be superbeetle stuff...or your might. No big deal. As you note...a tight stack of washers....starting with largeer diameter on top of the Mazda bearing and gettint smaller to keep clear of the cone and end up about the side of the bearing itself will do fine. That way it spreads out the weight bearing on to pof the mazda bearing.
Bear in mind that teh origianl bearing by itself is fine for bearing the load. The main purpose of the mazda bearing (primary) is a mechanism to allow bushing teh strut rod and allowing the top plate and spring to rotate around te hrod (more precisely for the rotate to rotate within the spring). Any added bearing load holding ability from the Mazda bearing is simply a bonus. Ray
Bear in mind that teh origianl bearing by itself is fine for bearing the load. The main purpose of the mazda bearing (primary) is a mechanism to allow bushing teh strut rod and allowing the top plate and spring to rotate around te hrod (more precisely for the rotate to rotate within the spring). Any added bearing load holding ability from the Mazda bearing is simply a bonus. Ray
-
herr_sparky
- Posts: 145
- Joined: Wed Oct 24, 2001 1:01 am
got the spring plates done yesterday...$30 for the pair (min. charge):
one of them is a bit looser fit, but i doubt it will make any difference...

finding the right assortment of washers/spacers has been a little tricky so far...a 7/8" ID means a whopping 1 3/4" OD, and thats too big to fit inside the bearing cone. the closest thing i've found at the hardware store is a 7/8" split lockwasher...its OD is just under 1 1/2". i'm not sure about using something like that, though...


one of them is a bit looser fit, but i doubt it will make any difference...
finding the right assortment of washers/spacers has been a little tricky so far...a 7/8" ID means a whopping 1 3/4" OD, and thats too big to fit inside the bearing cone. the closest thing i've found at the hardware store is a 7/8" split lockwasher...its OD is just under 1 1/2". i'm not sure about using something like that, though...

-
raygreenwood
- Posts: 11907
- Joined: Wed Jan 22, 2003 12:01 am
You know...and bear with me here....you can let the skirt of the bearing juuust touch the top plate. Add just enough spacers to make exact contact of the conical skirt to the plate with most of the load on the stack of spacers. in this way you do not add any extra height to recalulate around, you get better load spread and the whole purpose of the mazda bearing is to get better and more accurate turning of the spring aseembly and top plate. Just letting the conical skirt touch ...but not be loaded...onto the top plate will give very smooth turning and also allow the skirt to help stop any side loading. Ray
-
herr_sparky
- Posts: 145
- Joined: Wed Oct 24, 2001 1:01 am
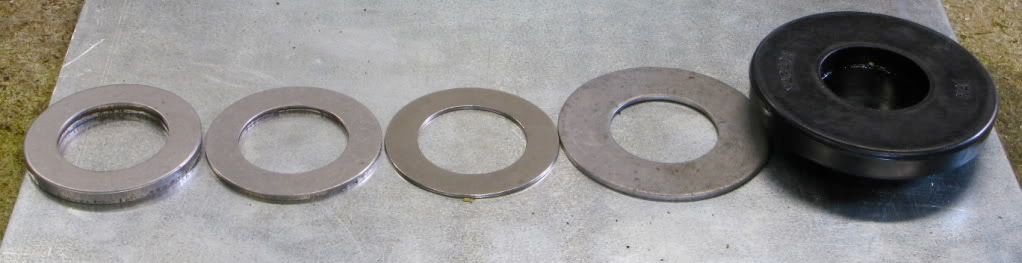
found a good variety of washers at McGuire Bearing...they're actually part of a thrust bearing kit that they were willing to split up:
 blog post detail
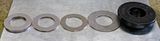
sizes are, L to R : 0.124, 0.062, 0.031, 0.045
the last one, (.045) next to the Mazda bearing is a machine bushing from Ace Hardware.
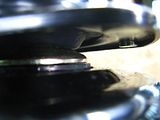
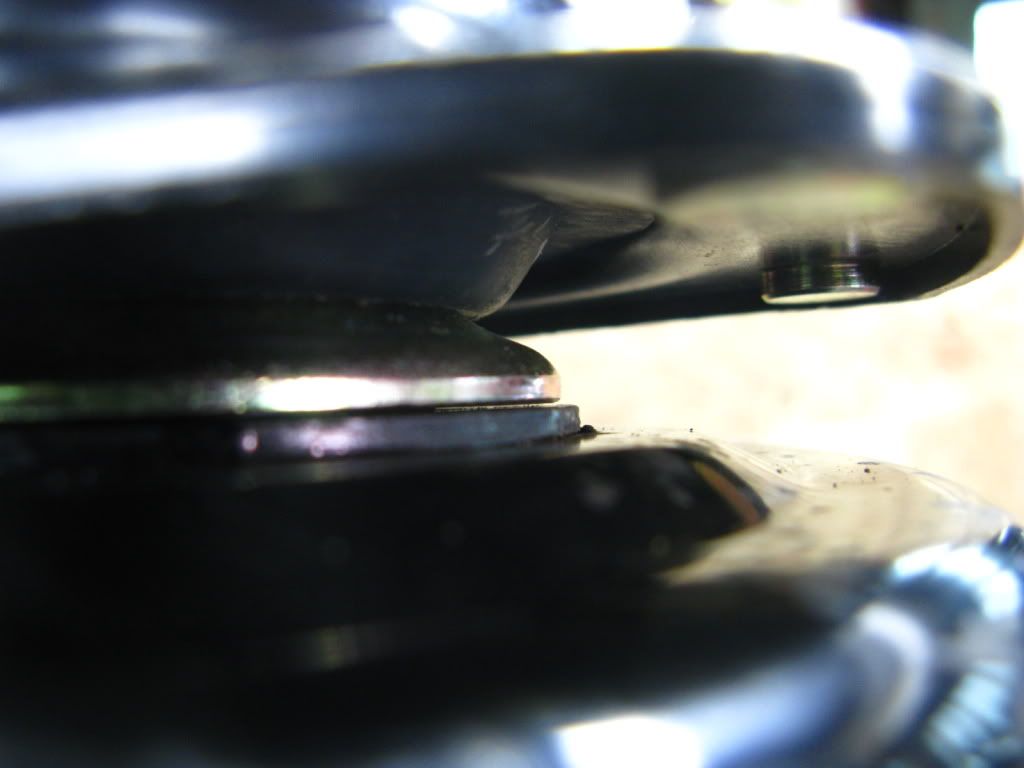
this stack height of .262" allows the Mazda bearing to fit inside the cone without rubbing and the edge of the bearing cone's skirt to just barely skim the surface of the spring plate:
on to stub calculations...
 blog post detail
sizes are, L to R : 0.124, 0.062, 0.031, 0.045
the last one, (.045) next to the Mazda bearing is a machine bushing from Ace Hardware.
this stack height of .262" allows the Mazda bearing to fit inside the cone without rubbing and the edge of the bearing cone's skirt to just barely skim the surface of the spring plate:
on to stub calculations...
-
herr_sparky
- Posts: 145
- Joined: Wed Oct 24, 2001 1:01 am
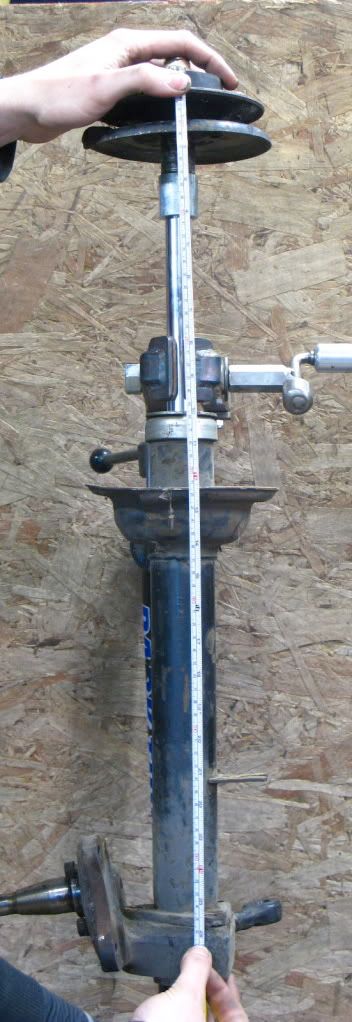
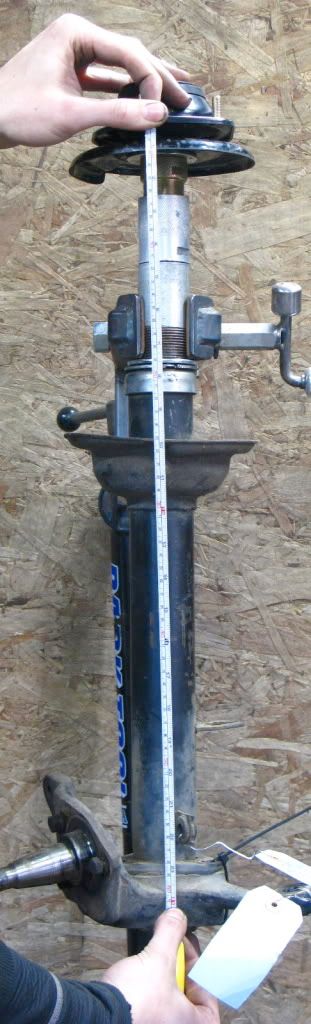
here are the final dimensions of the assembled struts (original configuration vs. modified with Mazda bearings and late-style mounts):
from top face of mount to lower edge of strut body flange @ steering knuckle:
OE:650mm mod:590mm
 ______
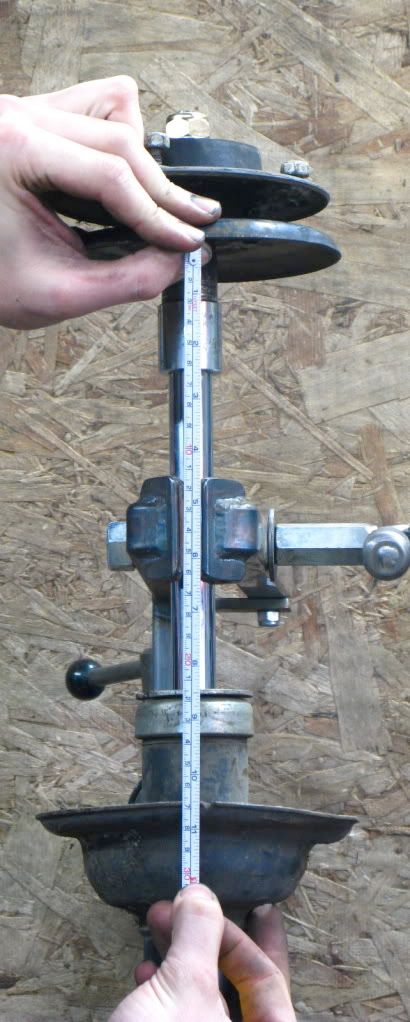
so thats about 2 1/2"...that would mean that installing the strut as is would result in a 2 1/2" lowering of the front end, right? just making sure i'm understanding this right...even if thats what i wanted (i dont, thats too much, i want about 1 1/2") check out what that would do to my spring compression, as in the distance between the spring seats:
OE:266mm mod:210mm
 _____
_____
again, a difference of around 60mm/2 1/2"...theres no way i'm going to try and compress the coils nearly 10" to get them in, so my question is this: if i make the stub's length from shoulder to shoulder (forget about the threads for a moment) 2 1/2" to preserve the same preload, won't i just be replicating the same ride height of the OE struts? and if, instead, i made the stub with a shoulder to shoulder length of 1" (ignoring the preload issue for a moment) wouln't that result in a lowering of the 1 1/2" i'm looking for? do i have the concept right? if i do, i dont see any way around relocating the lower perch in order to preserve sane preload...unless 8 1/4" between spring seats seems sane to anyone...
from top face of mount to lower edge of strut body flange @ steering knuckle:
OE:650mm mod:590mm
 ______
so thats about 2 1/2"...that would mean that installing the strut as is would result in a 2 1/2" lowering of the front end, right? just making sure i'm understanding this right...even if thats what i wanted (i dont, thats too much, i want about 1 1/2") check out what that would do to my spring compression, as in the distance between the spring seats:
OE:266mm mod:210mm
 _____
_____
again, a difference of around 60mm/2 1/2"...theres no way i'm going to try and compress the coils nearly 10" to get them in, so my question is this: if i make the stub's length from shoulder to shoulder (forget about the threads for a moment) 2 1/2" to preserve the same preload, won't i just be replicating the same ride height of the OE struts? and if, instead, i made the stub with a shoulder to shoulder length of 1" (ignoring the preload issue for a moment) wouln't that result in a lowering of the 1 1/2" i'm looking for? do i have the concept right? if i do, i dont see any way around relocating the lower perch in order to preserve sane preload...unless 8 1/4" between spring seats seems sane to anyone...
-
Bill K.

- Posts: 563
- Joined: Mon Oct 27, 2003 10:50 pm
Re:
Above is similar to how I tried this modification the first time, but later realized the stack height of the washers used here is too short. The rubber strut mount bushing deflects under load of the car and when bumps are hit causing the strut bearing housing to contact the spring plate. This unintended contact degrades the benefit of the Mazda bearing which allows the spring plate to rotate independant of the strut rod. The stock spacer (.75") is more than is needed for height and is too small of diameter to distribute the load over the entire Mazda bearing. With assymmetric 1303 strut bearings and the Mazda bearing, a spacer height of .5-.6 inch prevents contact under full deflection of the rubber strut mount bushing. Like this:herr_sparky wrote:found a good variety of washers at McGuire Bearing...they're actually part of a thrust bearing kit that they were willing to split up:
sizes are, L to R : 0.124, 0.062, 0.031, 0.045
the last one, (.045) next to the Mazda bearing is a machine bushing from Ace Hardware.
this stack height of .262" allows the Mazda bearing to fit inside the cone without rubbing and the edge of the bearing cone's skirt to just barely skim the surface of the spring plate:
on to stub calculations...

from topic here