Page 5 of 14
Re: Chenowth Explorer A-Arm... My SLOW Build
Posted: Tue Jun 12, 2012 4:07 pm
by 59Bisquik
Lee,
Ok, thats what I thought you were talking about with the brace at the rear of the arms. Thats an easy fix and I was wondering about that too. I also thought I would leave the brace out of the lower arms since I would rather have the arm bend than damage the frame.
The steering box gusset is fairly simple. The bolts can be accessed from the center if needed and I will just box in the ends.
Thanks for the comments on the frame. I really like it too. After the previous experience with my old Chenowth, that was the only brand I wanted!
Re: Chenowth Explorer A-Arm... My SLOW Build
Posted: Mon Jun 25, 2012 8:43 pm
by 59Bisquik
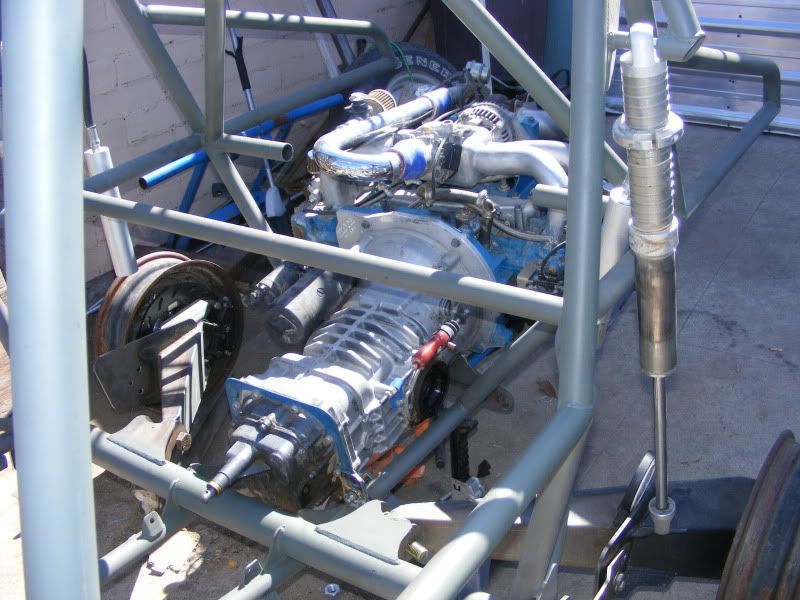
Here is Saturdays progress. Added a plate to the center where all the a-arms attach. Finished the front shock mounting, added misalignment spacers to the side hiems and added copper anti-seize to all of the hiem threads. Also mounted the engine and tranny and gave it a 10 degree angle. Had to cut a cross bar out since the throttle body and intake tube interfered. I need to figure out how to make the upper tranny/engine mount and make the missing pipe look tidy. Very excited that it is sitting on its own front suspension!
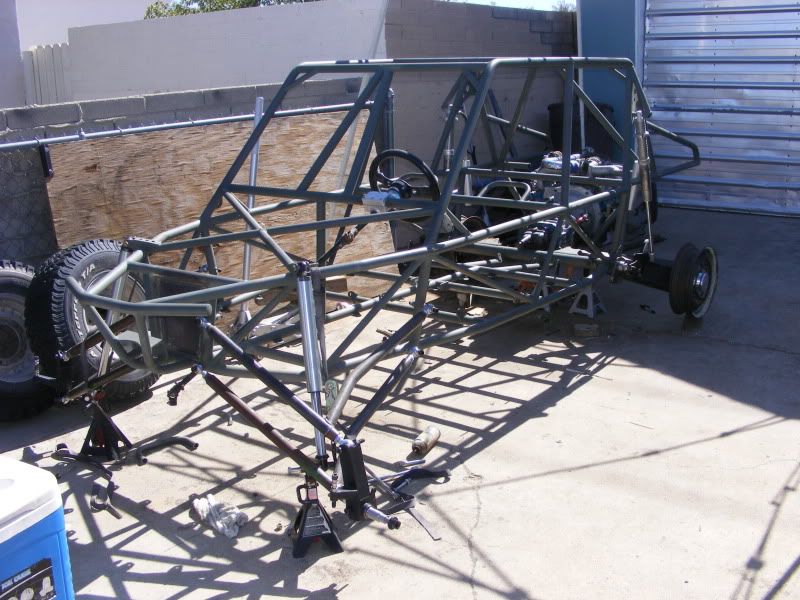
Next weekend I will gusset the steering box mount and reinstall the steering. Need to chase the spindle threads and install the front brakes. Most importantly, build a set of rear training arm pivot plates to accompany the beautiful torsion adapter plates that Devastator made me. As a side note, I am pissed that I spent quite a few dollars extra for USA made rear trailing arms and the 3 bolt pattern on the passenger arm is drilled back 1/2" too far! Its too late to return them since I didnt notice it until the micro stubs were already installed and some welding was done. Oh well... after next weekends work, it is a roller!
Re: Chenowth Explorer A-Arm... My SLOW Build
Posted: Mon Jun 25, 2012 9:22 pm
by Ol'fogasaurus
Can the holes be plugged and redrilled (

); it may be an option at least worth looking into and if it can be done it would be a lot cheaper than new arms.
Lee
Re: Chenowth Explorer A-Arm... My SLOW Build
Posted: Tue Jun 26, 2012 4:44 am
by 59Bisquik
Lee,
Yes, the arms can be redrilled and used. I am just upset that I paid to "upgrade" from the Chinese to the US made arms and then come to find that they are drilled wrong.
Re: Chenowth Explorer A-Arm... My SLOW Build
Posted: Tue Jun 26, 2012 7:24 am
by JUSSUMGUY
On the tube that had to be cut, can you just cut it out completely and replace it with a tube that has one bend in the middle thus clearing your motor, and tying into the same spots on the side?
Sure would like to see the parts Devastator made for you.
Re: Chenowth Explorer A-Arm... My SLOW Build
Posted: Tue Jun 26, 2012 8:17 am
by Ol'fogasaurus
59Bisquik wrote:Lee,
Yes, the arms can be redrilled and used. I am just upset that I paid to "upgrade" from the Chinese to the US made arms and then come to find that they are drilled wrong.
It would be interesting to hear if this was an "occasional" problem (hand drilled and a mistake was made reading the scale) or if the drill jig is wrong... assuming they used a jig!

Some jigs can be expensive to make so some people do without them; proper drill jigs should be bushed which requires extra time and money; e.g., expense (stating the obvious of course).
These little AW $#its just make a better person and builder of you if you let it

. Your project is looking better and closer to completion. Carry on sir, you’re doing fine.
Lee
Re: Chenowth Explorer A-Arm... My SLOW Build
Posted: Tue Jun 26, 2012 9:24 am
by 59Bisquik
JUSSUMGUY, I will be posting up the pics of Devastators handy work next weekend. I sent him templates and specs and he did a beautiful job of making them!
Lee, Thanks for the compliments, its alot of hard work but will be well worth it in the end.
Re: Chenowth Explorer A-Arm... My SLOW Build
Posted: Tue Jun 26, 2012 10:33 am
by Devastator
59Bisquik wrote:JUSSUMGUY, I will be posting up the pics of Devastators handy work next weekend. I sent him templates and specs and he did a beautiful job of making them!
I'm glad the parts are working well for you and am excited to see them all welded and bolted together.
That front end looks great!

On that removed bar..could you bend one on each of the attaching ends so that it is higher than the original, but welded in almost the same place?
Re: Chenowth Explorer A-Arm... My SLOW Build
Posted: Tue Jun 26, 2012 11:23 am
by 59Bisquik
I was thinking to make the bend so it would go under the intake and then I could add tabs to make it an upper tranny mount also.... Only one problem, I dont have a bender!
Re: Chenowth Explorer A-Arm... My SLOW Build
Posted: Tue Jun 26, 2012 12:26 pm
by Devastator
You could make shallow bends like that with a lot of different things, including one of those HF pipe benders.
Re: Chenowth Explorer A-Arm... My SLOW Build
Posted: Tue Jun 26, 2012 5:19 pm
by 59Bisquik
Ive got access to one of those HF pipe kinkers... might be worth a shot.
I was thinking instead of welding it in, put flanges on the ends so its removable. That would aid in pulling the tranny and such.
Re: Chenowth Explorer A-Arm... My SLOW Build
Posted: Tue Jun 26, 2012 5:57 pm
by Ol'fogasaurus
You can heat bend it too. If you look early in Leather's build we talked about it. I think he used a car rim as a bending jig. Pack it tight with
DRY sand then apply heat. For something like this where you are not putting much of a bend in the a pipe bender might work but make sure it is not too deep (steep of an angle) and if you have to make two of them, mark each of the pipes for the center contact of the shoe for each of the bends before you do the bends so they will be the same. Mark the shoe for its contact point also. From some of the video I have seen doing the pipe bender thing, they used wet runny sand but I think a solid pack of dry sand is going to be a better deal. It should stop some of the reduction of the pipe’s cross section and even out the stretching/thinning of the metal on the outside of the bend and packing of the metal on the inside the bend.
I do not normally recommend a pipe bender but if this is a small enough deal, then MAYBE its OK. Remember, tube and pipe are measured differently; tube is measured OD and pipe is measured ID so the two outside diameters are different which can cause problems with the tube deforming using pipe parts.
http://www.youtube.com/watch?v=ZlSnVSrWg0M.
The buckeling is the result of the inner radius of the tube not being able to compress anymore (radius too tight) and the metal had to go somewhere.
I hope this helps some.
Lee
Re: Chenowth Explorer A-Arm... My SLOW Build
Posted: Tue Jun 26, 2012 6:29 pm
by JUSSUMGUY
Figure your angles for the bends and I'll bet there is a STF'er near you that could bend it for you. If nobody close to you can do it send me the dimensions and I'll bend it for you and mail it to you. I have plenty of tubing so that is not a problem
Re: Chenowth Explorer A-Arm... My SLOW Build
Posted: Tue Jun 26, 2012 8:22 pm
by Devastator
I completely agree with Lee. Only make a shallow bend with a HF bender. Less than 30 degrees. If this doesn't work, you might contact Big Dave. I think he has a bender, and lives in the same state as you.
EDIT: Big Dave doesn't live in CA. Sorry.

Re: Chenowth Explorer A-Arm... My SLOW Build
Posted: Tue Jun 26, 2012 8:44 pm
by 59Bisquik
Thanks for all the advice and offers! There are some really good people on this board! I will give it a shot myself with my HF pipe kinker and if it doesnt work out... some of you might be getting a call!
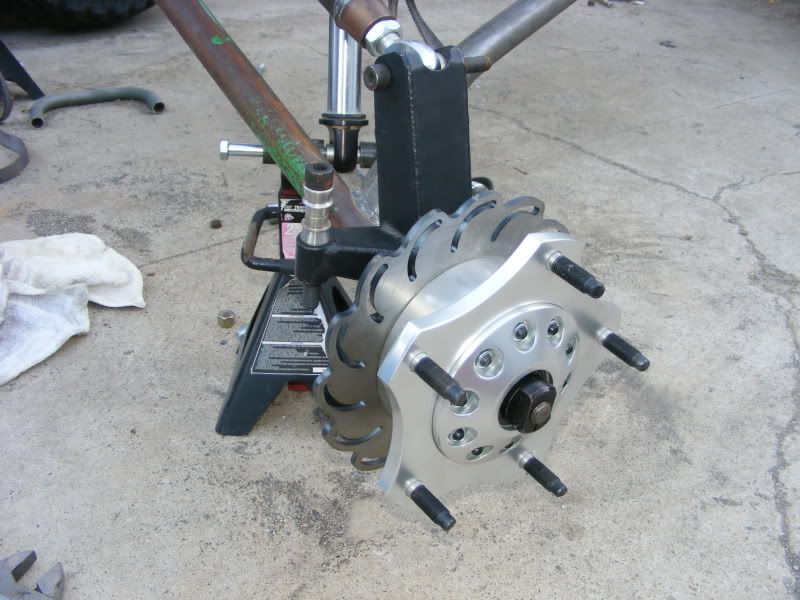
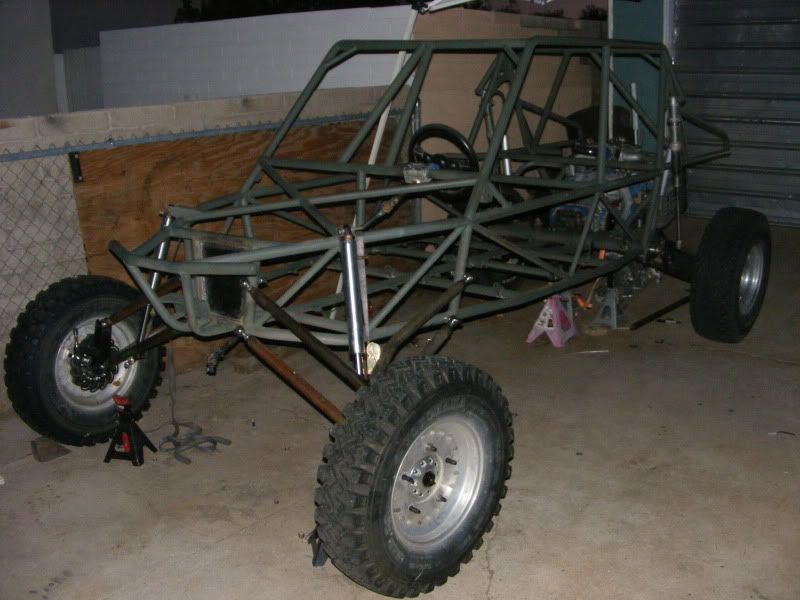
Here is a little work I did tonight, mounted the front brakes and popped the tires on!