upper strut assembly

Discuss with fans and owners of the most luxurious aircooled sedan/wagon that VW ever made, the VW 411/412. Official forum of Tom's Type 4 Corner.
herr_sparky
Posts: 145
Joined: Wed Oct 24, 2001 1:01 am

upper strut assembly

Post by herr_sparky »

i'm finally getting around to my strut rebuild/lowering project, and i'm not sure what it is that i have to work with here. this is what i've got from a parts car that i stripped a while back, and i dont think its actual 412 parts:

Image

the conical rubber donut is the only thing with a part # on it (823 412 355...super beetle)

i'm doing the work on a '73 412, so i 'll be drilling the body to accept the asymmetrical style, but i'm not sure about what i need for the upper assembly.

ray, could you email me your strut mods? i've already bought the KYB GR2s, need to have the stub made...

herr_sparky@hotmail.com

thanks
User avatar
raygreenwood
Posts: 11907
Joined: Wed Jan 22, 2003 12:01 am

Post by raygreenwood »

Yes, the superbeetle parts are identical to the 412 parts with respect to the strut busing bearing assembly. You can buy both rubber donuts and bearings still I believe.

Things that you will probably need to do...if yours do not look like that now....meaning you have the symmetrical bolt pattern bushing...is that you will need to also enlarge the center hole where the dome of the bushing plate pushes up into the trunk. After using a grinder to enlarge this hole...you will notice that it comes very close to the bolt holes of the bushing plate....giving some worry about strength. Just be sure to use the three curves strenthening plates that are under your stock bolts. Also....if you want to have the machine shop fashion a pair of 1/8" thick plates of mild steel...with the center hole cut to size and you or they can drill the new bolt pattern.
After you grind the center hole and re-drill.....you lay the plates over the top and the nuts bear onto the plates. Not only does it clean everything up visually...it...lends very good strength.

There is another way.... 8) ...an I have been loathe to say this one...because my welding is ugly.

Originally......I was not sure how to do this mod. When I did it in about 1999 or 2000.....I took my old symmettrical strut bushing plates and literally cut the centers out of them. I ground it out cleanly so I basically had a plate steel ring with three studs sticking up....with a big hole in the center.
I knocked out the studs from the new assymetrical plates...and trimmed the outer edges with a grinder so the plate would fit underneath the round assymetrical strut plate...and not stick out.
I the centered and levelled the new assymetrical plate...and welded it to the round plate. I then from the top filled in a bead all the way around and ground it smooth and painted it black. I still had to enlarge the center hole and put on a top Fascia plate to make it look better.... but it was easier to fit.
It also...allowed keeping teh exact same centers for teh strut rod....which I later realized was not hugely important....as I was going to add to the caster down below. Ray
herr_sparky
Posts: 145
Joined: Wed Oct 24, 2001 1:01 am

Post by herr_sparky »

your hybrid sounds like a great idea, i'm leaning in that direction for now...

i've been reading the many posts about this topic and from what i can tell i already have everything i need for the upper assembly except for some new spacers between the bronze-colored bearing and the upper spring plate. the large steel ones in the picture seem too long... (this dimension is what affects preload, right? i'll be relocating the lower perch 1-2", so i imagine getting its length right will take some trial & error)

Image

i'm also missing a short spacer under the black, dished top cap to keep it from bottoming out on the (cracked) white plastic ring...

Image

you can just barely see the end of the KYB strut rod down in there...still need to have the stub made.

also, i have a dumb question: which end of the coil springs is up? there is a top & bottom for progressive coils, right?
User avatar
raygreenwood
Posts: 11907
Joined: Wed Jan 22, 2003 12:01 am

Post by raygreenwood »

OK. A couple of important things here.

Which KYB shocks are you using in that picture?

Before you go any further there is a very important thing you MUST do.
You need to re-assemble a strut with ALL of the old parts. With the strut on the workbench you need to then...accuratly measure from the edge of the top spring plate to the edge of the bottom spring perch. Pick a spot you are calling your mesurement point and mark it with a punch on both ends.
Almost as important...you need to measure on your old strut....the total length of the strut from the three bolt flange where it bolts to the steering knuckle at the bottom.... to the flat part of the plate on the strut bearing plate above where it fits up against the body.

This is so....aside from strut compression when the cars weight sits on it....you can have an idea how much your mods will change the total strut height.

Now. What exactly do you want to do with your car?

If you are just trying to (a) get rid of that nose high attitude and (b) at the same time get an increase in hnadling of about 100% or more and (c) get your suspension onto parts that are readily replaceable......there is no reson whatsoever to re-locate the lower spring perch.

Lowering the front end by levelling the car...does lower the front end a decent amount. By using the stub adaptor to do this....it also will compress the coil spring by approximately an inch give or take. Thats a decent amount of pre-load. The front springs were already superb on this car for handling.
Also...if you want lower...the sidewall profile of the tires are an almost bigger part of the equation.

Going from the original 165 or 185 sr-15...which is a 75 series....and most 411's and 412's ran 185's.......you are lowering by 15.75mm...all around just by going to 205/60-15's. Going to 205-55-15's....will lower you 26mm (a little over 1"). The 55's are as low of a profile as you want to go without a little bit of consideration. This will make things pretty stiff with the compression of the coil spring and the uprated cartridges.

Here is my issue with using the KYB Gr-2 Audi struts and lowering the spring perch. Yes....without the adaptor stub...you will need to lower the spring perch to use the Audi cartridge...and keep the coil spring at no more than about 1- 1.5" maximum compression from the stock setting.
Going any more compressed makes the spring stiff enough to destroy the springs in ball joints...been there...done that...twice. So eiether way...this is why you need to know your old spring length when the struts are assembled.

But....lowering the bottom perch...AND not using the stub...will lower your from end about 3". This flexes the chassis downward....rotaing the control arms and sway bar. You may well have a travel and binding issue...and then there is the issue of needing to lower the rear to match the front.
In reality.....when you look hard at what needs to be lowered and far its going...the 412....once set level...is pretty dang low.

The correct way for the coil spring to be...is the closer together section of coils nearest the bottom.

Do your oil coil measurments...and get back to me....and we can go from there. Ray
herr_sparky
Posts: 145
Joined: Wed Oct 24, 2001 1:01 am

Post by herr_sparky »

ray: thanks for another super detailed reply! so, here's the scoop:

they're the GR2 ( KYB 365008 ) for the audi 4000/vw quantum
If you are just trying to (a) get rid of that nose high attitude and (b) at the same time get an increase in hnadling of about 100% or more and (c) get your suspension onto parts that are readily replaceable......there is no reson whatsoever to re-locate the lower spring perch.
that would be yes, yes, and yes...

also, i do understand (finally) that lowering the perch alone does not effectively lower the car. unfortunately i've already machined the weld off a long time ago so i'll be welding it back on anyway, and that way i can adjust/control any excessive preload. i intend to follow all your recommendations on spring compression, etc.

something i didnt mention is that my existing struts/front end are still in the car as it sits in my driveway waiting for parts for the brakes. the strut parts that i'm working with here are from a different car...and i dont have the old damper cartridge anymore, so i cant assemble it in stock trim (even if the lower perch was still attatched). and the existing, stock struts that are still mounted in the car need to stay put for a while longer until the brakes are done and i've driven it a couple times. i was hoping to be able to just follow your designs and build the whole thing on the bench, then swap it out.

not only is that plan not looking so good anymore (because i really need to perform these measurements you describe), but i'm starting to change my mind about how much i want to lower it... i'm considering going big, even if it handles poorly, just because it looks bitchin'. besides, i can always have the other set be the "sensible" ones...

and tires... hadnt considered that yet...i want to run either 205/60 or 195/50...

so, in short, ( :shock: ) ive gotten a little ahead of myself. i only have a few of the parts i need for a proper mock up and i'm trying to imagine the finished product.

if you have the time, this post on my blog has better detail:

http://borntodieinthegutter.blogspot.co ... art-1.html

also, would you mind emailing me your stub design and any other materials you have about this? that would be a big help...thanks!
User avatar
wshawn
Posts: 209
Joined: Thu Dec 27, 2007 6:36 am

Post by wshawn »

Just a quick one regarding the strengthening of the top mountings for the front struts once they are redrilled.

The superbeetle front strut brace will fit once you have the asymetrical mounts. That is what I have fitted to mine after the front strut rebuild following Ryas detailed advice. And by the way they do handle sooooo much better.

Mine is set level(ish) and at the weekend I had to pick up 20 paving slabs to redo my patio, with 10 in the front and 10 in the back with a couple of bags of sand for good measure the old girl carried the load quite nicely.
User avatar
raygreenwood
Posts: 11907
Joined: Wed Jan 22, 2003 12:01 am

Post by raygreenwood »

Oh...don't worry you are doing fine.

But...and this is really simpler than you think. Go out to your driveway. Jack up one side of the car, take off the wheel. You can now measure with a little care...from the lower edge of the top spring plate...to the edge of the bottom spring perch. The strut is fully extended via spring pressure when the car is off the ground. Mark the spot wit ha scriber or file so you know between what points you measured. This does not have to be horribly accurate. Like 1/16th tolerance is fine.

The height between top plate and flat edge of bearing assembly is not a huge worry. That can be adjusted with spacers later anyway.
In general...unless the trunk is heavily loaded....the type 4's front struts are usually either fully extended...or at least 90% fully extended.
So...the length of the strut rod and stub and the resulting distance it allows the strut bushing to extend to...sets both the spring compression and the height of the front end. So...you really need to know what that distance between top plate and lower perch is....so you can set up teh one you have either to that measurement or slightly more compresssed. If you end up with a less compressed spring...chances will be high that your front end will still be too high. Ray
herr_sparky
Posts: 145
Joined: Wed Oct 24, 2001 1:01 am

Post by herr_sparky »

hmm...yes.

on the car, the distance is 275mm / 10 7/8"

my extra springs (blue) are about 445mm / 17 1/2" total length

that means a 6" compression of the spring...that seems like a lot. and thats just if i were to duplicate the current setup... wouldnt your stub design pre compress the spring even more? thats why i'm thinking of reducing all that preload by lowering the perch, unless my thinking is flawed... :?

also: cant wait to use a strut brace...using its mounting as a reinforcement for the modified tower, that sounds very tidy.
User avatar
raygreenwood
Posts: 11907
Joined: Wed Jan 22, 2003 12:01 am

Post by raygreenwood »

No they don't really. The amount extra that the addition of the stubs compress the spring...is under 1". It is this 1"...(actually about .85" if memory serves)...is exactly whats required to lower the front end level with the rear
That is precisely why you needed this measurement so you can make sure that you are not adding a huge amount of extra pre-load.

Bear in mind.....the Audi strut rod is almost 4" shorter when fully extended...that the stock strut rod. This 4" ....minus the .85" lowering.....is precisely why the stub is required. If you try to use the Audi strut without the stub....you will compress the spring almost a full 10" from its 17.5" (I knew it was very close to 18" and varies with upper spring plate design)...which will not only potentially destroy the spring....but make it so insanely stiff that you woudl shatter everything in your suspension on the first bump. Ray
wildthings
Posts: 1171
Joined: Thu Jun 03, 2004 12:42 am

Post by wildthings »

Just though I would show a picture of the SB style strut bearings installed on my '72 411.

Image
herr_sparky
Posts: 145
Joined: Wed Oct 24, 2001 1:01 am

Post by herr_sparky »

yes, of course...what i mean is:

currently, on the car which is on jack stands at all 4 corners with wheels removed, the distance between the spring seats is exactly 10.875" (lets call that 11" just for the sake of comparison/easy math). thats fully extended and at rest, measured from the notch on the lower cup to the lower lip of the upper spring plate with a 12" ruler:

Image

so... with a stock, uncompressed spring length of 18" (assuming thats what is in my car right now) that would mean that as is sits, assembled and mounted, it is compressed a whopping 7"... that cant be right...again, that all assumes that what the car is equipped with now is all stock...i'm starting to think it isnt...

anyway, its just a little mystery that i'm sure will be cleared up and obvious once i take the existing struts out and figure out what exactly is in there... it just seems to me that that 7" is an awful lot...

but back on topic: thanks for the pic, wildthings. the enlarged center hole looks great, not as big a difference as i was imagining. did you make your own white friction ring? mine's cracked...

also, what arrangement of spacers, etc. did you use underneath? did you trim the brass-colored bearing cone skirt? i'm going to try the mazda "glide plate" mod that ray's described...

Image
User avatar
raygreenwood
Posts: 11907
Joined: Wed Jan 22, 2003 12:01 am

Post by raygreenwood »

Hmmmmm :?
That is odd. I will have to dig out my notes and see what measurements I might have in sketches. I don't have access to my car right now. It is about 1300 miles from here.

I have had the stock struts apart over the years so many times.....I can pretty much visulaize exactly what problems there were.

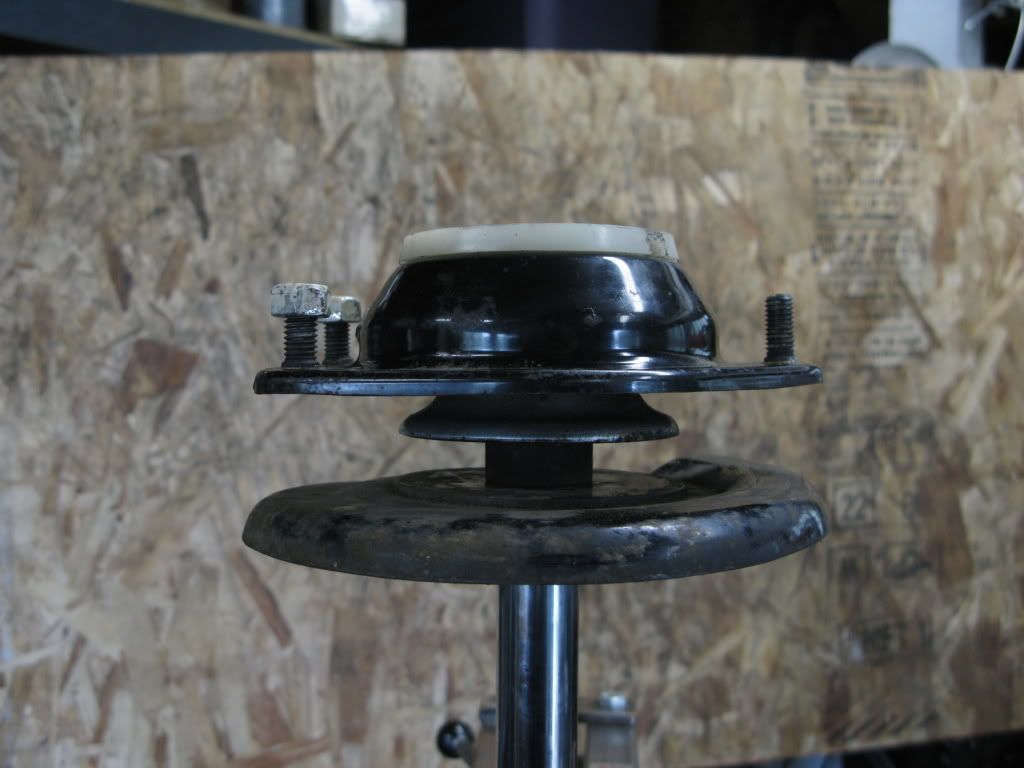
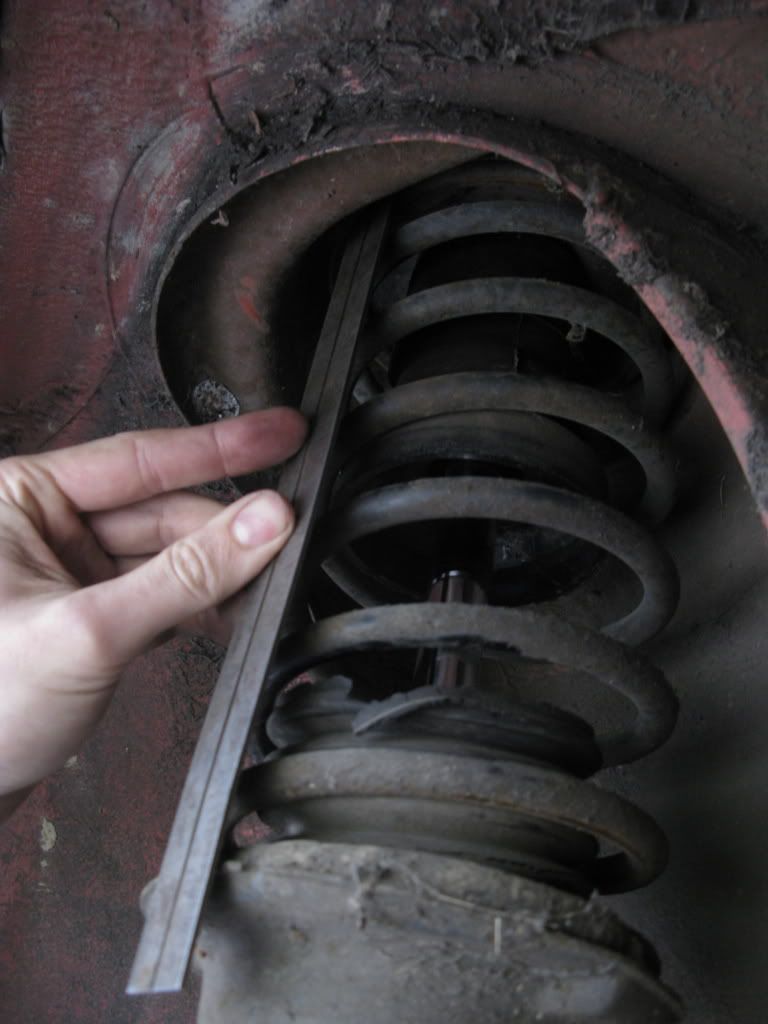
Hmmmm.....In general when compressing the springs....it takes about 3.5" of compression with the compressor tool to get just enough slack to take the nut from the last five threads of the rod which is at full extension due to spring pressure. The step in the strut rod has the steel bushing which rests against the bottom of the top plate.....and protrudes about another 2+ inches up through the bearing.

If my memory is correct.....there should be not much more than about 4" of spring compression. I may be totally off.
Let me find my original sketches. I just saw those somewhere in my pile of stuff recently.
They should include the measurement from top to bottom plate...like you are doing in your picture...using stock strut cartridges.

But, either way....if you are using 411 or 412 stock strut tubes, either bearing or either spring series....and use the Audi strut cratridge with either stock bearing...and keep the steel spacer in place that was in the bump stop whether you use the bump stop or not....you will end up with no more than 1" more of spring compression than stock...and a lower fornt end by that 1". I have already done two sets of these and tried them with both 411 and 412. So...the stub works with that strut cartridge and all stock bushings and housings.

It may be that they compress 7". I have to find my sketches to be sure.....but that would not be out of place with what I have been saying about the front end of 411/412. They have extremely progressive...and very strong springs. Much more than would ever need for running without a full trunk.
Those springs can handle most any level of handling....the main problem was that the front end was underdamped and had soft bushings .

Also....Personally I would just wait to rebuild the struts until the others come out. They take maybe 30 minutes each to assemble. Just get all of your parts together and you can strip and repaint the ones that are in the car in very short order. Much less measuring work.
Later..when you have you adjustable perches on the other tubes....its about 30 minutes per side to simply transfer the new parts across to teh other tubes.
I'll see what I can find tonight. Ray
wildthings
Posts: 1171
Joined: Thu Jun 03, 2004 12:42 am

Post by wildthings »

herr_sparky wrote:but back on topic: thanks for the pic, wildthings. the enlarged center hole looks great, not as big a difference as i was imagining. did you make your own white friction ring? mine's cracked...

also, what arrangement of spacers, etc. did you use underneath? did you trim the brass-colored bearing cone skirt? i'm going to try the mazda "glide plate" mod that ray's described...
All my strut bearing parts were new, but as its been four years or so since I did the rebuild so I can't remember all of my sources. I think that the only part that I shortened was the spacer that the dust shield mounts on. My car sits at about the stock height which is higher than many people want, but generally okay for me as I drive a lot of dirt roads. I have thought of going back and trying to bring it down a little to improve handling in cross winds.

The ride is fine as I have Koni adjustables that I was able to dial in nicely.
herr_sparky
Posts: 145
Joined: Wed Oct 24, 2001 1:01 am

Post by herr_sparky »

yep... cip1.com has new mounts/bearings for $50 each... yikes.
wildthings
Posts: 1171
Joined: Thu Jun 03, 2004 12:42 am

Post by wildthings »

Try Discount Imports in Milwaukie, I am thinking that D.I. might be where I came by my strut bearings. I don't remember them being particularly expensive where ever I got them from.
Post Reply