Page 1 of 21

Ghia Road Course Setup

Posted: Sat Oct 03, 2009 8:03 pm
by FJCamper
Image

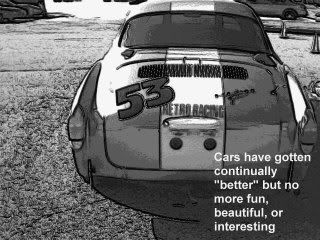
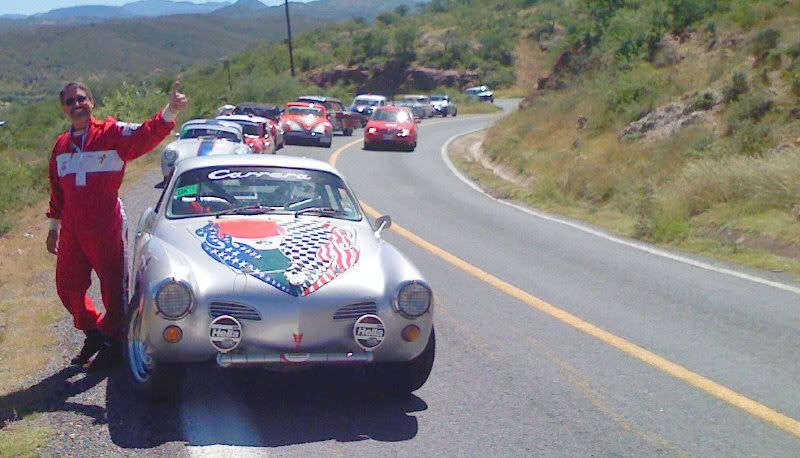
More than a few ShopTalk guys have asked us how exactly do we have our suspensions setup on our IRS (No. 53) and swing axle (No. 261) cars.

There are no suspension or setup "secrets" here, just proven techniques. It gave us two SCCA Solo championships, and fast lap times at most of the major southeast road courses in direct competition with much newer and presumably faster cars.

The first question anyone who knows racing should ask here is why run a Ghia?

To win, you can't just run a car you love and hope it will win. You have to run a car you know that can win.

The VW Karmann Ghia is that car. Here's the bullet points of why it can win.

* The Ghia is light, 2000lb. and under. In today's racing world that is usually 1000lb. less than the competition. And by competition, we mean anything you pick out on the track to beat. Forget classes for a moment, think lap times.

* The Ghia has the advantage of a rear engine, which greatly helps accelleration traction, and weight distribution in braking over almost any front engine car.

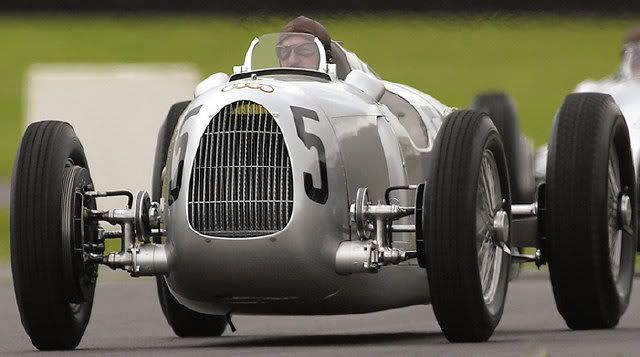
* Old Doc Porsche knew what he was doing with the suspension design, and general chassis dynamics. It was the layout of his Grand Prix Auto Unions just before WWII. The Ghia's chassis comes from an old race car, but one that works.

Image

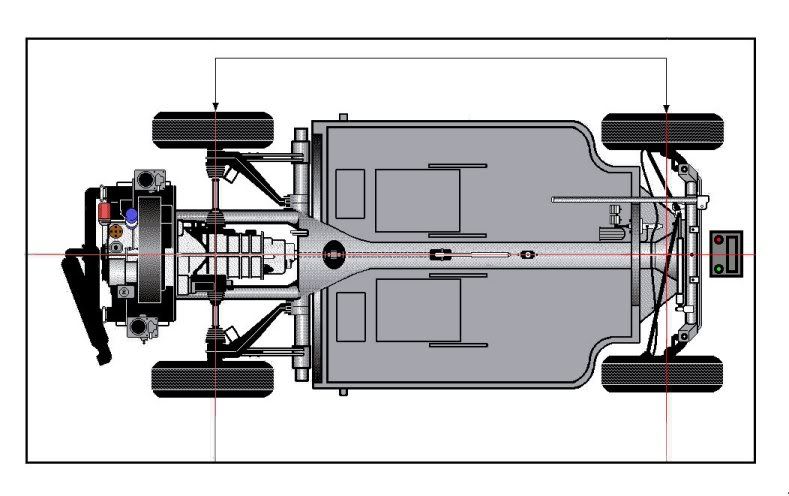
Recognize this front axle beam arrangement? It's where our Type 1 axles come from.

So, most of our real work is done before you start chassis setup. All we have to do is refine a few details.

Image

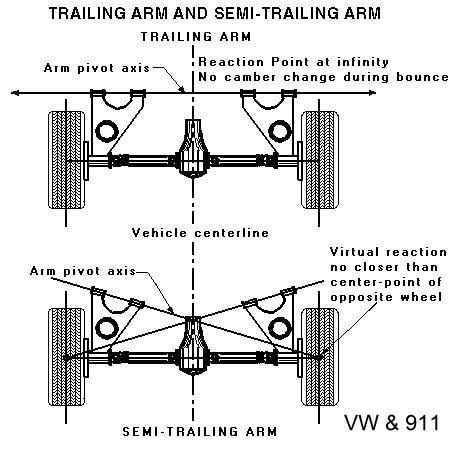
The Ghia's IRS rear suspension is the best racing choice. It is technically a semi-trailing arm arrangement. Here's both trailing and semi-trailing for comparison.

Image

The semi-trailing arm arrangement creates some toe-in on bumps and on compression, which aids in quicker turn-in in fast sharp corners because it is literally doing some rear-end steering.

The pure trailing arm arrangement is more stable at very high speeds, which we will define here as over 100 mph ... but it is less nimble.

To make the Ghia's semi-trailing arms work better at 100 to 140 mph, a good rear sway bar that resists travel is the fix. The faster you go, the less you want happening in the suspension. Ask the salt flat guys.

Image

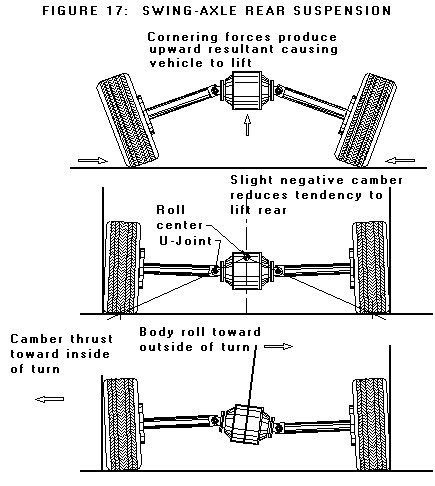
The vernerable old swing axle is the example of a system you need to limit movement. The advantages are strength, great ability to take bumps at speed (a great advantage in the Carrera Panamericana) and how it's very instability can be used to advantage by a really good driver to hang the tail out at will and carve up a tight course.

Okay, that's the briefing. Next chapter is chassis and body prep.

Image

Ghia Road Course Setup Part 2

Posted: Sun Oct 04, 2009 4:25 pm
by FJCamper
Image

CHASSIS and BODY Prep

The first obvious step is to make sure your suspension parts and body/chassis are not bent. While this is obvious, it is often overlooked. Wrecked and repaired cars can have bent front axle beams, warped or cracked engine-mount yokes, bodies that do not sit evenly on the floor pan, rusted frame heads, heater channels, etc.

Don't worry about worn out shocks, ball joints, tie-rod ends, bushings, steering boxes, weak torsion bars, or king & link pins. You're going to be replacing all that anyway. Fix the serious body-floor pan problems. Racing stresses will finish making rusted and cracked seams break and collapse.

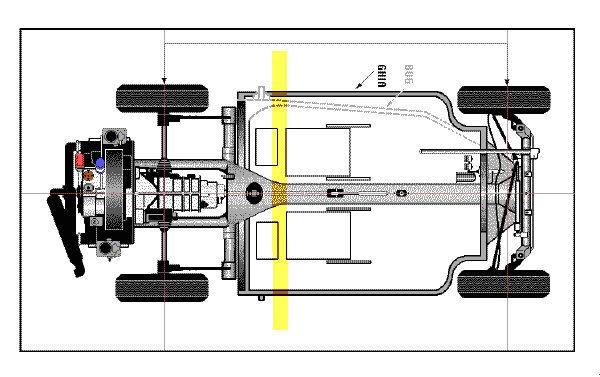
The Ghia has a body bolted onto a floorplan. The Porsche 356 body is welded to its floor pan, making the entire structure stiffer, so the Ghia needs some anti-flex help. The yellow line marks were it bends.

Image

Bodies and chassis that bend means the front and rear suspensions are not working together all the time, and that means iffy handling at best and crashes at worst.

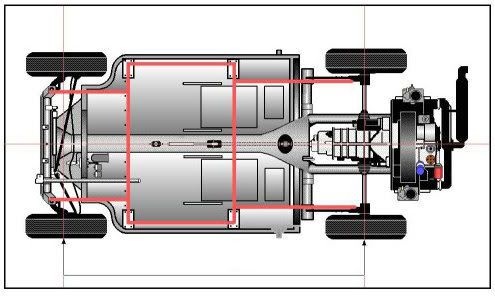
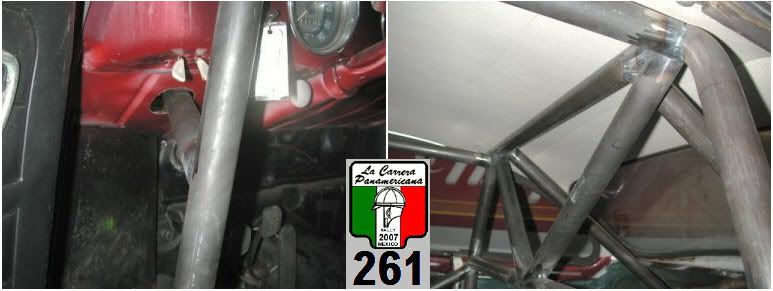
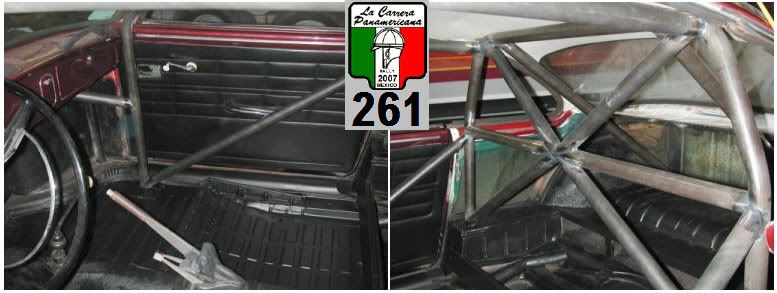
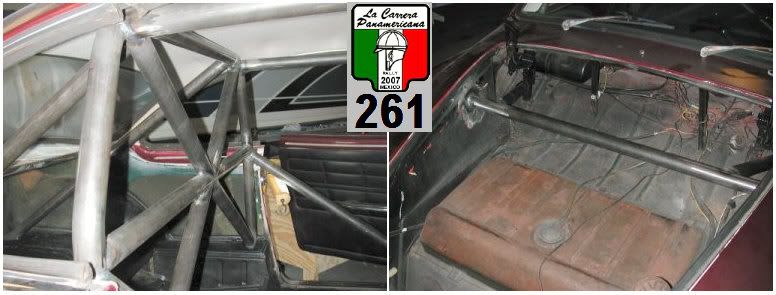
If you're racing, a roll cage fixes this flex business, because it ties the front to the rear very nicely. Take a look at our full welded-in cage in the 261, our Carrera Panamericana car. We needed the best, but lightest, cage design we could fit. 261 is stiff.

Image

261 Rollcage outline in red

Image

Image

Image

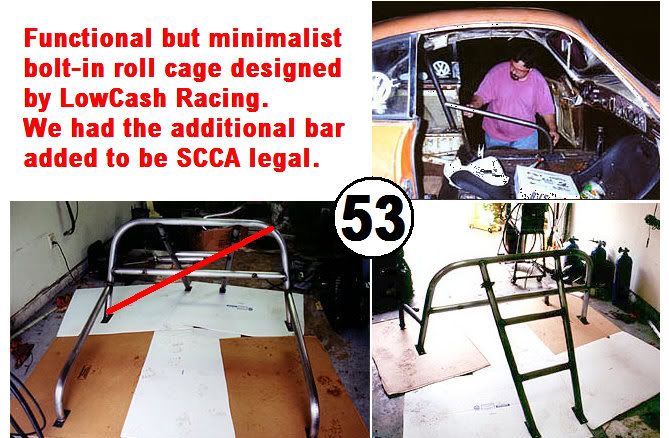
For 53, which has to contend with V8's, we use an even lighter (bolt-in) semi-cage. Every ounce counts here, and this design, created by LowCash Racing, meets tech requirements while adding the vital fore and aft stiffening points.

Image

Above: LowCash testing the cage in their drag Ghia.

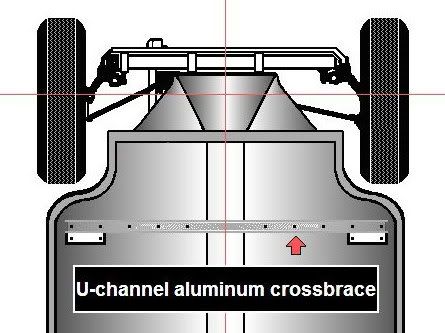
A special chassis mod we've made to 53 is the addition of front jack points via a full length aluminum beam that runs fully side to side. It doesn't add chassis stiffness, but makes it quicker to get a jack in place and gives us jack stand points away from the front axle beam.

Image

If you're not racing, you can still add chassis stiffness by welding on braces under the floor pan, in the jack pickup point area, similar to what VW did for its convertibles. Here you'll have to improvise. The braces need to be at least two feet long.

Something we actually need but haven't installed on 53 or 261 is axle beam braces. These were options on VW's "rough country" kits. I had them, factory, on my VW bug in Saudi. We haven't used them on 53 or 261 because where they fit to the axle they block using the tow bar, and we often flat tow.

Okay. Now we have a sound body and a stiffened chassis. Next step is suspension renovation.

FJC

Part 3 Suspension Renovation

Posted: Tue Oct 06, 2009 11:51 am
by FJCamper
Image

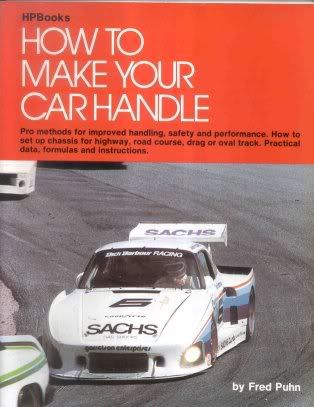
(I recommend Fred Puhn's HOW TO MAKE YOUR CAR HANDLE for some serious in-depth study of chassis dynamics) HP Books ISBN 0-912656-46-8

Image

Suspension Renovation

Rubber bushings make for a quiet car but softens up and slows down suspension responses.

VW Type 1 chassis and suspensions don't have much rubber in them to start with, which is a good thing. It helped make even the stock Bug or Ghia responsive and fun to drive. But to race, you need better predictability for the best handling, and to do that, you have to get rid of all of the stock rubber.

An excellent replacement for factory rubber is urethane, and a recognized brand name for replacements is Prothane. We got ours in a full VW Type 1 kit from Prothane, but all the individual bushings are available. Urethane bushings are much firmer than the factory rubber, and control movement much more precisely.

http://www.prothane.com/universal.php

Here's the list of bushings that you need to replace in the Ghia.

1 Rear spring plate inner and outer bushings.
2 If IRS, the rear diagonal arm pivot bushings.
3 Front axle beam torsion tube inner Micarta bushings.
4 Shift-coupling bushings.
5 (Not Prothane) Nylon shift rod bushing.
6 Steering shaft coupler disk.
7 Rear suspension snubber bump stops.
8 Note that we're not advising urethane transmission mounts.

The rear suspension benefits greatly from replacement of the spring plate bushings. It makes the torsion bar to spring place rotation arc more accurate, and reduces fore and aft movement of the entire IRS diagonal arm or swing axle spring plate. Toe changes are minimal, and the entire rear end becomes more of an organized set of parts working together.

The same thing can be said of the IRS diagonal arm pivot bushings. Sloppy movement there creates unwanted (read: scary at speed) rear end steering.

Up front in the axle beam, knocking out the inner bearings and Micarta bushings allows you to use the much more supportive deep-tube trailing arm bushings. These help managing the stress loads generated by high-G corners.

Replacing the shift rod coupling bushings with much firmer urethane, and installing a new nylon shift rod bushing makes for a far more definitive shifter feel. You'll also get a slightly better steering feedback feel also by replacing the old steering coupler disk with a new piece of urethane.

The factory rear bump stop snubbers are not bad, but the urethane ones are better, and here there is a special modification. For smooth-course road racing, cut the rear snubber to half it's depth. This allows the rear suspension to compress more deeply before hitting the snubber, which on contact starts to change handling feel. You do need the snubber, just not so much of it. A car riding on its snubbers in a fast, hard curve is on the verge of losing control, as the suspension proper has stopped working.

Notice we did not recommend urethane transmission mounts, front or rear. That's because all our experience with them has been mixed. Stock mounts seem to work about as well, and we think when used for holding transmissions in place, urethane might actually flex more than stock hard rubber ... but this does not mean you should stay stock here.

We use steel transmission mounts front and rear on 53 and 261. Some racing classes might forbid steel mounts, so check. And run steel mounts until they catch you. The smooth and authoritative gear shift changes you will get from steel trans mounts, urethane shift coupling bushings, and a new nylon shift rod bushing has to be experienced to be appreciated.

By the way, we run a stock shift lever with a short-shift kit on 53. It's simple, it takes the abuse, and it works. Yes, we've tried several types of shifters, and got the best results from this modified stocker.

For the street, steel mounts are a bit much, because they absolutely transmit significant road noise into the car.

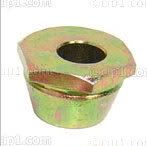
One of the most dramatic changes in handling improvements is the installation of extra-offset front (ball joint) axle beam eccentric camber adjusters. You can crank in one to two degrees of negative camber with these inexpensive little jewels and it makes a winning difference.

Image

Camber adjusters
http://www2.cip1.com/ProductDetails.asp ... D6612%2D10

Keep in mind that camber is important on all four wheels, while caster is a factor on the front wheels only.

The entire design intent of the front axle beam is to lean with the body in a turn, and create gradual loss of front tire adhesion, creating understeer. This is absolutely life-saving in a oversteering swing axle, but not so important with IRS.

How much camber you can use depends on your tire width. Because we use relatively narrow 175x15 tires, we can run a full degree or more negative on a system intended for slightly positive to zero camber. With a wider tire, a half degree negative would be enough.

Negative camber helps because with a tire than begins by leaning inward at the top, as you corner, it will straighten up rather than lean away from the turn. Motorcyclists lean into a turn for the best grip, right? Factory suspension designers deliberately design in poor grip to warn street hot shoes from getting too wild.

With extra front camber on hand, you'll be happily surprised at how well the front end tracks through the turns, only introducing understeer at much higher speeds, where you need it.

The king/link pin cars, meaning all 356 Porsches and VW's up to 1966, can have negative camber added by machining the link pin to steering knuckle contacts, but it is a labor intensive job. Most all of the winning 356's did it.

Be advised the ball joint camber adjusters do not just affect camber, but have some effect on caster as well. Joe Chirco reminds us: "When you rotate the caster/camber eccentrics, remember that both geometries are changed. Always set your caster/camber before adjusting toe as eccentric rotation will change toe."

Image

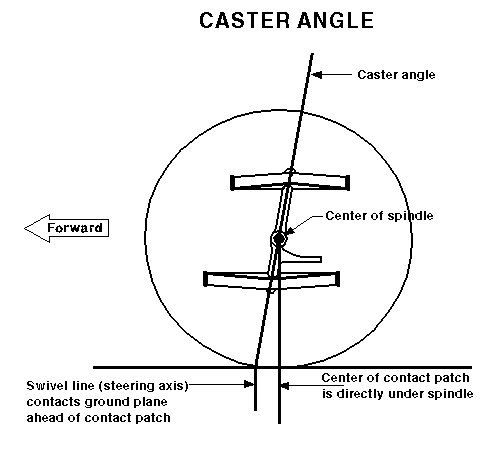
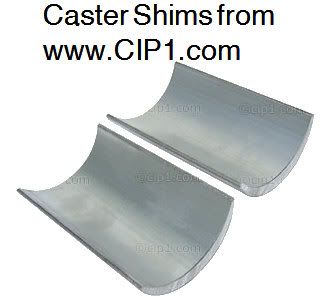
Caster (only measured at the front wheels) is important for stability in straight tracking, and the faster you go, the more (to a point) caster you need. Slick autocross jockeys use very little. The less caster, the quicker you can throw a car around a cone course. So, it stands to reason that caster adjustment is a major dividing line between fast autocross cars and fast open track cars.

We ran 2 degrees of caster when we autocrossed, and increased it with shims under the lower tube to 4 degrees for road racing.

Image

Older 911's used 6.5 degrees of positive caster. Type 1 VW's usually came with 3 degrees positive. Most cars that use negative caster have very little. How much caster any one type of car needs depends on weight (among other factors). Heavy cars have the least caster. Lighter cars the most.

Next: Shocks, Sway Bars, and Tires

Posted: Thu Oct 08, 2009 3:36 pm
by BAJA-IT
Thanx, That is some good info.

Keep it coming!

Posted: Fri Oct 09, 2009 7:30 am
by TeamEvil
WOW ! ! ! ! ! !

Superb information ! ! ! When you write the book on setting up a Ghia for competitive road racing, make sure that you get in touch . . . .

Seriously.

Posted: Fri Oct 09, 2009 7:57 am
by fast Ed
Great posts, thanks!!


cheers
Ed N.

Shock setup

Posted: Mon Oct 12, 2009 12:04 pm
by FJCamper
Image

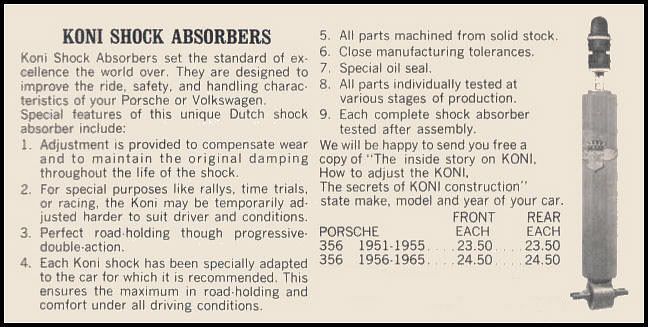
Koni Special shocks today come painted red or red-orange, depending on your opinion of the color. Over the years, Konis have been painted many colors, but may be best remembered as orange for the Special series, aftermarket for the 356, but a mandatory option for the Carreras. Those are the ones we use.

THE KONI SOLUTION

Shocks that are too stiff or too soft, or have too short a travel, will make your car uncomfortable at slow speed and dangerous at high speed.

On 53, our 1970 road course Ghia, we use oil-filled Koni adjustable shocks. The Konis have given us excellent control and performance.

Koni has long been making great shocks for Porsche, beginning with the 356A (Porsche tech bulletin May 1959). They know how to valve a sport or competition shock for the weight distribution of the Porsche 356, and what the Porsche needs, the Ghia needs.

Image

They are rebound adjustable when off the vehicle (UP resistance is bump, DOWN resistance is rebound). Rebound is adjusted by fully compressing the shock and rotating it clockwise to make it firmer. The choices are soft, medium, and hard.

Because the Ghia's front suspension is stiffer (more roll resistance) than the rear, it would seem a front setting of hard, and a rear setting of medium, would be fine. But our experience, no matter what the track, has been different. The smoother and the faster the track, the firmer the shock settings can be ... just keep in mind that "soft" is relative.

We use medium and soft settings, typically medium front and rear. Koni "hard" is incredibly suspension-bouncing hard. And this is from guys who accept full steel engine and trans mounts and no rubber anywhere in the suspension.

You know you have your shocks adjusted right on the track and conditions when, on hitting a bump, the suspension travels upward in a smooth and controlled fashion and back down the same way. No wheel hop, no air-time skipping across the pavement, and never the feel of a momentary loss of control.

WHY NOT GAS SHOCKS?

Actually, I'd consider gas shocks for long endurance racing, meaning six hours up to 24 hours. Oil shocks can "fade" (soften or become erratic in response) once they become very hot and the oil and air inside has foamed together.

All shocks are oil shocks. But pressurizing the inside of an oil shock with nitrogen gas adds resistance to the oil movement, and keeps the oil from frothing as it travels through the valves.

SHOCK TRAVEL

Don't forget that shocks have a length limit on full compression or full extension. This is a problem when those limits and your actual suspension travel do not agree. For VW people, this becomes important when a Bug or Ghia has been dramatically lowered and the shocks (almost always the fronts) are now "too tall" for full compression, or "too short" for full extension.

You get a bouncy, chattering effect from this, because the suspension is no longer working. And the faster you try to go, the worse it gets, even with no bumps. When the suspension stops working, you can lose control.

The answer is shorter shocks for shorter travel, Opel GT shocks being a quick-fix favorite. However, knowing what you know now about preset factory valving, didn't the Opels have all the weight on the front end, meaning the valving would be awkward (in extreme situations) for your rear-engine Ghia? And by the way, the Opel GT main handling handicap was a very short front suspension travel.

Image

THE KARMANN GHIA CARRERA

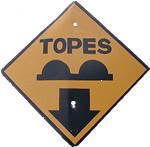
We used common nonadjustable EMPI "heavy duty" oil shocks (ours came painted white) front and rear on our '65 Carrera Panamericana Ghia. The theory was we needed to cope with big bumps (topes) and bad pavement more than have a really stiff race track style suspension.

Now understand these EMPI oil shocks are not anything special, just a heavy duty shock valved for the general characteristics of a VW. The theory paid off. We had smooth suspension travel and compliance.

We had first fitted KYB GR2 gas shocks to the rear. The GR2 is a reasonably compliant shock. The idea here was the weight of the rear of the car on 2000 miles of high speed bumpy roads might fade oil shocks.

With the KYB's, we saw something. Gas shocks try to stay extended all the time, and they were pushing down on the rear swing axles with enough effort to maybe be a problem by helping create jacking as the weight was off an axle. We try to keep swing axles level, not let them fall or be pushed down. We removed the KYB's and refitted the EMPI oils.

FJC

Re: Ghia Road Course Setup

Posted: Thu Oct 15, 2009 1:33 pm
by VW&MGman
Hi FJC,

Great info on the Ghia's suspension setup for racing!

How applicable would all that be to a swing axle Beetle that would be road/circuit raced?

Thanks for your insight.

Re: Ghia Road Course Setup

Posted: Thu Oct 15, 2009 4:10 pm
by FJCamper
Hi VW (& MG?) Man

Everything about Ghia suspensions applies to Bugs. Swing or double-jointed axles, etc.

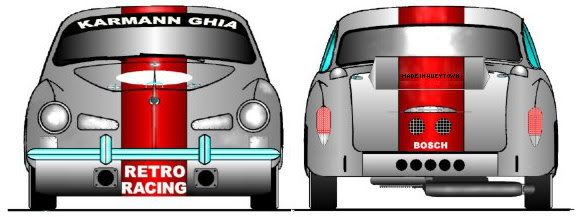
At RetroRacing, we have one of each, a '65 swing axle Ghia and a '70 IRS.

We're about to dig on down into the mechanics of the suspensions, so stay tuned.

FJC

Lighter, Lower. Faster

Posted: Fri Oct 16, 2009 10:07 am
by FJCamper
Image

Lighter is Faster

Both the older VW Bug and Ghia weighed in stock at just about 2000 lbs. That is light. It is exactly what you want for a competition car.

A VW engine weighs about 250+ lbs for a stocker with heavy heat exchangers and a generator, to about 220 lbs for one with J-pipes, aluminum alternator, and missing thermostat, fan housing flaps, and assorted tin. Add about 75lbs for a transmission, and you've still got far less weight than most upright 2-liter fours and their cooling systems and drivetrains. 100-150lbs less, on average.

Image

Racing Weight Distribution

Mount the VW's engine and transmission in the rear, most of it behind the axle and outside of the wheelbase, then right at midships of the chassis set a 150-200lb driver, and on the front wheels mount a 60lb. ten gallon fuel tank (six pounds per gallon for gasoline) and a 38lb battery, and the scales begin to tip. About 300 lbs in the rear, about 300 lbs distributed from the driver to the front axle.

But, low or not, isn't the rear-mounted engine and transmission causing a balance problem? Stock, VW Bugs and Ghias have about a 40/60 weight distribution. A few sports car makers brag about their nearly 50/50 weight, but 40/60 happens to coincide with the average purpose-built rear or mid-rear engine racing chassis, such as an Indy or Formula 1 car. They could have 50/50 if they wanted, so why choose 40/60?

More rear weight helps traction in acceleration, and throws more weight forward to all four wheels to help better distribute hard braking effort.

Image

Exotic Formula 1 Tech Standard in Your VW

Formula 1 cars today have "inboard suspensions," which mean the springs are mounted up in the chassis, not in struts from the suspension arms to the chassis. Inboard suspensions means less unsprung weight at the wheel. Unsprung weight causes a wheel to bounce hard, overloading shocks, hurting handling.

The VW (except for the Superbug) comes with front and rear inboard suspension . . . torsion bars mounted inside the chassis.

We don't get fancy inboard brakes, but you can't have everything.

Image

Center of Mass: How Low Can You Go?

The center of mass (also called center of gravity) of an object is the point at which you can balance it. For automotive purposes, the closer the center of mass to the road, the better.

The VW air-cooled flat-four engine, by itself, has a low (close to the road) center of mass. Stick it in a chassis with the transmission at the same height, and with no significant heavy items above the centerline of the wheel hubs (except the fuel tank, and more on that later) and you can draw a line through the engine center all the way through the center-middle of the chassis to the front of the car. You have a vehicle with the majority of its mass just inches off the road.

A race car needs the lowest center of mass it can get. The stock VW Karmann Ghia's center of mass is about hip-high on a person in the driver's seat, slightly higher than that in the Bug.

Getting the center of mass low has so much priority that purpose-built single seat race cars have reduced the diameter of their transmission clutch housings just to mount the engine lower. This means smaller diameter, more complex, multi-plate clutches. They believe it is worth it.

By comparison to common inline four-cylinder engines, the VW is a very low center of mass indeed.

A VW driver (and passenger) happen to sit exactly at the center of mass of the chassis. The driver's weight contributes both to forward weight, and to weight within the wheelbase. Weight within the wheelbase is always better than outside the wheelbase.

Sitting at the center of mass gives the driver excellent feel for what the vehicle is doing.

High Weight, Ride Height, Handling

All weight above the center of mass harms handling. High weight leverages against the suspension, causes body roll, and tire adhesion breakaway.

There's a lot you can do about high weight. Mount the driver's seat lower. Glass is heavy, replace it with Lexan. Mount batteries at floor level. If you can't mount your fuel tank lower, make it smaller.

A Ghia, being lower, has an advantage over the taller Bug. And yes, we're talking small gains here, but racing is extreme.

As a rule, lowering a car improves its handling. It drops the center of mass closer to the road, cuts down on air getting under the car, and decreases body lean.

Stock VW Bugs and Ghias sit at a reasonable street car ride height, about six inches from the floor pan to the pavement. Lowering the VW two inches (both front and rear) is the practical maximum for a road-going car, even a race car.

More than a two-inch drop makes deep oil sumps impossible to use on some chassis (remember the VW suspension geometry allows substantial squat on take off), and decreases suspension travel. Suspension travel is vital. A moving suspension is controllable. A bottomed-out suspension, even for a moment, triggers all sorts of handling problems, especially at racing speed.

Suspensions bottom out on the highway because of bumps, but on the racetrack, sheer inertial force can compress the suspension to the bump stops. This is caused by racing into dips, at constant high speed on banked tracks, and by max-G sweepers.

Re: Lighter, Lower. Faster

Posted: Fri Oct 16, 2009 2:09 pm
by vwjim
FJCamper wrote:Stock VW Bugs and Ghias sit at a reasonable street car ride height, about six inches from the floor pan to the pavement. Lowering the VW two inches (both front and rear) is the practical maximum for a road-going car, even a race car.

More than a two-inch drop makes deep oil sumps impossible to use on some chassis (remember the VW suspension geometry allows substantial squat on take off), and decreases suspension travel. Suspension travel is vital. A moving suspension is controllable. A bottomed-out suspension, even for a moment, triggers all sorts of handling problems, especially at racing speed.

Suspensions bottom out on the highway because of bumps, but on the racetrack, sheer inertial force can compress the suspension to the bump stops. This is caused by racing into dips, at constant high speed on banked tracks, and by max-G sweepers.
What about an engine / transmission lift, so in effect the rear suspension acts like its only lowered 2", but the weight of the chassis and body is lowered further. Its a lot of work, but would it be an advantage, or have more negatives?

Re: Ghia Road Course Setup

Posted: Fri Oct 16, 2009 6:47 pm
by FJCamper
Hi VWJim,

People have relocated the rear axle/engine combo up relative to the rest of the floorpan. They actually started doing that with the 356's. It works, at least as far as preserving some suspension movement.

It is a lot of work.

FJC

Re: Ghia Road Course Setup

Posted: Tue Oct 20, 2009 11:07 am
by FJCamper
Race Modifying the Type 1 Axle Beam

The VW Type 1 axle beam started life as the front suspension for Dr. Porsche's "P-Wagen" Auto Union Grand Prix racer. It allowed for an inboard suspension, and rigidly mounted to the chassis so that it leaned with the body, a breakaway of front tire adhesion to provide progressive understeer -- the more lean, the more understeer.

Front Roll Stiffness and Handling

The VW and Porsche chassis (swing axle and IRS) depend on stiff front ends and soft rear ends to handle properly. The very design of the Type 1 front axle beam was originally considered by Porsche engineers to not need a front sway bar, and did not get one as a handling tuning aid until 1954! The Ghia got one next in 1955.

The addition of a front sway bar allowed Porsche and VW to slightly soften the front torsion leafs for a better ride, but maintain the right amount of front roll stiffness.
Image

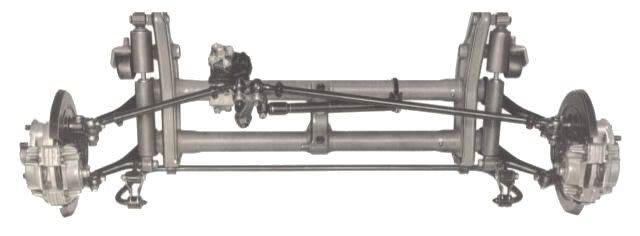
The Porsche 356C axle beam

Porsche used the same design of front axle beam as VW for its 356 sports car, but braced its ends to stop deflection caused by cornering loads. Deflection means bending with a return to the original position, and bending affects handling.

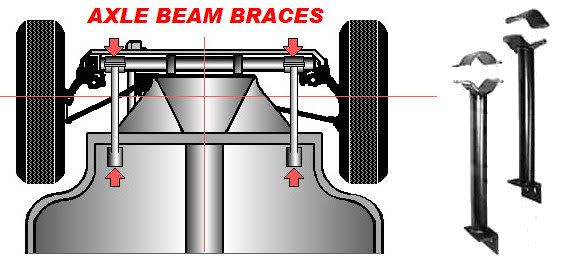
Bracing Your Axle Beam
Image

You can -- and should -- brace your front axle with inexpensive supports. This drawing shows one type, and here is a link to an example of what is commonly available.

http://www2.cip1.com/PhotoGallery.asp?P ... D413%2D151

Be advised these mounts sometimes interfere with the grease nipples on the front axle, being just close enough to block a grease gun from fitting snugly. And, they definitely interfere with tow bars.

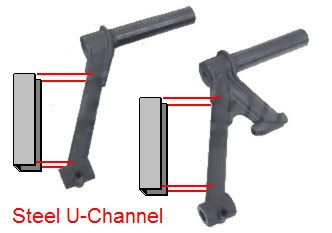
Boxing Your Trailing Arms
Image

Front trailing arms deflect as well. The 356 racers also brace their trailing arms by welding steel U-channel over them. They began this after seeing how the arms would deform when loaded by high G-forces when racing tires were used.

Install Neoprene Trailing Arm Bushings

Just as previously described, the deep, full-length neoprene sleeve bushings better support the trailing arm inside the beam.

Lowering the Front End

If you lower your Ghia, you don't want to adversely affect suspension geometry ... so for handling, until you get very advanced, you do not lower the front without lowering the rear, preferably both by exactly the same amount.

First, as mentioned before for performance application, lower no more than two inches. Dropped spindles are excellent for this. They retain the steering box/tie rod alignment and do not create "bump-steer" problems. Bump steer is exactly what it sounds like ... a bump causes the car to self-steer. When you lower the front of almost any car, the tie rods are no longer going to be the right length for full suspension movement, and when, with wheel travel, the tie rods becomes too long or too short, it's going to push out or pull in a front wheel for you.

At racing speed, this is dangerous.

The second best way to lower the front end is with an adjustable front axle beam. The brand name Puma is one of the best known for this. The axles have a movable center mount for both top and bottom torsion bar leaf stacks, and the mounts can be rotated and locked in such a way as to raise or lower the suspension ride height by changing the starting point of the torsion bar resistance.

With an adjustable axle beam, you jack up and brace the front end of the car, loosen the nuts holding the setscrews on both top and bottom axle beam center mounts, remove the lock plates, and the torsion leaf stacks are free to rotate inside the axle beam. A little experimentation with a jack to move the front end up and down a few times as you reset the lock plates, and you can find your desired ride height.

There is a misunderstanding about adjustable axle beams, however. Many purchasers presume "adjustable" means at least from stock height to low and back up to stock again if desired. But, some axles only provide a starting point that's at least two inches lower than stock, and going back to stock ride height is no longer possible. Ask your supplier before you buy.

Front Axle Lowering Tricks

There are some tricks you can do with adjustable axle beams that make them more useful than just a way to lower the car.

Image

For one, you can loosen the center mounts so the torsion leaf stacks have no effect at all, and install coilover front shocks so the front ride height and spring rate can be set much more precisely.

On a dune buggy, you can release one torsion leaf stack (either one) and leave the other engaged, reducing your springing by half and reducing the increased ride height caused by loss of the weight of the car body.

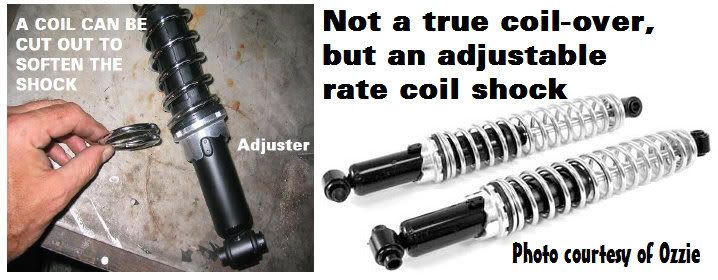
If you feel experimental, you can free up one torsion leaf stack and run adjustable coil spring shocks (not technically coilovers) and set them for spring rate, to affect front roll stiffness.
Image

Front Sway Bars

As we mentioned before, Porsche did not start using a front bar until late in 1954, followed shortly by the Ghia. The Bug got one a year later.

The big difference was in the thickness of the Porsche and VW bars, and how they were mounted. Porsche used a 16mm front bar secured at its ends for a very strong mount. VW clamped a very light bar to the lower front trailing arms. This simple clamping reduced the effectiveness of the bar, and allowed for it to sometimes work loose.

You can fabricate mounts to hold your front bar in place. This mounting arrangement also dramatically increases the efficiency of the bar, making it function like a much stiffer one.
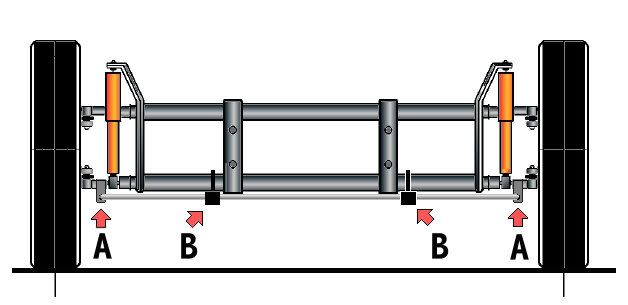
Image

"A" represents the stock mount. "B" shows improvised additional mounts.


The standard nonadjustable front bar upgrade for the Porsche and VW is 19mm. This size seems to work for most people for both street and track use.
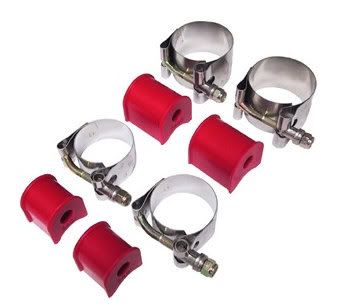
Image

These clamps are far better than stock, and install easier to boot.
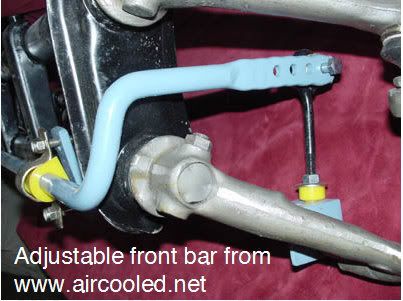
Image

Adjustable Bars

Whiteline makes a good adjustable front bar. Adjustment here means changing the bar's stiffness. In this photo, the bar end link to the lower control arm is set to the softest setting.

The reason for an adjustable bar of any sort is to allow handling changes for different tracks. A stiffer bar means more understeer. As a rule, the faster you go, the less oversteer you want.

Understeer = leave the road forwards trying to turn.
Oversteer = leave the road backwards trying to turn.

If adjustable bars are part of your tuning tactics, you can have an adjustable front bar and nonadjustable rear, or vice versa. The ultimate would be adjustable front and rear bars. On 53, we use a nonadjustable 19mm front bar, and a nonadjustable 19mm rear bar or a 22mm adjustable rear bar ... or no rear bar at all.

An enhancement to swaybar tuning is adjustable end links. The Whiteline front bar shown earlier comes with a fixed length end link. An adjustable end link (especially one with heim joints where applicable) allows you to fine tune preload. With zero preload, the bar at rest exerts no resistance on either side of the suspension. This is the normal setting.

With preload, all slack in response is eliminated, and suspension responses are quicker.

Adjustable end links also allow compensation for bent parts, running on banked tracks, or for weight redistribution.

Next -- the rear suspension.
Re: Ghia Road Course Setup

Posted: Fri Oct 23, 2009 10:10 am
by Ozzie
Image
Who?
Thanks for the props, but we all know who the master is.
Learn well, grasshoppers. Shinsei knows his stuff.

Re: Ghia Road Course Setup

Posted: Sun Oct 25, 2009 10:14 pm
by panel